• Steel Soldiers now has a few new forums, read more about it at: New Munitions Forums!

  • Microsoft MSN, Live, Hotmail, Outlook email users may not be receiving emails. We are working to resolve this issue. Please add support@steelsoldiers.com to your trusted contacts.


LMTV - Sound Proofing & Insulation Mods (Post Your Proofing)

Overdrive

Active member
411
83
28
Location
Wentzville, Missouri
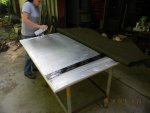
For this thread I thought instead of a how to I would just post up a couple of pics of my adventure adding sound proofing to the inside of the LMTV cab and ask others to show the same.

I have seen several other folks post pics of their sound proofing but I didn't see a specific thread for the topic so please post up any pics or tips.

Here is my setup:
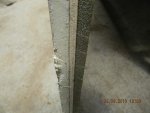
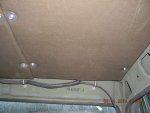
- Product used: (nice and thick) Noico Black 80 Mil X 36 Sq Ft Self-adhesive Foil & Butyl Sound Deadening Under Carpet and Mat. Got it on Amazon and about the most reasonably priced thick sound deadener out there. I purchased two boxes of 36 sq. ft. each. Going to need another box to finish under the driver/passenger seats and the roof.

- Sound deadener applied to under heater and behind heater against the front of the cab
sound1.jpg

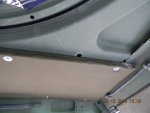
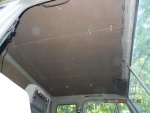
- Sound Deadener Applied to: Removed plastic panels from back wall and under the back side windows. Added deadener to entire surface of back wall of cab, area under back side windows, and am almost done with center hump.
sound2.jpg
NOTE: I kept the round panel mounting holes clear of deadener, obviously, however I did also make sure all the pocket and bigger holes were not obstructed to avoid any condensation issues.

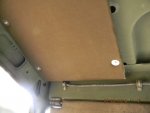
Pic of back wall done and ready for the plastic cover to go back on. I cut-up the original foam backing on the hump pad and added it to the void spots on the back wall. Also doubled up on the 80mil soundproofing on same voids.
soundproof5.jpg
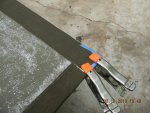
This project is taking FOREVER, but I should be done in a week or so. Last pic shows the unfinished hump... Have to finish the hump, one sheet under the driver and passenger side storage boxes (running out of deadener sheets) then cover all the sticky seams with aluminum tape.

sound3.jpg

Interesting note, I pulled up my original hump mat and found I have the front gunners platform mounts already installed. Not sure if all LMTVs are like that but I thought it was cool. Wish I could find the platform.

I am installing a new center hump mat so I plan to use the old foam under my original mat, that is still in great shape, to add insulation to the back wall.

Looking forward to seeing the other sound deadening projects out there and will post some finished pics when I get there.
Thanks OD
 
Last edited:

mkcoen

Well-known member
Steel Soldiers Supporter
5,637
380
83
Location
Spring Branch, TX
I just received 100 sqft of GTMat 80mil. I got mine off eBay and it came with seam tape and a roller. Another LMTV owner said he used this on his truck (can't remember what thread it was in though). He applied the material then used a heat gun to get a tight fit. I'll probably try that in an out of the way spot first before doing the entire cab.

OD did you do inside the doors? If so, how difficult was that to do? The rolls I have are 24" wide so I'll need to use a couple of sections. Looking forward to getting started but probably won't start until Mid-May.

IMG_4097.jpg
 
Last edited:

Pointman0853

Member
Steel Soldiers Supporter
319
13
18
Location
Gardnerville, NV
I did my LMTV and the difference was amazing. Once I get the AC Roof Unit on, I plan to build foam roof insulation and a headliner. Nothing fancy, just a basic unit.

Pointman
 

Overdrive

Active member
411
83
28
Location
Wentzville, Missouri
OD did you do inside the doors? If so, how difficult was that to do? The rolls I have are 24" wide so I'll need to use a couple of sections. Looking forward to getting started but probably won't start until Mid-May.

View attachment 618848
Hey mkcoen,
I did the driver's door previously when I first got my truck since the window was broken so I had access to put a couple of pieces on the door. However, I didn't clean it very well so it didn't stick all that great. I will be going back into the doors to add as much as possible after cleaning. The door skins have that sticky sound spray from the factory on there and with all the years on the truck dust and crud is covering most of that coating so lots of cleaning required. If you try to use a couple of smaller pieces rather than one big piece in the doors it will make the install easier.

Using the 80mil Noico sheets I am having no issues at all matching the contours of the truck without using heat.

I got my 3rd box of 36sq ft. yesterday so I am trying to get the project done. I am contemplating putting TWO layers over the center hump but we will see. I at least want a 2nd layer over on the passenger side of the hump since that sits right next to the turbo and exhaust.

OD
 

Overdrive

Active member
411
83
28
Location
Wentzville, Missouri
Almost done!

Here is the back wall ready to put the plastic cover back in place. I doubled up on soundproofing in the 6 void spots on the back wall as well as recycled the old pad under the center hump (installing a new hump mat) by cutting it up into pieces to fit in the void spots as well. Pick shows all the seams taped so no black goo gets on the back panel.
soundproof5.jpg

Now working on finishing the hump and covering all the joints with foil tape. Pic of passenger side hump showing I went all the way up to the firewall with the sound deadener... Guess its not really a firewall since the engine is under the cab but you know what I am talking about ;)

soundproof6.jpg
 
Last edited:

tennmogger

Well-known member
Steel Soldiers Supporter
1,576
527
113
Location
Greenback, TN
Headliner, one way to do it:

The roof on the LMTV is a heat sink and really gets hot from the sun. The hard surface bounces around any noise in the cab. These panels were made using a sheet of Luan, half an inch of aluminized foam board on the ceiling side, and recycled sleeping mats on the human side to absorb sound. That sandwich was then wrapped with heavy canvas (like the smell!).

The sandwich was made with 3M spray contact cement between the 4 layers. 1-1/2" stainless screws and SS fender washers hold up the three pieces.

BTW, if the entire ceiling is made in one piece it won't go in the door. Discovered that with a cardboard mockup!

Three sections were easy to work with, one on each side and one large section covering the portal area. I just realized I did not take a final picture of the complete headliner. Will add it later.

The change in cab temperature was remarkable. Noise was less too.
 

Attachments

tennmogger

Well-known member
Steel Soldiers Supporter
1,576
527
113
Location
Greenback, TN
Here are pictures of the complete cab ceiling (somehow came out last, below). Also added today was an extruded aluminum strut for mounting radios. Installation pictures for that were added, too.

There are some holes in the sub-roof that looked handy for hanging stuff from the ceiling. The holes were large and there is no way to get a nut into that space, so another means of mounting was needed. A search online yielded some robust and neat toggle fasteners, also available at the local Home Depot, so that's what I got. Search for HBT Toggler Bolts. See pictures, hopefully self explanatory: Toggle in place, screw in threaded rod of appropriate length, pull out plastic toggle tags, add fender washer to give nut something to tighten against, tighten it all up, add nut to act as standoff for the strut.


035.jpg038.jpg039.jpg042.jpg050.jpg048.jpg
 

Attachments

mkcoen

Well-known member
Steel Soldiers Supporter
5,637
380
83
Location
Spring Branch, TX
I started on the insulation for the roof this morning then had to make a trip to town and by the time I got back it was too hot to continue today. I did shoot some temps between the insulated and uninsulated areas. Pic 1 is bare metal and pic 2 is on the insulation. A 33° difference is pretty substantial. By the time I get the whole truck insulated it should help tremendously.

IMG_4411.jpgIMG_4416.jpg

Edit: Went back and shot it again at noon - 150° uninsulated and 100° insulated.
 
Last edited:

Pointman0853

Member
Steel Soldiers Supporter
319
13
18
Location
Gardnerville, NV
I am just finishing up my headliner project with only the center section left to install. I will post up pic's later. I used 1" foam board with 1/8" luan for backing and 3-M spray bonding adhesive to hold it all together. I found some headlining material on FleaBay fairly cheap and it looks good with #8-2" long sheet metal screws and SS flat washers holding it all up. I have enough luan and fabric left over to build trim pieces to cover the holes across the front the cab and up along the sides. Heat escapes from there and into the cab.

It would be nice to find a way to vent this area above int insulation to the outside without getting water in when it rains..

Pointman
 

Bobcat701

New member
92
1
0
Location
Autryville, NC
Thanks for the education. I am adding that project to my to do list. Since I am in North Carolina that project is going on the top ten. Thanks for sharing.

Joe
 

PowerstrokeNC

New member
430
1
0
Location
Greensboro, NC
For applying the insulator over the doghouse/hump. Any reason you didn't apply from the underside, in the engine bay? I am contemplating this project and that would be easier since you wouldn't have to remove everything in the cab.
 
Top
AdBlock Detected

We get it, advertisements are annoying!

Sure, ad-blocking software does a great job at blocking ads, but it also blocks useful features of our website like our supporting vendors. Their ads help keep Steel Soldiers going. Please consider disabling your ad blockers for the site. Thanks!

I've Disabled AdBlock
No Thanks