kneesnthebreeze
New member
- 26
- 0
- 1
- Location
- jefferson, ga
This thread contains a few topics from several threads that I have run across lately, from engine maintenance to interior add-ons for all around comfort.
I purchased my 5 ton last September from a fire fighter in the city where I work. The truck was in what I would consider pretty good shape. It was an M931ai with a bed from a deuce instead of the fifth wheel. Just what i needed for hauling around the family atvs and camping stuff. Installed new fuel filters as im pretty sure they were the original ones from the Red river depot where it was refurbed in i believe 2005. what a mess the canister was. --side note-- before I get too far, as i said previously, this contains topics from several threads, all of the parts that I have purchased (truck specific) have come from either THOSE MILITARY GUYS or NAPA.
Ive been fighting air loss in three of my tires and have to fill them weekly, so I purchased several o rings for the 14x20's but have been procastinating putting them on because of the Ga heat and humidity (I hate the heat). A few months ago, the injection pump started dripping from a triangle-ish shaped plate on the engine side. It would only start dripping when it was running. Wanting to fix that, I removed the pump, breaking several fuel lines (because of rust/ corrosion/ too much da** paint from the factory) and so on... Replaced the fuel lines and ripped into the pump (carefully) dissasembling as far as i dared. replaced what i would have guessed to be about 90% of the seals and rings in it and put it back on the truck. Primed it for what seemed an eternity and it fired up! a few days later, The drip was back
Looked around for diagrams and schematics or magical cures from unicorn tears that may be able to show me what i missed- nothing could be found....Took the pump off again and said screw it! and tried an rtv type sealant on the plate, reinstalled, same result. But now I had a drip also coming from i believe the fuel dampener. just makes me want to run my head into a wall. more research follows...
In the meantime, the driver seat shock was completely worn out and it felt like i was launching into orbit every time i hit a bump in the road. Ordered a seat shock from TMG. The seat bolts were completely rusted and corroded, theres hardly an inch to get a ratchet or wrench in there for dissasembly. 8 HOURS later, in the sweltering heat, my wife and I had ripped out the seat and part of the floor pan to be able to get the new shock in. I WILL NEVER DO THIS AGAIN. I dont reccomend doing it ever, just crap some old shoes or part of a used tire under the seat. Dont get me wrong, the shock works great, such a smooth ride now, but holy ****...not worth the hassle.
Drive belts! & of them will run about $140 in total, have your strongest friend help you and a team of winches to bring you cold beer and towels because this is not fun. Replaced the water pump while i was in there, used lots of anti seize on the copper gasket- thank you whoever posted that on another thread. TIP- put a large bucket under the truck when you do this, spill most of your coolant on the lawn and then go get a kids swimming pool to put under it. IT GOES EVERYWHERE when you pull the pump. About 8 hrs later, we finally replaced all the belts and had the new pump on. Pro-tip*****Buy 3 jugs of coolant at the store the first time, then have to make two more runs to the store not knowing that the truck takes approximately a million gallons of coolant to be full.
Back to the PT pump....stumbled upon a link http://www.bunkerofdoom.com/travel/ss2009/8109_build/tm/nhc250.pdf
which has the diagram that i was looking for. This link has been posted elsewhere in the forums but here it is again. Was going to tear into that yesterday but decided to install my overhead panel from TMG while the wife was here to help and whine about the heat. I initially ordered the plain model with only the light installed, deciding to copy their design and modify to meet my needs. Let me preface this by saying that i also hate electrical and am definitely not an expert***. I found a six gang switch block on amazon, a 24-12v converter from TMG, a small amplifier--the same one TMG uses on their panel but i found it on amazon---thank you prime free two day shipping, a 10 way fuse block because why not and a huge box of wire connectors and 12ga wire in red and black. about seven hundred dremel cutting disks later, I was able to cut holes for new Alpine 5 1/2 or 5 1/4 cant remember speakers. screw the speakers in place and riveted the amp converter fuse block onto top of panel. wired it all up and began install.
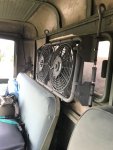
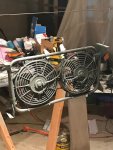
Let me back up, the cooling fans in the pictures, 10" electric radiator fans that i found on amazon for about $65- made into a bracket from two extra side mirror frames that came with the truck. just inverted them, zip tied the fans to it and od painting endued. Scrounged up some makeshift brackets from the hardware store an mounted it against the rear window of the cab. The window is frozen shut but there is plenty of space between the fans // bracket and cab to allow air to be pulled through.
Got the overhead and fans mounted, took about 5 hours to mount and wire....NOTE- the overhead console, if installed as came from TMG would have only taken about 15 minutes to put in (set the rear edge in first, the two little "j" hooks at the front of the cab near the roof-loosen those, and then simply swing the front of the consol over top of the hooks and re tighten them DUNZO! then I ran the wiring from the electrical madness that I created to the fans for the switches to work and then down to the rear of the battery box. The 24v light that came installed on the console was as simple as hooking up the positive and negate straight to the 24v sides of the batteries (a big thank you to TMG) for the wiring explanation. I then installed a Quik car brand cutoff swith on the exterior of the battery box, next to the parking brake for easy reach. installed it to make sure there is not a battery drain from all of the doodads on the console when im not driving. Then just cut a hole in the rear of the battery box and ran all of the wiring in through it to the master switch and batteries respectively. CAUTION**** having the small wife crawl inside the battery box will cause her to touch something metal to something electrified-sparking like the fourth of july---you will incur penalties such as getting donkey kicked in the face from her surprise reaction***.
Everything wired up, we closed the seat and turned on the truck, SHABANG! the lights on the 6 panel switch block came on, reading 12.1 volts. I then hit the switches for the fans..... to my amazement they each came on separately (as they were separately wired// switched) and ran beautifully- instantly cooling the cab. SUCCESS!!!!!! went to plug the ipod into the usb that ran down from the little amplifier on the console and them BAM! the console lost power. Fearing that the truck would then self destruct, i hit the battery cut off switch that i had installed and lifted the battery box seat. No smoke, no fires, but no power to the console. However the interior 24v light still worked! telling me the problem was with MY parts installation. I looked and looked, only finding that the little 24v converter was extremely warm, i;m assuming that the fans were just too much for the poor little fella. So i ordered a larger pyle brand one on amazon and it will be here monday. Fingers crossed that it will be the fix. It was recommended to me by a nice guy to add up the amps that i was needing (i wish i knew i how to do that). I only know that the 6 gang switch block and the fuse block // amp that i installed stated that they were rated for 30amps i believe. I just assumed that the converter could not sustain all that for very long and gave out...I AM OPEN TO ANY SUGGESTIONS for you electrical dudes out there.
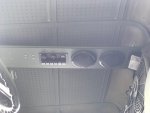
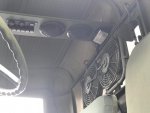
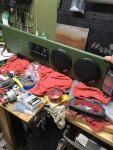
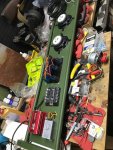
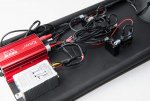 Note.. the photo that shows the back side of the console with the amp and converter wired and looks like it came from the internet.. it is one that i found while googling and i tried to copy the wiring on mine the best i could from TMG. thanks again to those guys.
I purchased my 5 ton last September from a fire fighter in the city where I work. The truck was in what I would consider pretty good shape. It was an M931ai with a bed from a deuce instead of the fifth wheel. Just what i needed for hauling around the family atvs and camping stuff. Installed new fuel filters as im pretty sure they were the original ones from the Red river depot where it was refurbed in i believe 2005. what a mess the canister was. --side note-- before I get too far, as i said previously, this contains topics from several threads, all of the parts that I have purchased (truck specific) have come from either THOSE MILITARY GUYS or NAPA.
Ive been fighting air loss in three of my tires and have to fill them weekly, so I purchased several o rings for the 14x20's but have been procastinating putting them on because of the Ga heat and humidity (I hate the heat). A few months ago, the injection pump started dripping from a triangle-ish shaped plate on the engine side. It would only start dripping when it was running. Wanting to fix that, I removed the pump, breaking several fuel lines (because of rust/ corrosion/ too much da** paint from the factory) and so on... Replaced the fuel lines and ripped into the pump (carefully) dissasembling as far as i dared. replaced what i would have guessed to be about 90% of the seals and rings in it and put it back on the truck. Primed it for what seemed an eternity and it fired up! a few days later, The drip was back

Looked around for diagrams and schematics or magical cures from unicorn tears that may be able to show me what i missed- nothing could be found....Took the pump off again and said screw it! and tried an rtv type sealant on the plate, reinstalled, same result. But now I had a drip also coming from i believe the fuel dampener. just makes me want to run my head into a wall. more research follows...
In the meantime, the driver seat shock was completely worn out and it felt like i was launching into orbit every time i hit a bump in the road. Ordered a seat shock from TMG. The seat bolts were completely rusted and corroded, theres hardly an inch to get a ratchet or wrench in there for dissasembly. 8 HOURS later, in the sweltering heat, my wife and I had ripped out the seat and part of the floor pan to be able to get the new shock in. I WILL NEVER DO THIS AGAIN. I dont reccomend doing it ever, just crap some old shoes or part of a used tire under the seat. Dont get me wrong, the shock works great, such a smooth ride now, but holy ****...not worth the hassle.
Drive belts! & of them will run about $140 in total, have your strongest friend help you and a team of winches to bring you cold beer and towels because this is not fun. Replaced the water pump while i was in there, used lots of anti seize on the copper gasket- thank you whoever posted that on another thread. TIP- put a large bucket under the truck when you do this, spill most of your coolant on the lawn and then go get a kids swimming pool to put under it. IT GOES EVERYWHERE when you pull the pump. About 8 hrs later, we finally replaced all the belts and had the new pump on. Pro-tip*****Buy 3 jugs of coolant at the store the first time, then have to make two more runs to the store not knowing that the truck takes approximately a million gallons of coolant to be full.
Back to the PT pump....stumbled upon a link http://www.bunkerofdoom.com/travel/ss2009/8109_build/tm/nhc250.pdf
which has the diagram that i was looking for. This link has been posted elsewhere in the forums but here it is again. Was going to tear into that yesterday but decided to install my overhead panel from TMG while the wife was here to help and whine about the heat. I initially ordered the plain model with only the light installed, deciding to copy their design and modify to meet my needs. Let me preface this by saying that i also hate electrical and am definitely not an expert***. I found a six gang switch block on amazon, a 24-12v converter from TMG, a small amplifier--the same one TMG uses on their panel but i found it on amazon---thank you prime free two day shipping, a 10 way fuse block because why not and a huge box of wire connectors and 12ga wire in red and black. about seven hundred dremel cutting disks later, I was able to cut holes for new Alpine 5 1/2 or 5 1/4 cant remember speakers. screw the speakers in place and riveted the amp converter fuse block onto top of panel. wired it all up and began install.
Let me back up, the cooling fans in the pictures, 10" electric radiator fans that i found on amazon for about $65- made into a bracket from two extra side mirror frames that came with the truck. just inverted them, zip tied the fans to it and od painting endued. Scrounged up some makeshift brackets from the hardware store an mounted it against the rear window of the cab. The window is frozen shut but there is plenty of space between the fans // bracket and cab to allow air to be pulled through.
Got the overhead and fans mounted, took about 5 hours to mount and wire....NOTE- the overhead console, if installed as came from TMG would have only taken about 15 minutes to put in (set the rear edge in first, the two little "j" hooks at the front of the cab near the roof-loosen those, and then simply swing the front of the consol over top of the hooks and re tighten them DUNZO! then I ran the wiring from the electrical madness that I created to the fans for the switches to work and then down to the rear of the battery box. The 24v light that came installed on the console was as simple as hooking up the positive and negate straight to the 24v sides of the batteries (a big thank you to TMG) for the wiring explanation. I then installed a Quik car brand cutoff swith on the exterior of the battery box, next to the parking brake for easy reach. installed it to make sure there is not a battery drain from all of the doodads on the console when im not driving. Then just cut a hole in the rear of the battery box and ran all of the wiring in through it to the master switch and batteries respectively. CAUTION**** having the small wife crawl inside the battery box will cause her to touch something metal to something electrified-sparking like the fourth of july---you will incur penalties such as getting donkey kicked in the face from her surprise reaction***.
Everything wired up, we closed the seat and turned on the truck, SHABANG! the lights on the 6 panel switch block came on, reading 12.1 volts. I then hit the switches for the fans..... to my amazement they each came on separately (as they were separately wired// switched) and ran beautifully- instantly cooling the cab. SUCCESS!!!!!! went to plug the ipod into the usb that ran down from the little amplifier on the console and them BAM! the console lost power. Fearing that the truck would then self destruct, i hit the battery cut off switch that i had installed and lifted the battery box seat. No smoke, no fires, but no power to the console. However the interior 24v light still worked! telling me the problem was with MY parts installation. I looked and looked, only finding that the little 24v converter was extremely warm, i;m assuming that the fans were just too much for the poor little fella. So i ordered a larger pyle brand one on amazon and it will be here monday. Fingers crossed that it will be the fix. It was recommended to me by a nice guy to add up the amps that i was needing (i wish i knew i how to do that). I only know that the 6 gang switch block and the fuse block // amp that i installed stated that they were rated for 30amps i believe. I just assumed that the converter could not sustain all that for very long and gave out...I AM OPEN TO ANY SUGGESTIONS for you electrical dudes out there.


 Note.. the photo that shows the back side of the console with the amp and converter wired and looks like it came from the internet.. it is one that i found while googling and i tried to copy the wiring on mine the best i could from TMG. thanks again to those guys.


