• Steel Soldiers now has a few new forums, read more about it at: New Munitions Forums!

  • Microsoft MSN, Live, Hotmail, Outlook email users may not be receiving emails. We are working to resolve this issue. Please add support@steelsoldiers.com to your trusted contacts.


New Stencils

Tow4

Well-known member
Steel Soldiers Supporter
2,087
619
113
Location
Orlando, FL
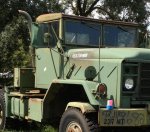
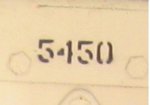
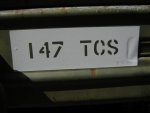
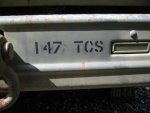
I'm getting ready to paint my M1028A2, so I made up some stencils today. I thought I would do a test to see how they work. I'm painting the truck so I didn't try to line it up with the current marking. I did a quick alignment with the bumper and slapped it on then masked around it.

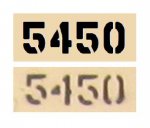
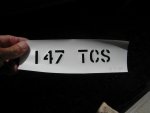
I'm very pleased with the results. I'm using a self-adhesive vinyl and it stuck to the bumper very well. All the prep I did was wipe off the bumper with a dry towel. There was no bleed through and the stencil came off easily.

After I pulled the stencil off it looked like it could used again so I stuck it on some wax paper. I made enough stencils so I don't have to reuse them, but that was a nice surprise.
 

Attachments

Tow4

Well-known member
Steel Soldiers Supporter
2,087
619
113
Location
Orlando, FL
Depends on how big you want the stars Ray.

Do you want to paint them on Phil or stick them on? I guess you can do either. I had all the letters left after I pulled the stencil off. How tall do you want the letters?
 

gringeltaube

Staff Member
Super Moderator
Moderator
Steel Soldiers Supporter
6,879
2,254
113
Location
Montevideo/Uruguay
How in the world "do you make stencils" without a machine...
  1. have correct military font (PM me if not...)
  2. type desired text; numbers; letters; etc.
  3. print on cardstock paper
  4. cut out with exacto-knife (and lots of patience!!)
  5. attach stencil with masking tape.
  6. mask adjacent surfaces
  7. spray
Example, below....


G.
 

Attachments

goldneagle

Well-known member
4,420
829
113
Location
Slidell, LA
  1. have correct military font (PM me if not...)
  2. type desired text; numbers; letters; etc.
  3. print on cardstock paper
  4. cut out with exacto-knife (and lots of patience!!)
  5. attach stencil with masking tape.
  6. mask adjacent surfaces
  7. spray
Example, below....


G.
I did the same in 2" letters for my Side of the hood permanent tags.
 

Attachments

Last edited:

Tow4

Well-known member
Steel Soldiers Supporter
2,087
619
113
Location
Orlando, FL
I'm making the font as I go. I've looked around and none of the fonts I have seen match what is on my trucks. The Phantom Stencil font is pretty close, but still has some differences. Mostly the webs that hold the stencil together are in different places. This picture is an example. Note the web locations on the 5. I think the stencil used for the "5450" in the picture was probably made with a Diagraph stencil cutter. The one I used years ago produced similar stencils.

After looking at a lot of pictures of markings, I'm convinced the military used quite a varity of fonts. The font is supposed to be "Gothic" according to the painting and marking TM, but I usually see some variation on that. Now with computers you can really do whatever you want, so I'm making mine match what's on my truck. :D
 

Attachments

gringeltaube

Staff Member
Super Moderator
Moderator
Steel Soldiers Supporter
6,879
2,254
113
Location
Montevideo/Uruguay
Well; yes, many to chose from. And no... not one that would fit perfect.
It is like Ray said: they have used more than one only mil. font style; and everyone shows minor differences.

In this case, that "5450" would come closest to the True Type, MD Military Stencil (comparison below); certainly one of the most common styles found.

Now if it had to be "perfect", I agree that it is best to create numbers and letters, ourselves.


G.
 

Attachments

Tow4

Well-known member
Steel Soldiers Supporter
2,087
619
113
Location
Orlando, FL
What gringeltaube said.

If I didn't have the ability to make what I want, I would just use what I could find. But, it's not hard and doesn't take long, so I don't mind doing it.

I prefer the "stencil" look. Letters and numbers with no breaks in them on a military truck just doesn't look right. The M1028A2 has some of the stick on markings (I didn't think you were supposed to mix them) that will be going back on as a stencil.
 

Beerslayer

Well-known member
Steel Soldiers Supporter
1,054
53
48
Location
Tualatin, Oregon
I am using Gringeltaube's font and am happy with it. I use a Xyron Wishblade stencil cutter. It does not do well on card stock, not made for heavy use. It installs as a printer. You make up your stencil in Word or similar word processor and send the stencil to it as a print job.

I also cut stencils out with an Exacto knife, and sometimes have to help the Xyron to finish the job with a knife.

As for the actual use of the stencil, my wife helped me a lot with this. She took me in hand to the craft store, Michaels I think, and showed me where to find the stencil adhesive. It is an aeresol and allows the stencils to be stuck on there, used, then reused later without masking tape. Pretty much eliminates the stencil under spray that causes the letters to be fuzzy.

I made my own star stencil, it is the same size as the military uses on the front and back bumper, and looks better to me than most of them I have seen. I drew that one by hand and cut it out with an Exacto knife. I have probably used that star stencil 10 times or so and it still works good.
 

PA GasPasser

New member
38
0
0
Location
The Keystone State
Just a shout out to say THANKS! to Gringeltaube for hooking me up the proper fonts to make my own Stencils. I PM'd him after coming across this thread and I have to say, he had me set up in no time!
 
Top
AdBlock Detected

We get it, advertisements are annoying!

Sure, ad-blocking software does a great job at blocking ads, but it also blocks useful features of our website like our supporting vendors. Their ads help keep Steel Soldiers going. Please consider disabling your ad blockers for the site. Thanks!

I've Disabled AdBlock
No Thanks