• Steel Soldiers now has a few new forums, read more about it at: New Munitions Forums!

  • Microsoft MSN, Live, Hotmail, Outlook email users may not be receiving emails. We are working to resolve this issue. Please add support@steelsoldiers.com to your trusted contacts.


Rear fender condenser to Red Dot install thread

Coug

Well-known member
Steel Soldiers Supporter
2,829
4,033
113
Location
Olympia/WA
Sent Mac Motors an email, they replied back that they will go check stock and if they have it they will get it shipped to me by Friday.
Honest mistake, looks like they're going to make it right, so good company to do business with.
 

Coug

Well-known member
Steel Soldiers Supporter
2,829
4,033
113
Location
Olympia/WA
Just got off the phone with Craig at Mac Motors.
Turns out someone's been shipping them brackets under the wrong part number, all the brackets they have are for the right hand side. They had received these under the wrong part number from a different distributor who apparently mislabeled them.

He has a few calls in trying to make sure he can get me the correct bracket, and try to get it to me by friday if possible. Might even be in a stock order from AM General he said, but he's not getting his hopes up.

A+ for customer service at this point, I'm not holding the wrong part against him as I understand how hard it is to deal with a warehouse full of parts, and he's just a distributor, not the manufacturer.

He did say though finding this out saved him some more time/money/frustration as 2 other people have placed orders for this bracket, and the orders haven't gone out yet, so 2 other people will be saved from the same frustration I'm going through.

I'll keep you all updated as I hear more.
 

86humv

Well-known member
Steel Soldiers Supporter
1,693
489
83
Location
Texas
You figured it out...Thats a Right bracket 6015673
You need a 6015665.
 

billyoffshore

New member
18
12
3
Location
Cape Charles, Virginia

Coug

Well-known member
Steel Soldiers Supporter
2,829
4,033
113
Location
Olympia/WA
I am the "next poor sod" lol.....thanks for the pics for sure...
I finally got the correct bracket a few days ago, got the condenser installed.
I'm still waiting on some other fittings I've managed to screw up during this whole process, then I'll do some more pics and write up about it.
With my luck though, the compressor will end up being bad or something. (though currently fighting with my serpentine belt during startup, so who knows)

worst part of the whole thing really is having to cut holes in my truck. Not a fan of drilling or cutting on my rig if I can avoid it (but in this case the aircon will hopefully be worth it)
 

Coug

Well-known member
Steel Soldiers Supporter
2,829
4,033
113
Location
Olympia/WA
So finally finished up everything today.
Without pulling the tub off the chassis it's kind of hard to get to where things should be run under there, and I think in reality running hard lines would be a lot better (at least underneath) than the rubber lines, bit I did what seemed like a halfway decent job of getting everything where it was supposed to go.


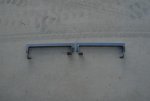
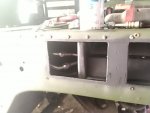
So I installed the rear hanger bracket, then put the condenser in held up with a few sticks to put it in place. Figured out where the opening should be starting at the back end of the opening, and used that as a reference for where to install the cover grate. Drilled the holes to match the grate, then opened them up and installed rivnuts. 10-32 in this case. Don't have a picture of where it starts in the rear, but it was right at the edge of the inset area in the fender. put the grate in place, then just cut in on a straight line about 1/2" or so inside the rivnuts. Left 2" where the vertical support/stiffener pieces are on the inside.
8f49404c9a7a86cc6870509a0c8fd7e75568363c-2.jpg


So now with the cutouts, I could get my hand in there where the lines connect. Used a scratch awl to mark where the first few bolts were that I could reach, pulled out the condenser and drilled up from the bottom.
Then took a piece of cardstock to mark out where the forward holes would be, as there is no way to mark them from the bottom (made sure the drilled holes lined up properly before drilling any more)

8f49404c9a7a86cc6870509a0c8fd7e75568363c-3.jpg
Put the cardstock on the top of the fender, with 2 bolts for alignment, and marked then drilled the front holes.
8f49404c9a7a86cc6870509a0c8fd7e75568363c-4.jpg


Inside is a big jumble of wires, but mostly gets hidden by the cover.
8f49404c9a7a86cc6870509a0c8fd7e75568363c-1.jpg

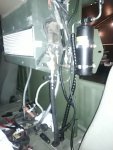
So these things were on the wire harness to the red dot condenser, I assume they have something to do with radio interference and feedback type deal, so decided to install them in the HMMWV. It was fewer wires to put them back by the condenser rather than in the cabin, they are tucked up right in front of the condenser and should be relatively protected unless I start playing in reverse at high speeds.
21369f326407d8ba16de68adb3f0d7dd6f7ac652-4.jpg
How they look from the outside.
21369f326407d8ba16de68adb3f0d7dd6f7ac652-1.jpg

AC lines and wiring inside protective wraps.
21369f326407d8ba16de68adb3f0d7dd6f7ac652-3.jpg

Vacuumed it out, left it overnight, no changes in pressure. Left it another day, still no change.
Don't have a scale to determine charge weight, so just ran the truck with aircon on until the sight glass on the receiver/dryer was almost clear and the pressure cycles slowed down.

Had the condenser fans wired backwards, reversed the wires on the isolators took care of that.

Now the last thing I need to do that's only slightly related is figure out how to do alignment on the serpentine pulleys, as when the aircon is on the belt is riding up a little on the edge of the fan clutch, causing it to squeal.
 

Attachments

Coug

Well-known member
Steel Soldiers Supporter
2,829
4,033
113
Location
Olympia/WA
So removed the serpentine belt, reinstalled it the opposite direction.
The squeal went from being a chirp whenever the belt was under load from the generator or aircon compressor, to being non stop squealing. Belt dressing or soapy water made the sound disappear for a few seconds is all. Belt wasn't jumping up onto the front ridge of the fan clutch pulley now though.

So I had a new belt I ordered a couple weeks back, installed it. No more squeaks or squeals during a short test. Will have to order another belt to keep on hand.


Side note, the tensioner seems to bounce a lot, maybe a half inch of movement constantly while engine is on. Did this with both the old belt and the new one. I don't see anything in any of the grooves or pulleys, everything seems to spin smoothly. Should I look at replacing the crank pulley (and probably harmonic balancer) since it's at least 10 years old, and sat in the desert all that time?
 

Milcommoguy

Well-known member
Supporting Vendor
1,652
2,095
113
Location
Rosamond, CA
Sounds like something is out of round?? Magnetic base and dial indicator on the pulleys one at a time with belt/s off. Crank shaft a little more of a pain, wrenching it around. Check for loose or cracked brackets power steering pump, alternator, you got the idea. Changing the harmonic balancer not a bad idea for many of the trucks IMO.

30 year old rubber anything could use a changing, CAMO
 

Coug

Well-known member
Steel Soldiers Supporter
2,829
4,033
113
Location
Olympia/WA
Sounds like something is out of round?? Magnetic base and dial indicator on the pulleys one at a time with belt/s off. Crank shaft a little more of a pain, wrenching it around. Check for loose or cracked brackets power steering pump, alternator, you got the idea. Changing the harmonic balancer not a bad idea for many of the trucks IMO.

30 year old rubber anything could use a changing, CAMO
Engine is a GEP that was rebuilt and installed in the truck in 2009, so likely only one decade old.
with as much movement as there is, I figure it's probably one of the larger pulleys. Haven't put a dial indicator on any of them (i think I have one somewhere, but haven't used it in 5 or more years), but with as much as it moves the tensioner pulley and the crank pulley being the only pulley I can't spin over by hand to check added to the rubber isolator design plus the balancer there I won't hurt anything by changing them.

I have the crank pulley and harmonic balancer on order now. Not sure if it is normal for these at idle but the engine does seem to have a bit of a shake as well (more than I am used to seeing, though my main comparison is the 7.3 turbo in my F450) so I figured it probably can't hurt.
 

Retiredwarhorses

Well-known member
Steel Soldiers Supporter
4,254
3,842
113
Location
Brentwood, Calif
Engine is a GEP that was rebuilt and installed in the truck in 2009, so likely only one decade old.
with as much movement as there is, I figure it's probably one of the larger pulleys. Haven't put a dial indicator on any of them (i think I have one somewhere, but haven't used it in 5 or more years), but with as much as it moves the tensioner pulley and the crank pulley being the only pulley I can't spin over by hand to check added to the rubber isolator design plus the balancer there I won't hurt anything by changing them.

I have the crank pulley and harmonic balancer on order now. Not sure if it is normal for these at idle but the engine does seem to have a bit of a shake as well (more than I am used to seeing, though my main comparison is the 7.3 turbo in my F450) so I figured it probably can't hurt.
whats the tensioner doing at 1500 Rpm...its, easy to see failing dampener or crank pulley, just look while running, should be no wobble. Don’t look for perfection on the red dot setup, this is not a precise OEM solution.
i had a truck that kept eating serp belts, alignment looked good and measured good, eventually I convinced customer to change to new style serpentine setup and pancake compressor, problem solved.
 

Coug

Well-known member
Steel Soldiers Supporter
2,829
4,033
113
Location
Olympia/WA
I was asked for some pictures of how the evaporator unit fits in the cab, so here they are.

View from looking in passenger side door.
3d3ae22d724568c0228c235c6e4edb164a14bce7-7.jpg
slightly blurry picure from above driver's side dash
3d3ae22d724568c0228c235c6e4edb164a14bce7-6.jpg
Tried a panorama shot, not the best camera.
3d3ae22d724568c0228c235c6e4edb164a14bce7-5.jpg
from outside driver's door
3d3ae22d724568c0228c235c6e4edb164a14bce7-4.jpg
From directly in front of my face sitting in the driver's seat.
3d3ae22d724568c0228c235c6e4edb164a14bce7-3.jpg
another driver's side looking in
3d3ae22d724568c0228c235c6e4edb164a14bce7-2.jpg
and another
3d3ae22d724568c0228c235c6e4edb164a14bce7-1.jpg


My opinion is if the unit were lower, then it would definitely be an obstruction out the passenger side from the driver's seat. I believe the other methods of installing these in a 2 man are to mount it lower, but at a rearward angle.

With where it is at the air does not blow directly onto me. This isn't really a problem because even on low in mid 70s weather in direct sun it cools off the cab enough that I'm tempted to turn on the heater assembly. It might be worse at higher outside temps, I'll get back to you if it is.
 

DREDnot

Well-known member
717
430
63
Location
Phoenix, AZ
Most excellent.
Exactly what I was looking for.
Thank you for those. I can eliminate some of my more crackpot ideas of how to mount the evap. Theres just not enough room to do much of anything different with that red dot setup in the two man configuration.
 

Coug

Well-known member
Steel Soldiers Supporter
2,829
4,033
113
Location
Olympia/WA
You could also possibly install it lower and at an angle, but to me it looks like if you go with the angled flat upper portion flat against the back wall you lose a lot of floor space on top of the tunnel, and possibly get some vision blocked. Only upside I see is still being able to look out the back window a little bit.

A/C KIT UNIVERSAL REDDOT EVAPORATOR R-2400-0 25.000 BTU 24V ...
So yeah, I don't really see much other option unless you make a custom rear wall that extends the cab backwards 6-12 inches to move it back out of the way.
 

Crapgame

Well-known member
624
316
63
Location
Navarre, FL
I saw a HMMWV being turned into a faux H1, with a combination HVAC unit mounted to the roof and windshield frame like the two front legs of the Turret Weapons Support..
Overhead AC Housing.jpg
 

Coug

Well-known member
Steel Soldiers Supporter
2,829
4,033
113
Location
Olympia/WA
So update, the system works great. In 80 degree weather and the AC on low I have to turn on the heater to keep from being too cold.

Only issue I'm having now is the high side port is leaking a little refrigerant. Coming from the side of the fitting, so I'm hoping it's an easy replacement. Downside is having to drain the system and pull the fitting out, then go and buy a replacement for it.

I suppose I could just take it to an AC shop, but almost scared to see what they would charge for this, and I don't have one within 20 miles of me.

Had all the other guys jealous at the PNWSS (Pacific NorthWest Steel Soldiers) rally this past weekend. Between an air conditioned truck, and my homemade drash trailer it was pretty comfortable. One of the other guys brought a Base-X 303 tent that was about perfect with my ECU trailer.
 

Coug

Well-known member
Steel Soldiers Supporter
2,829
4,033
113
Location
Olympia/WA
so the leak was where the high side port threads into the tube on the evaporator unit.
For the moment I pulled it out just a little, wrapped some teflon gas pipe tape around it, and tightened it back down.
I sprayed it all down with contact cleaner, will see in the morning if it is still leaking. Either way I need to replace it eventually.
 

MattNC

Well-known member
222
270
63
Location
Raleigh, NC
Can I ask about the protection under the fenders as it wasn't clear. Once installed is there protection of the fan and exchanger from rocks being kicked up from the tires?
 

Coug

Well-known member
Steel Soldiers Supporter
2,829
4,033
113
Location
Olympia/WA
Can I ask about the protection under the fenders as it wasn't clear. Once installed is there protection of the fan and exchanger from rocks being kicked up from the tires?
There is a decently hefty piece of ABS plastic that bolts to the bottom of the condenser. Looks like it's designed to be able to bolt to armor pieces or something to the front and rear, but isn't required to in order to be protected.
From the shape of it I might have to clean it out once in a while if I drive through mud or snow, as it's open front and back at the moment, but is definitely protected from anything thrown directly from the tires.

e64f461810b236dd308db7a0f5a201180f1c672d-3.jpg

The low clearance is due to having the BEOD (body, explosive ordnance disposal) on the back and a trailer that's a little tongue heavy at the moment.
 
Top
AdBlock Detected

We get it, advertisements are annoying!

Sure, ad-blocking software does a great job at blocking ads, but it also blocks useful features of our website like our supporting vendors. Their ads help keep Steel Soldiers going. Please consider disabling your ad blockers for the site. Thanks!

I've Disabled AdBlock
No Thanks