• Steel Soldiers now has a few new forums, read more about it at: New Munitions Forums!

  • Microsoft MSN, Live, Hotmail, Outlook email users may not be receiving emails. We are working to resolve this issue. Please add support@steelsoldiers.com to your trusted contacts.


Reversing Light/Alarm: M809 Series

MyothersanM1

19K M1 Armor Crewman
Steel Soldiers Supporter
1,954
401
68
Location
Culver City, CA
This modification should cover most M809-series trucks.

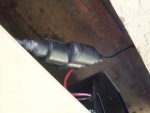
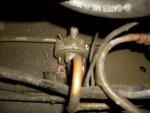
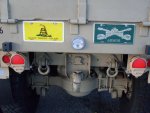
My state does not require these appliances on my truck, but always wanting to keep safety paramount, I thought a reversing light and alarm would be a good idea to install. Last October I rebuilt my transfer case declutch cylinder, replaced all rubber air hoses associated with its operation and replaced the twin poppet valve on the transmission. I figured I could use the air pressure available when the reverse sprag was actuated.

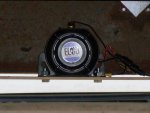
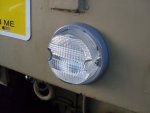
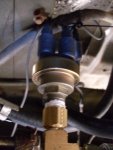
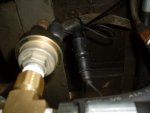
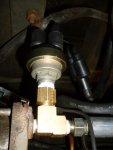
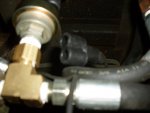
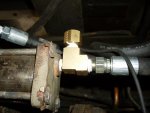
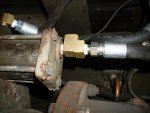
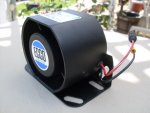
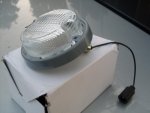
So, I installed 1/4 Pipe Size, Female X Female X Male Tee between the declutch cylinder and reverse supply hose and plugged it for later. That fitting in conjunction with a Brake Light Air Operated Switch would be the basis for this modification to work. I purchased an ECCO SA917 Smart Alarm from eBay and a Grote reverse light for the M35A3 from Erik’s for the working end of this job.

Here is a list of parts I used for my project minus any hardware needed:

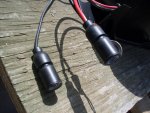
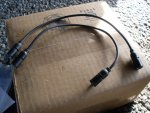
Rubber Shell "Y" Connector MS27147-1

Rubber Shell Connectors (qty 10) MS27144-2

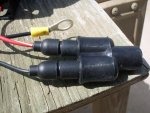
Brake Light Air Operated Switch, M35/M54/M809/M939 etc, 11602160

Prestolite Wire For Military Vehicles, 16 AWG, M13486/1-3

Backup Light For M35A3, 01-6201-93

Med-pressure Brass Threaded Pipe Fitting, 3/8 Female X 1/4 Male Pipe Size, Adapter
McMaster-Carr

Med-Pressure Brass Threaded Pipe Fitting 1/4 Pipe Size, Female X Female X Male Tee
McMaster-Carr

ECCO SA917 Back-Up Smart Alarm (eBay find)
ECCO | Products
 

Attachments

Last edited:

MyothersanM1

19K M1 Armor Crewman
Steel Soldiers Supporter
1,954
401
68
Location
Culver City, CA
Prep work

I crimped female Packard/rubber shell connectors to the positive lead and crimped a large ring connector to ground on the back-up alarm. I changed the male Packard/rubber shell connector on the reverse light to female as I planned to use a Rubber Shell "Y" Connector in order to connect every thing together.

I pondered where to locate the light for good visibility and settled on the bed rear below the tailgate. I installed large rubber stoppers for the tailgate some time ago, but they also keep the light from being smashed. The light kit come with a template for drilling and make things really easy. The light can be installed socket (wire end) up or down. The M35A3 TM shows it installed up so as to allow any moisture that should get into the collect and corrode the bulb socket.

I cut a 1 ¾” clearance hole for the lamp body with a bi-metal hole saw. Instructions state anywhere between 1 11/16” to 2” hole will work. I first drilled the 3/16” mounting holes in the socket down position, which I did not want. So, I re-marked and drilled for the up position.

Mounted to the overhanging bed rails is a 4”wide x ¼” thick steel plate which was installed during my taillight relocation project. This is where I would mount the back-up alarm so it could be up out of harms way. I centered and marked the mounting holes using the alarm as my template. I drilled out four 3/8” holes.
 

Attachments

Last edited:

MyothersanM1

19K M1 Armor Crewman
Steel Soldiers Supporter
1,954
401
68
Location
Culver City, CA
Mounting the Light and Alarm

The reverse light was mounted using two #10 ¾” machine screws with nuts and lock washers. You can see in the picture that the bulb is facing down. I then assembled the whole light, including lens, bezel and gasket, using the supplied machine screws.

I mounted the back up alarm on the upper side of the steel plate using four 3/8” hex bolts with nuts and split lock washers. The alarm grounding wire was attached to one of the bolts below the lock washer to ensure good continuity. The alarm faces toward vehicle front so the rear of the bed does not hamper the sound.


Attachments

Last edited:

MyothersanM1

19K M1 Armor Crewman
Steel Soldiers Supporter
1,954
401
68
Location
Culver City, CA
Wiring and plumbing

The light and alarm was connected together using a rubber shell “Y” adapter. I took a 20’ length of Prestolite 16AWG wire and crimped on a female Packard/rubber shell connector. This wire lead was connected to single side of the “Y” adapter. I carefully fished the wire down along the frame and around the transfer case zip tying to the rear wiring harness as I went.

I disconnected both leads from the existing brake light switch. I stripped a small section of wire from the light/alarm so I could test both brake lamp leads to see which was the constant hot (line) lead. I set the three-lever switch to “STOP LIGHT” and had Soldier “B” come to assist. The first lead I tapped was the load. Sure enough, the second go at it, I got an alarm beep tone and Soldier “B” verified that we had light. I reconnected the brake light load lead back to the switch.

The hot lead was connected to a “Y” adapter and set aside. I made two jumpers with female connectors on both ends. One jumper would I connected back to the brake light switch and the other would connect to the reversing switch.

All air was removed from the system and I removed the pipe pug on the brass tee attached to the declutch cylinder. The air switch used for this project has a 3/8”NPT connection. To compensate I installed a 3/8” Female X ¼” Male Pipe Adapter applying Teflon tape to the threads. I then taped and installed the air switch. The second line lead jumper was connected to the air switch. All loose and dangling wire was dressed up away from moving parts with zip ties. The light/alarm lead then received a crimped female rubber shell connector, then connected to the air switch and was also dressed up with zip ties.
 

Attachments

Last edited:

MyothersanM1

19K M1 Armor Crewman
Steel Soldiers Supporter
1,954
401
68
Location
Culver City, CA
Testing and finished

With everything hooked up and secured, it came time to test under working conditions. I started the truck and pumped up a full supply of air, ensured the three-lever switch was set to at least “STOP LIGHT” and shifted into reverse. I could hear the alarm engage. I shut down the engine leaving the transmission in reverse in order to hear the alarm more clearly. I set the three-lever switch to “SERVICE DRIVE” and the alarm was still sounding. I walked to the rear and the reverse light was lit. To make sure nothing got fouled up during wiring, I had Soldier “B” pump the brake pedal for me. We had good brake lights.

I am pretty satisfied how it all turned with little to no problems. You can’t see the alarm, but it is very audible, and the reverse light does not detract from the looks of the truck. I am sure if anyone wants to undertake this install it wouldn’t be much different on any other truck. My TM shows a different brake light air switch in a different location than what is on my truck, but in the end all the wiring is the same. Please do not hesitate to contact me if you have questions regarding this project.

Thank you for reading this post.
 

Attachments

nf6x

Feral Engineer
1,630
49
48
Location
Riverside, CA, USA
Very good write-up! [thumbzup]

When I installed reverse lights in my HMMWV, I used the existing switch mounting point in the shifter assembly for the reverse switch, since some HMMWV variants had reverse lights. The HMMWV has a power feed to the horn that's switched on only in stop light and service drive modes, so I used a Y connector to tap the reverse light power from there. That gave me reverse lights integrated into the blackout system without needing any cuts in the original harness. I used the reverse lights and brackets from one of the HMMWVs that normally had the lights. The lights appear identical to the M35A3 one that you used.

I plan to install reverse lights in my M923, too. I haven't planned out how I'll do it yet. I'm considering converting all of the lighting to LEDs, so maybe I'll use a different reverse light assembly. In another thread, somebody mentioned that there's a plugged port on the outside of the transmission that gets hydraulic pressure in reverse gear, so maybe I can use a hydraulic pressure switch there to trigger my lights? I haven't dug into the shifter yet to see if there's already a switch mounting point in there. I may also include a reverse alarm and/or a rear view camera.
 

dmetalmiki

Well-known member
5,523
2,026
113
Location
London England
Nice work, and well carried out. I have Back UP sirens on all my stuff. (in addition to a back up "walker" allways) as you point out safety first,especially in and arround crowds at shows.
 

73m819

Rock = older than dirt , GA. MAFIA , Dirty
Steel Soldiers Supporter
In Memorial
12,196
314
0
Location
gainesville, ga.
The only problem with this install is if you have the air cutoff mwo to drop the speag into nutral, with NO air going to the reverse sprag neans NO air to the pressure switch, hence NO backup light or alarm
 
Top
AdBlock Detected

We get it, advertisements are annoying!

Sure, ad-blocking software does a great job at blocking ads, but it also blocks useful features of our website like our supporting vendors. Their ads help keep Steel Soldiers going. Please consider disabling your ad blockers for the site. Thanks!

I've Disabled AdBlock
No Thanks