• Steel Soldiers now has a few new forums, read more about it at: New Munitions Forums!

  • Microsoft MSN, Live, Hotmail, Outlook email users may not be receiving emails. We are working to resolve this issue. Please add support@steelsoldiers.com to your trusted contacts.


Weird wiring issues!!

w5ood

Member
60
18
8
Location
Houston / Texas
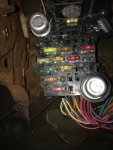
Ive finally gotten my sons CUCV buttoned up pretty good and its time to start on mine during this down time. A few issues with wiring have been found.
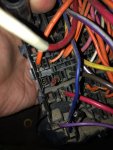
1. You can turn on the headlights anytime. The switch for the lights next to the blackout lights does nothing to the lights.
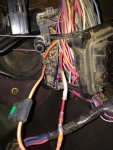
2. The fuse for the lights is gone. The slot for the 30amp fuse looks like it had the melting issue and its gone so they bypassed headlight fuse somehow.
3. When I turn on the headlights the gas gauge drops to empty.

So what the best plan of attack for this? Any help would be appreciated. I have been looking at wiring diagrams in the TMS but im just not good enough at reading them to know where to start.
 

richingalveston

Well-known member
1,715
120
63
Location
galveston/Texas
I would get the relay harness for the headlights. This is sold at lmc and some other places. the relays can be powered by an inline fuse to the 12 volt junction block and then the switch leg can be run back to the headlight switch. This will fix the melted fuse problem correctly without disturbing the fuse block. I believe the only way to fix the fuse block Is to replace it.
if the wiring is in real bad shape, a new (used) wiring harness may be your best bet to fix the problems. You can replace the interior harness pretty easily which will give you a new fuse block.
Once the wiring harness has been replaced by the new relays, you will have to chase down the headlight wires to see where they are getting the power from now. getting it disconnected may fix the gas gauge problem.
IF it does not then you will at least know it is not the headlight wiring harness that is doing this and you will have to chase down the fuel gage wires to see if they have been altered from stock
but I would fix one thing at a time and maybe some of the other issues will fix themselves.
 

cucvrus

Well-known member
11,274
9,603
113
Location
Jonestown Pennsylvania
I would check for grounds on the radiator support to the headlamps. Make sure they are clean and not pulling ground from other areas. Bad grounds can do weird things. Thoroughly check and clean the fuel tank sending unit ground located on the left rear frame rail behind the rear wheel on the to frame flange. Clean another area and move the ground and replace the 5/16" star ground washers. I have also removed the 30 headlamp fuse from the fuse block and replaced it with a circuit breaker and an in line fuse. Been a while but I think the brake lights are on the inline fuse I added and the circuit breaker serves the rest of that overloaded lighting system. Not every CUCV I had or have has had the same issue but it is prevalent to this circuit. As long as it is working I don't change it. Also adding some LED headlamps and bulbs will lighten up the amperage load on that 30 amp light circuit. Pulling and cleaning the contacts of all the fuses and the fuse block contacts will help a great deal. Good Luck and report back. I never added any of the Chinese wiring harnesses that LMC sells. I never needed to change or modify anything once the real issue was discovered and resolved. Take Care and Be Safe.
 

w5ood

Member
60
18
8
Location
Houston / Texas
I have cleaned all the grounds by the radiator, the grounds on the frame by the radiator, the grounds from the engine to the bus bars, all the connections on the bus bars as well. I have not looked into the ground for the sending unit Ill check that out. I am just unsure what wires to follow for the head lights to see how they rewired them. I have used an LMC headlight kit on my sons and it still works great for 4 years. Ill do the same but I just wanted to get the headlight on the right fuse so in the future its close to stock and I can follow it. Right now the fuses are all messed up, wrong sizes in wrong spots and im afraid that its been done to compensate for the moving of the head lights to a different fuse.

I am going to replace fuses with the right sizes, I do have the threads from SS that explains where things go, im just worried about putting in a larger (proper size) fuse right now.

GEN2 light not coming on either and im afaid its because of the wiring under the dash as well. Both Alt are charging fine when running 14.5 on one and 14.6 on the other. grrrrr
 

Attachments

Last edited:

ehuppert

Active member
279
138
43
Location
Upstate NY
I went the headlight relay route on my rebuild/restoration. Bosch relays, and ordered the pigtail harnesses. Standard motors S654 (used enough of these that i knew the number!!) makes for a neat install. I have the Hella headlights with replaceable bulbs....Not as good as the LED's., but only apx $100. Pretty substantial improvement! In additiona to better light, this gets rid of the load on headlight circuit....

I personally NEVER buy a harness, always make my own. Not difficult, and i can control the quality of my work! Relays mounted near battery, power comes from distribution block on my set-up.
 

cucvrus

Well-known member
11,274
9,603
113
Location
Jonestown Pennsylvania
W5ood Looking at your fuse box it appears to have some issues. I am not the top notch electrician. I know enough to keep my out of trouble. But the big melted area on the midway right side served as the 30 amp lighting fuse. Yours is missing. Is the leg to the fuse still hot? Check that out. I remove the bulkhead connector and replace the 2 fuses that are being served by that leg and like I said. I put a circuit breaker in for the lighting and an in line for the brake/stop lamps. Always worked for me. That 30 amp fuse either works or needs modified. That has been my experience. Good Luck. I am sure entire wiring harnesses are available for these trucks. Used. Be Safe.
 

MarcusOReallyus

Well-known member
4,524
810
113
Location
Virginia
I am just unsure what wires to follow for the head lights to see how they rewired them.
I'd go simple, first. Check next to the fuse box to see if they just bypassed it right there. You might find an inline fuse there somewhere that has taken the place of the fried fuse holder in the fuse block.

I have used an LMC headlight kit on my sons and it still works great for 4 years. Ill do the same but I just wanted to get the headlight on the right fuse so in the future its close to stock and I can follow it.
That's good thinking, in my book. Even though it's not a good design, at least you'll know what is what.

I advise against trying to figure out what the PO did. Just get a new fuse box and start the process of putting everything back to stock. You can drive yourself batty trying to second guess someone else's hack job. Just take it one circuit at a time and make it like stock.

Once you have it all stock, you will probably have solved all your problems, and you will certainly know the system, so if any remain, you can start troubleshooting with confidence.
 

cucvrus

Well-known member
11,274
9,603
113
Location
Jonestown Pennsylvania
Not sure if something like this would help you out with the issues you have. I have many of them. Brand new and had them for years. I use the inline fuse holders and throw the rest away. Wasteful but I am not an electrician. DSCF7179.JPGDSCF7180.JPGSweet deal on these relays. If it says "Song Chaun" it has to be good, Be Safe. PM me if I sparked your interest. Marcus you need any? Let me know. Share the scrap.
 

w5ood

Member
60
18
8
Location
Houston / Texas
Well Ive found more out. I removed dash and cleaned every terminal and bulb and bent pins out, I had to solder one of the copper connections for GEN2 light. A little continuity testing helped me find the break. Looks like gen lights are fine now. The left blinker light still comes on when I turn on headlights. Gas gauge moves now and stay put when headlights come on.

Someone took the red wire off the back of the original headlight fuse and spliced it into the one just to the left and put in a 20amp fuse. BUT they left the brown wire in place. Im guessing that is wrong. So I was going to get an inline fuse and put the red and brown wire on it and just hang it out the side of the fuse box.

Definitely making some progress. But im still not sure why that right blinker lights comes on, I even unplugged the blinker switch to see if there was a short in it, but it stay lit. Im hoping that red wire hooked to power and not with the brown one has something to do with it. Im still open to any advice if someone with more electrical savvy want to help. thanks for those that replied.
 

cucvrus

Well-known member
11,274
9,603
113
Location
Jonestown Pennsylvania
Check all your grounds and make sure all your lights are working. The light on can indicate a dead non functioning bulb. Good Luck. Have you looked at the fuel tank ground?
 

w5ood

Member
60
18
8
Location
Houston / Texas
So here is what they did to the wiring. The red wire that was cut was wrapped around the orange wire in the right corner that is partially stripped. It looks like the red wire where it was originally located the other half is bridged to the solid orange above it. What is the best way to reconnect the red wire ? I bought an inline fuse. I can easily hook one side to the old red wire but where or how should i connect the other side of the fuse? Should I splice it into the orange wire it was originally bridged to?

I added the inline fuse, one side to the red wire the other to its old location the bridged clip, I old school soldered it into the back of the fuse block. Now I think Ill remove the horn diode and suppressor. Per this thread I am assuming its ok to remove the diode and the suppressor. Wish me luck I hope this gets everything back to stock or close as possible.


Attachments

Last edited:

w5ood

Member
60
18
8
Location
Houston / Texas
Check all your grounds and make sure all your lights are working. The light on can indicate a dead non functioning bulb. Good Luck. Have you looked at the fuel tank ground?
Yes I removed the clips from the back of the fuel gauge and sanded everything to bare metal and the post on the back of the fuel gauge. Then I removed the ground from the frame and sanded it all down to shinny bare metal. It appears to be working now, just need to add some gas to see for sure.
 
Top
AdBlock Detected

We get it, advertisements are annoying!

Sure, ad-blocking software does a great job at blocking ads, but it also blocks useful features of our website like our supporting vendors. Their ads help keep Steel Soldiers going. Please consider disabling your ad blockers for the site. Thanks!

I've Disabled AdBlock
No Thanks