


Vhyle
New member
- 181
- 1
- 0
- Location
- Clarksville, TN
I just replaced my leaky mechanical fuel pump and rubber hose. During the install, I had issues with getting the threaded fitting on the steel IP line to match up to the new pump. So during the install, I loosened up the pump bolts, and also removed the IP line from the bracket at the front of the block, and also bent out the top bracket underneath the intake. This allowed me to manipulate and move the IP line freely enough to get it to thread back up onto the pump.
However, during all this, I discovered a potentially bad weak spot in the fuel system. The injector drainback tube inside the rubber hose (going to the #1 injector) was so corroded, it snapped right in two on a slight bump with my hand. I discovered this because the drainback tube is attached to the front bracket that secures the IP line. So when I removed said bracket, the drainback tube broke right off and started leaking fuel. I'm actually glad this happened - I just exposed a weak spot in my fuel system, which would have left me with a bad leak somewhere down the line, or maybe even stranded.
I made this a new thread because future CUCV owners, or those who are working on their fuel systems, can take notes. The biggest thing I've noticed about changing out the mechanical pump is that a lot of people have a hard time threading the IP line back onto it, due to different angles. Unless you're immortal, you won't easily bend that tube, so here's another way.
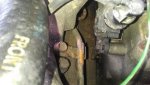
Photo 1 - Old pump... been leaking for quite a while now. Looks like around the seam. I know because I touched and smelled it, making sure it wasn't residual oil (which there's some of that too).
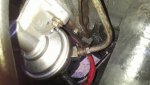
Photo 2 - Underneath old pump.
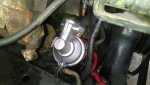
Photo 3 - New pump installed. Notice the angle differences between the threaded fitting and the pump. Just enough to make you cuss.
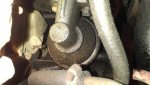
Photo 4 - The top bracket that secures the IP line. I just bent it out and down, allowing it to move freely. Combined with the front bracket removal, it made this job much easier.
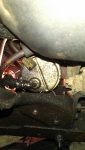
Photo 5 - Another shot of the new pump and new rubber hose. Note the rusty, broken off tube on the right... that was my next weak point in the fuel system.
The moral is: check this thread out to make your mechanical pump replacement a little easier. And also, take a look at your injector drainback tube. If it's old and corroded, chances are it's broken off underneath the rubber.
I already consulted the -20&P, and found the part number (p/n 14061569). Found 'em on Fleabay for $16. Done deal.
EDIT: Re-uploaded photos.
However, during all this, I discovered a potentially bad weak spot in the fuel system. The injector drainback tube inside the rubber hose (going to the #1 injector) was so corroded, it snapped right in two on a slight bump with my hand. I discovered this because the drainback tube is attached to the front bracket that secures the IP line. So when I removed said bracket, the drainback tube broke right off and started leaking fuel. I'm actually glad this happened - I just exposed a weak spot in my fuel system, which would have left me with a bad leak somewhere down the line, or maybe even stranded.
I made this a new thread because future CUCV owners, or those who are working on their fuel systems, can take notes. The biggest thing I've noticed about changing out the mechanical pump is that a lot of people have a hard time threading the IP line back onto it, due to different angles. Unless you're immortal, you won't easily bend that tube, so here's another way.
Photo 1 - Old pump... been leaking for quite a while now. Looks like around the seam. I know because I touched and smelled it, making sure it wasn't residual oil (which there's some of that too).
Photo 2 - Underneath old pump.
Photo 3 - New pump installed. Notice the angle differences between the threaded fitting and the pump. Just enough to make you cuss.
Photo 4 - The top bracket that secures the IP line. I just bent it out and down, allowing it to move freely. Combined with the front bracket removal, it made this job much easier.
Photo 5 - Another shot of the new pump and new rubber hose. Note the rusty, broken off tube on the right... that was my next weak point in the fuel system.
The moral is: check this thread out to make your mechanical pump replacement a little easier. And also, take a look at your injector drainback tube. If it's old and corroded, chances are it's broken off underneath the rubber.
I already consulted the -20&P, and found the part number (p/n 14061569). Found 'em on Fleabay for $16. Done deal.
EDIT: Re-uploaded photos.
Attachments
-
 93.5 KB Views: 29
 -
 98.9 KB Views: 30
 -
 95 KB Views: 36
 -
 35.6 KB Views: 28
 -
 72.9 KB Views: 28
Last edited: