• Steel Soldiers now has a few new forums, read more about it at: New Munitions Forums!

  • Microsoft MSN, Live, Hotmail, Outlook email users may not be receiving emails. We are working to resolve this issue. Please add support@steelsoldiers.com to your trusted contacts.

??? on Front Differential seal replacement and front bearing cover removal on a M939

juanprado

Well-known member
Steel Soldiers Supporter
5,516
2,733
113
Location
Metairie/La (N'awlins)
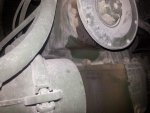
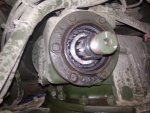
I am working on a m923 rear axle changing the pinion seal on the front of the axle and the gasket on the front bearing cover due to a small drip leak.

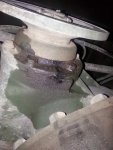
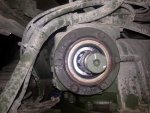
I have loosened the drive shaft and moved it out of the way, Pulled the cotter pin and big nut. (BTW, It is 2 1/4). I also have the 10 bolt flange that the drive shaft bolts up to removed. I then pulled the 8 bolts on the front bearing carrier plate. I have moved it with a gear puller about 1/2 inch and have the gear puller gorilla tight and she does not want to move. I did spray lube on the grooved shaft. I can feel the metal shims rotating and they are loose and all is moved away from the chunk.

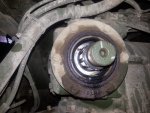
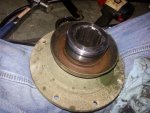
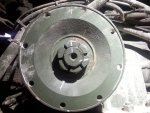
The breakdown calls it a bearing plate as I can rotate it and feel it but is the bearing grooved and fits around the shaft or is there a bearing retainer plate that is grooved? Trying to figure what is the resistance and I did not want to force it?

Does anyone have a picture of the inside of this plate? I also tried to find a TM specifically on changing this bearing? IS it removable or this one assembly to itself? I know the seal is supposed to be changed from the inside of this plate as I see no way to do it from the outside.

Should this plate slide out easily or is it gorilla torqued to the shaft? has anyone had to fight this animal?

Attached is the tm but no specifics on the plate item 11?

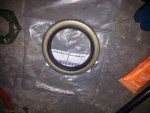
Also looking for an aftermarket part number for the gasket? It is round but flat on the ends.

Are these shims reusable and what is their purpose? Are they also available aftermarket as I think I ripped one of them?

Thanks for your insight as I would like to take the truck to the LA rally next week and thought this would be a "simple" seal replacement. :-(
 

Attachments

Last edited:

searls84

Member
195
6
18
Location
Las Cruces, NM
Sounds like you are having the same problem I did, don't fret, you'll have this done in 20min if I can explain it correctly! Here's what worked for me. Item 11 is what you need to get off, and item 3 stays on the shaft and is not removed. #11 is a "tin" housing (for lack of better description) That forms around the edge of #3(about 1/4" thick). When you remove the bolts that hold the housing to the axle,it should slide out a bit and be able to rotate around, with loose shims in between. Stick your finger in between the housing and axle, and you'll feel a lip at the very outter edge of #11 this is where #11 and 3 split apart. They are usually stuck together with an RTV like adhesive. Get a small flat head screw driver and stick it in this small void and pop them apart. The rest will be self explanatory after you separate the two. No need for any type of puller!!! If you have any questions pm me and I'll walk you through it!
 

juanprado

Well-known member
Steel Soldiers Supporter
5,516
2,733
113
Location
Metairie/La (N'awlins)
Searls84- you are exactly right. The outer housing is just a pretty thin tin cover. I was grabbing too much with the gear puller and it is probably not needed at all. The outer flange also slipped off without the gear puller. A small screwdriver and a hammer and she was history.

The tm is poorly written and illustrated as there is 2 large nuts, plates, washers and a bearing behind the plate that do not need to be moved along with the shims against the chunk. I hope I did not bend anything by prying on it with the gear puller. We shall see after reassembly.

Caution as if you disturb or rotate the shims make sure to properly align them as there are oil passages in the shim. They only line up one way. The bolt holes will allow you to align it 2 different ways but only one is correct with the oil passages.

From what I could determine, these Rockwells are only used on military vehicles and not on commercial vehicles so parts like the carrier gaskets are not readily available except surplus or maybe from Meritor directly. ( new owner of rockwell). I could never find them aftermarket.

I ordered the gasket from Red Barn Customs 810-650-8641. They were most helpful on the phone and allowed me to talk to a tech for support to answer my newbie "dumb" questions. Parts and Tech support personnel were awesome! They had told me the same exact thing Searls was pointing out. If you need parts, these are the folks to go to. I called several other outfits and got nowhere and felt I was bothering them.

I have the plate off and now just waiting for the gasket to come in and a metal shim that I ripped with the gear puller.
 

73m819

Rock = older than dirt , GA. MAFIA , Dirty
Steel Soldiers Supporter
In Memorial
12,196
314
0
Location
gainesville, ga.
The 5t rockwells were a civi axle that the military added the OUTER seal to, other then that they are a old civi item,
 

searls84

Member
195
6
18
Location
Las Cruces, NM
A.

The tm is poorly written and illustrated as there is 2 large nuts, plates, washers and a bearing behind the plate that do not need to be moved along with the shims against the chunk. I hope I did not bend anything by prying on it with the gear puller. We shall see after reassembly.

Caution as if you disturb or rotate the shims make sure to properly align them as there are oil passages in the shim. They only line up one way. The bolt holes will allow you to align it 2 different ways but only one is correct with the oil passages
Exactly! Sorry I forgot to put that in there, I was fishing at the time I posted and maybe a little brain dead! :)
Also to add, Boyce equipment were the ones who walked me through this very same issue and carried the parts... Just wanted to add another parts source to list!
 

juanprado

Well-known member
Steel Soldiers Supporter
5,516
2,733
113
Location
Metairie/La (N'awlins)
Well, I finally changed the seal and the paper gasket to the front facing pinion seal on the rear axle. I thought all is well and took it for a test drive. It appears since I used a gear puller as per the tm and tried to grab the differential bearing carrier plate in error, I distorted the rear facing pinion seal. It made quite a mess and slung gear oil all over the place.

I changed the rear facing pinion seal today. Again the TM is WRONG! It is the same seal front and back. To change just remover the cotter pin, back off the large nut with a 2 1/4 socket. The tm says to remove the 6 bolts and remove the rear plate and use a gear puller. WRONG! Just remove the pancake flange off the driveshaft. Now the seal is staring at you. It is driven in from the outside not on the inside like the front facing seal. No need to remove plate or bolts. I knocked the seal a little loose and in with a hammer and screwdriver then used a seal puller screw driver to yank it out. Put silicone around the outer flange of the seal and knock into the housing. I used a 3 1/4 axle socket to drive it even and flush. Add a little wheel bearing grease to the flange where it rides on the rubber seal and put the flange, nut and cotter pin back.

Looks good so far with no leaks.
 

Plugugly

New member
116
1
0
Location
Iowa
Well, I finally changed the seal and the paper gasket to the front facing pinion seal on the rear axle. I thought all is well and took it for a test drive. It appears since I used a gear puller as per the tm and tried to grab the differential bearing carrier plate in error, I distorted the rear facing pinion seal. It made quite a mess and slung gear oil all over the place.

I changed the rear facing pinion seal today. Again the TM is WRONG! It is the same seal front and back. To change just remover the cotter pin, back off the large nut with a 2 1/4 socket. The tm says to remove the 6 bolts and remove the rear plate and use a gear puller. WRONG! Just remove the pancake flange off the driveshaft. Now the seal is staring at you. It is driven in from the outside not on the inside like the front facing seal. No need to remove plate or bolts. I knocked the seal a little loose and in with a hammer and screwdriver then used a seal puller screw driver to yank it out. Put silicone around the outer flange of the seal and knock into the housing. I used a 3 1/4 axle socket to drive it even and flush. Add a little wheel bearing grease to the flange where it rides on the rubber seal and put the flange, nut and cotter pin back.

Looks good so far with no leaks.
I'm going to do the rear facing one on my back axle today, I'll try to take some pictures since the TM is apparently wrong. I'm hoping it goes as well as you say yours went, I have the seal and a piece of 3" pvc to use as a driver since the biggest socket I have is 2.5".

Is there a way to tell when it's fully seated other than feel? I guess it should be self explanatory when I start dissassembly, I can measure the depth in case there isnt a stop.
 

Plugugly

New member
116
1
0
Location
Iowa
Ok, I did the rear facing propeller shaft seal on my M923A2 today. It went pretty well thanks to juanprado's clue that you don't need to pull the whole thing apart per the TM. I took some pictures along the way, I'll share some to hopefully help others who might be afraid to do it, its really quite simple. I took more pictures than this, but it's a pain to download and upload them instead of link them, so I'll just share a few.

First you can see the leak I had. I marked the nut and flange for orientation to make re installation easier. This is what you'll find when you get the 2.25" nut off and pull the flange off. That all went fine, my 1/2" impact took the nut off okay and I could pull the flange off by hand. The new seal I got from Erik's was a little different than the one I found in my axle, seemed better, sealed on both sides. I cleaned everything up for the new parts. Then I put a light coat of silicone on the outside edge of the seal.Next, I greased the lips of the seal, as well as the mating edge of the pancake flange. I was going to use 3" PVC to drive that seal, but it tapped in easily with a mallet. Everything went back together easily, I put the nut back on until it realigned with my marks and put a new cotter pin in. Now that I know what tools to gather and have done it, I think I could do one in about 20 minutes.

If you've got a weepy rear end, fix it! It's easy and cheap, I think the seal was ~$15.
 

Attachments

todds112

Member
672
5
18
Location
Teton Valley, ID
Front Pinion.jpg

I need to do the front side, front axle pinion seal. I can find the seal (#10) and the gasket (#34), but not the other round gasket (#9). Does this need replaced too, or can it be reused? Anyone find this part?
 

juanprado

Well-known member
Steel Soldiers Supporter
5,516
2,733
113
Location
Metairie/La (N'awlins)
View attachment 537608

I need to do the front side, front axle pinion seal. I can find the seal (#10) and the gasket (#34), but not the other round gasket (#9). Does this need replaced too, or can it be reused? Anyone find this part?

All you need is the plate gasket and the oil seal inside it. The other piece does not come out when you change it.

The big nut is a 2 1/4 size socket. I ended up buying 2. Let me know if you need one by pm, and I will make you a fair offer on a brand new one by Kal made in Japan 3/4 drive
 

gottaluvit

Active member
Great thread! Thanks to all who contributed. My front intermediate just started leaking and is only a class 1 leak (seepage only; never a hanging drop visible yet). Question is, I bid on a M105A2 180 miles away at a level where I will win the auction, and I was wondering if it's safe to put this off until after the recovery or is it going to get so bad to drop my differential to a detrimental level on this road trip? I can take plenty oil to top it off now and then if the leak gets to be a bad class 3. Should I risk it driving with the leak, or order the seal and gasket and hope it gets here in time (and hope I can do this as smoothly as mentioned)?
 

silverstate55

Unemployable
Steel Soldiers Supporter
2,068
855
113
Location
UT
I recently had to replace all 4 seals on rear axles & 2 seals on transfer case on my M931A2...too much sitting around made them brittle and cracked. I also replaced all the bolts & nuts that attached driveshafts to pinions, as most had been overtorqued and were stripped.

The good news is that the 6 seals are all the same part number. A 1-inch impact wrench helped get the nuts off of the transfer case shafts, they were really torqued on quite firmly...the axle pinion nuts weren't bad though.
 

Coffey1

Well-known member
Steel Soldiers Supporter
3,871
493
83
Location
Gray Court SC
I have not had to use a puller on any pinion seal.
Pull nut and rear facing one slides right off
Front one slid right out then carefully pry that cover with all those feeler like shims off then the seal is in that cover put seal in put shims back with a thin coat of rtv bolt everything back up.
 

gottaluvit

Active member
Does the shaft have the hanger bearing? I had a front seal go out do the hanger bearing 's excessive slop?
No hanger/carrier bearing on this unit. Probably because such short wheel base. The leak isn't so bad, as I had plenty class 1 leaks on the 800 series dump I had when serving and didn't ever get most replaced while I was there. However, as silverstate55 mentioned, the sitting these units did concerns me that it just might let go and be a serious leak. I think I will order the parts and hope they get here in time before GP hits me with too much storage fees. I wouldn't fret it for local driving.
 
Top
AdBlock Detected

We get it, advertisements are annoying!

Sure, ad-blocking software does a great job at blocking ads, but it also blocks useful features of our website like our supporting vendors. Their ads help keep Steel Soldiers going. Please consider disabling your ad blockers for the site. Thanks!

I've Disabled AdBlock
No Thanks