K9Vic
Active member
- 1,261
- 7
- 38
- Location
- Fort Worth, TX
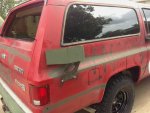
So on my last Suburban CUCV clone last year I came up with an idea to mount the antenna brackets from simple parts available at any hardware store. I got all my parts at Lowe's for this project and they are also available at Home Depot. So what I did is use furniture brad hole or T-nuts to hole the bolts for the bracket. After I get everything done I use paintable silicon and paint the brad holes to help against corrosion and leaking inside. To hold them in place I drill out the small holes with a 1/8 drill bit and use 1/8 rivets slightly filing them down flat when installed. I always start with the top first and finish with the bottom having the antenna bracket installed to measure. The reason I do this as sometimes these used brackets may be slightly wrapped when tightened down, this helps to get a perfect fit. Note that the measurements for this were started with the brush guard, see last step for details on that.
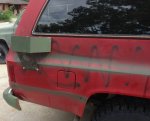
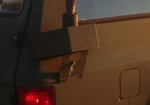
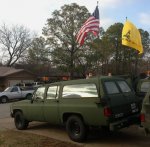
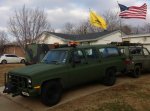
It has worked out well four times now and my last 1990 Suburban CUCV clone I have put flags on the antennas and held strong. Driven that 400 miles on the highway to Houston and back and 2000 miles around town with no problems. This seems to be better over the original design as these will never strip and spin out on you since they are three rivets holding it in place.
So here is how I did this, below is the exact part I got from Lowe's.
Hillman T-Nuts Brad Hole 5/16-18 x 5/8.
Bulk buy: 5/16-18 stainless bolts 3/4 long & 5/16 washers (not pictured).
1/8 x 3/8 rivets (3/8 is length, 1/8 round rivets).
Tools: 3/8 and 1/8 Drill bit, flat file, level, tape measure. (not pictured).

-----
Drill out the small holes in the Brad Hole to accept the 1/8 rivets.

-----
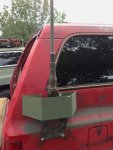
Measure everything carefully and drill a 3/8 hole in the metal, you will have to slightly file or round out the hole to get correct fit. I used the brush guard to make my first mesurement so that when installed it would be even with the window line and not be sticking out the back side.

-----
Insert the Brad Hole and drill the hole for each rivet, use the 1/8 drill bit. I will drill one hole and insert the rivet for a better hold, do this for each hole. I also just get it started to mark it and remove everything to complete drilling the 1/8 holes. This is just to avoid damage to the Brad Hole and yourself from spinning out on you with the drill bit.

-----
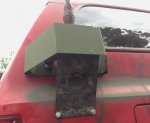
So you can see how it looks with all the holes drilled, there is plenty of area to hold the bracket in place. So now I install the rivets and to try to keep it level I will tighten down, but not complete installed all three rivets. I use a 1/2 full pull on the rivet gun for each rivet and thereafter complete the full pull to snap the rivets in place. I found this works better over snapping them in one at a time to keep them at level to each other. After installed I file them down slightly, but not too much.

-----
So as you can see the top row is done, so I no have to complete the bottom row. I will install the bracket and mark my holes to drill after removing the antenna bracket as the 3/8 drill bit is larger then the hole on the bracket. Same method of course and when done you can see how uniform it looks. I will also use the silicone and let it dry. After it is dry I will paint the area and all is complete.


-----
The first time I did this I did not have the brush guards so this time I lined up the top of the guard with the window line. I actually used the brush guard to place the top holes so it would be even with the window line. I marked one hole from the brush guard and made a level line to mark the main bracket. Now that I had the line I marked where to drill the holes from the antenna bracket. So this is why it looks the way it does as I started with the brush guard. I also put the brush guard in some from the end of the Suburban so it did not stick out. Ignore the off angle on the rear of the brush guard, I fixed that by pulling it down and is perfectly level now. On my last build it was goofy looking because I did not have the brush guards to measure for them being installed.

-----
So that is my method and I wanted to share how I did this with simple parts from any hardware store. The Brad Holes are about $1.00 each, blots about $.25 each, washers $.10 each ad box of 100 rivets $3.00. So for one antenna bracket it is under $10 and the 100 rivets will cover many more. I always will buy a few extra Brad Hole as I have stripped out the treads once. Since they are so cheap, an extra one or two is not a big deal.
It has worked out well four times now and my last 1990 Suburban CUCV clone I have put flags on the antennas and held strong. Driven that 400 miles on the highway to Houston and back and 2000 miles around town with no problems. This seems to be better over the original design as these will never strip and spin out on you since they are three rivets holding it in place.
So here is how I did this, below is the exact part I got from Lowe's.
Hillman T-Nuts Brad Hole 5/16-18 x 5/8.
Bulk buy: 5/16-18 stainless bolts 3/4 long & 5/16 washers (not pictured).
1/8 x 3/8 rivets (3/8 is length, 1/8 round rivets).
Tools: 3/8 and 1/8 Drill bit, flat file, level, tape measure. (not pictured).
-----
Drill out the small holes in the Brad Hole to accept the 1/8 rivets.
-----
Measure everything carefully and drill a 3/8 hole in the metal, you will have to slightly file or round out the hole to get correct fit. I used the brush guard to make my first mesurement so that when installed it would be even with the window line and not be sticking out the back side.
-----
Insert the Brad Hole and drill the hole for each rivet, use the 1/8 drill bit. I will drill one hole and insert the rivet for a better hold, do this for each hole. I also just get it started to mark it and remove everything to complete drilling the 1/8 holes. This is just to avoid damage to the Brad Hole and yourself from spinning out on you with the drill bit.
-----
So you can see how it looks with all the holes drilled, there is plenty of area to hold the bracket in place. So now I install the rivets and to try to keep it level I will tighten down, but not complete installed all three rivets. I use a 1/2 full pull on the rivet gun for each rivet and thereafter complete the full pull to snap the rivets in place. I found this works better over snapping them in one at a time to keep them at level to each other. After installed I file them down slightly, but not too much.
-----
So as you can see the top row is done, so I no have to complete the bottom row. I will install the bracket and mark my holes to drill after removing the antenna bracket as the 3/8 drill bit is larger then the hole on the bracket. Same method of course and when done you can see how uniform it looks. I will also use the silicone and let it dry. After it is dry I will paint the area and all is complete.
-----
The first time I did this I did not have the brush guards so this time I lined up the top of the guard with the window line. I actually used the brush guard to place the top holes so it would be even with the window line. I marked one hole from the brush guard and made a level line to mark the main bracket. Now that I had the line I marked where to drill the holes from the antenna bracket. So this is why it looks the way it does as I started with the brush guard. I also put the brush guard in some from the end of the Suburban so it did not stick out. Ignore the off angle on the rear of the brush guard, I fixed that by pulling it down and is perfectly level now. On my last build it was goofy looking because I did not have the brush guards to measure for them being installed.
-----
So that is my method and I wanted to share how I did this with simple parts from any hardware store. The Brad Holes are about $1.00 each, blots about $.25 each, washers $.10 each ad box of 100 rivets $3.00. So for one antenna bracket it is under $10 and the 100 rivets will cover many more. I always will buy a few extra Brad Hole as I have stripped out the treads once. Since they are so cheap, an extra one or two is not a big deal.
Last edited: