


I added a block heater and coolant filter to my 923A2 and decided to share since I didn't find a coolant filter install on the 8.3 when I searched. Juanpardo did a good one for the NHC250, and the principal is basically the same but I thought it would have been helpful to see exactly what you need. The block heater install has been covered, but I forget by whom. I figured I'd cover that lightly because a good job has been done already, but it's a good time to do both when you already have the coolant out.
I decided that I wanted to use the same taps that the heater used early on, and that is what my parts list is for. I do think that you can use the two other taps that are in the block in the pictures, but I was unsure. They certainly appear to go into the same areas, but since it hadn't been covered and I could find the specifics I played it safe. The down side to doing it the way I did is probably flow, since you're sharing the same 1/2" ports for 2 3/8ths" valves on the supply and return side. I guess the long term on that will have to wait for the long term.")
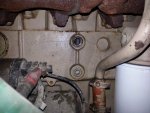
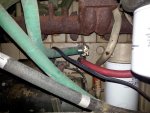
The ports at both ends are 1/2" as mentioned, both of mine had been reduced with a 1/2" x 3/8th's" bushing to accept the heater shut off valves. The supply side is out the side of the block, and the return is into the volute of the water pump.
Step one is to get enough drain pans to catch all your coolant. Then using the petcock on the bottom of the radiator and taking the cap off the tank, drain the system. After the draining is done, start taking stuff apart. For the block heater, drive the frost plug in above the starter with a screwdriver or similar, hitting that with a hammer. This is made easier if you pull the lines for the heater off the block and get them out of your way to swing, if you aren't doing the coolant filter you might want to skip that, but it's just a couple hose clamps. I left the hoses connected to the heater core end the whole time.
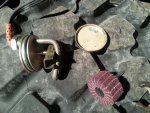
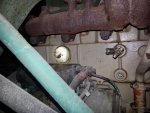
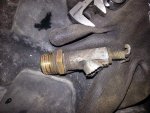
While the frost plug was out, I then unscrewed the valve in the side of the block. Mine was oriented in a bad way to get a wrench on it, and I had to cut the spigot off because I didn't have an appropriate crow's foot and I am an impatient neanderthal. The one in the block then screwed out with the valve and bushing all at once. I replaced the bushing with a new one, and also added a "street tee", as pictured. You may be able to find one with a male 1/2" connection (I couldn't), but I really think the bushing is an asset as it gives you space away from the block to spin the valves in after you screw the tee in.
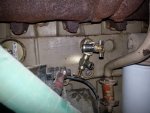
The valve on the water pump was a little easier, I didn't destroy it and was able to reuse it. I took the alternator loose at the bottom, and removed the belt and the two top bolts. With it tilted out of the way I could get a wrench on that from the top and thread it out. Because of the shape of the pump here, I needed the street tee again, a stand off or short brass nipple, and the same 1/2" to 3/8ths bushing into the pump. I put teflon pipe sealant on everything threaded. I put both the valves in the water pump tee right away, and went back block heater.
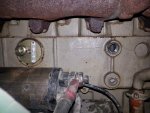
I left the heater and coolant filter fittings off while I did the actual heater install, just for the room to get my hands in there. The heater I used was a Katz 1000watt, it looks like the one in the other thread on this, too. The heating element needs to be parallel with the crank, for lack of a better way to describe it. It can be facing forward or aft, I faced mine forward. The instructions that come with the heater are easy to understand, and this has been covered but I’ll answer questions if they come up. I took the cord off while installing it and left it off until very last because it would have got in the way putting the valves in for the coolant filter and heater. The biggest thing about the block heater is the frost plug hole is going to be cruddy with sealant and paint, the other thread had me ready for this. I got a 2” Dewalt 150 grit flap wheel for my die grinder that you can see in the picture, and it worked like a charm for cleaning that up. I think it took longer to put it in the die grinder than it did to make the hole perfectly smooth.
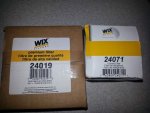
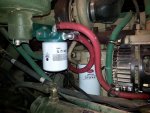
With the heater in per instructions and secured, I finished up the valve install on the side of the block. With the valves all in and orientated where I wanted, I went ahead and mounted the filter kit. The Wix box on the left is the filter kit number, the box on the right is the filter I chose. That filter number has the chemicals added, look into that topic and decide if you want the filter with or without.
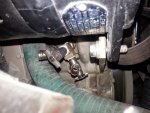
I piggybacked on the NHC250 install instructions when I chose my location, I did a little mocking up to make sure I could get the inner fender in and out, get to the dipstick, etc. Then I drilled a piece of angle iron to hold the filter and installed that as shown. Pretty self explanatory here. I have one concern here, and that’s the one bolt holding the assembly up to the existing bracket for the heater. I’ll keep an eye on that, and modify if needed. One 5/16[SUP]th[/SUP] bolt should be plenty to hold the weight, and I used a nylock nut and washered it appropriately. We’ll see.
The filter mount has all the labels for flow on it, so I plumbed that following those. I needed about 4 feet of heater hose to connect the filter to the valves. I did do something a bit unorthodox here, and put the valves for the filter on the block instead of at the filter. “Normal” thinking with the valves by the filter is changes with little to no fluid loss. My thinking was that I’d risk a few ounces of dribbling antifreeze in exchange for the ability to shut off and isolate a failed hose or filter.
I then refilled the radiator after checking all my valves and filter for tightness. I used the bleeder on the heater core to get air out. I’ll let it sit overnight, and take it for a spin tomorrow to get everything up to temp and see if it will take any more fluid or has any leaks. I did put the cord on the heater and loosely tied the cord up, I’m still working on where I want to keep that. On my tractor I cut the prongs off of a 3 prong outlet adapter and mounted that so I could plug the male end of the cord in when it wasn’t in use, and that is working pretty well.
All and all, it was pretty easy. The valves might have been easier with some crow’s foot wrenches, maybe. The filter should clean up any bad stuff in the coolant and help keep my coolant in shape chemical wise. I still have the ability to shut off the heater core in the summer, and now I can plug my truck in to go drift busting in the winter.
I wish I could remember the other thread about the block heater to give credit, maybe I’ll edit this post or add another with all the links to the stuff on Amazon and a link to the threads that inspired me. Also, I wasn't really sure which 5-ton forum this belonged in, I wouldn't really call it hot-rodding but it's not factory equipment either. I hope it is in the right spot and helps someone out.
I decided that I wanted to use the same taps that the heater used early on, and that is what my parts list is for. I do think that you can use the two other taps that are in the block in the pictures, but I was unsure. They certainly appear to go into the same areas, but since it hadn't been covered and I could find the specifics I played it safe. The down side to doing it the way I did is probably flow, since you're sharing the same 1/2" ports for 2 3/8ths" valves on the supply and return side. I guess the long term on that will have to wait for the long term.
The ports at both ends are 1/2" as mentioned, both of mine had been reduced with a 1/2" x 3/8th's" bushing to accept the heater shut off valves. The supply side is out the side of the block, and the return is into the volute of the water pump.
Step one is to get enough drain pans to catch all your coolant. Then using the petcock on the bottom of the radiator and taking the cap off the tank, drain the system. After the draining is done, start taking stuff apart. For the block heater, drive the frost plug in above the starter with a screwdriver or similar, hitting that with a hammer. This is made easier if you pull the lines for the heater off the block and get them out of your way to swing, if you aren't doing the coolant filter you might want to skip that, but it's just a couple hose clamps. I left the hoses connected to the heater core end the whole time.
While the frost plug was out, I then unscrewed the valve in the side of the block. Mine was oriented in a bad way to get a wrench on it, and I had to cut the spigot off because I didn't have an appropriate crow's foot and I am an impatient neanderthal. The one in the block then screwed out with the valve and bushing all at once. I replaced the bushing with a new one, and also added a "street tee", as pictured. You may be able to find one with a male 1/2" connection (I couldn't), but I really think the bushing is an asset as it gives you space away from the block to spin the valves in after you screw the tee in.
The valve on the water pump was a little easier, I didn't destroy it and was able to reuse it. I took the alternator loose at the bottom, and removed the belt and the two top bolts. With it tilted out of the way I could get a wrench on that from the top and thread it out. Because of the shape of the pump here, I needed the street tee again, a stand off or short brass nipple, and the same 1/2" to 3/8ths bushing into the pump. I put teflon pipe sealant on everything threaded. I put both the valves in the water pump tee right away, and went back block heater.
I left the heater and coolant filter fittings off while I did the actual heater install, just for the room to get my hands in there. The heater I used was a Katz 1000watt, it looks like the one in the other thread on this, too. The heating element needs to be parallel with the crank, for lack of a better way to describe it. It can be facing forward or aft, I faced mine forward. The instructions that come with the heater are easy to understand, and this has been covered but I’ll answer questions if they come up. I took the cord off while installing it and left it off until very last because it would have got in the way putting the valves in for the coolant filter and heater. The biggest thing about the block heater is the frost plug hole is going to be cruddy with sealant and paint, the other thread had me ready for this. I got a 2” Dewalt 150 grit flap wheel for my die grinder that you can see in the picture, and it worked like a charm for cleaning that up. I think it took longer to put it in the die grinder than it did to make the hole perfectly smooth.
With the heater in per instructions and secured, I finished up the valve install on the side of the block. With the valves all in and orientated where I wanted, I went ahead and mounted the filter kit. The Wix box on the left is the filter kit number, the box on the right is the filter I chose. That filter number has the chemicals added, look into that topic and decide if you want the filter with or without.
I piggybacked on the NHC250 install instructions when I chose my location, I did a little mocking up to make sure I could get the inner fender in and out, get to the dipstick, etc. Then I drilled a piece of angle iron to hold the filter and installed that as shown. Pretty self explanatory here. I have one concern here, and that’s the one bolt holding the assembly up to the existing bracket for the heater. I’ll keep an eye on that, and modify if needed. One 5/16[SUP]th[/SUP] bolt should be plenty to hold the weight, and I used a nylock nut and washered it appropriately. We’ll see.
The filter mount has all the labels for flow on it, so I plumbed that following those. I needed about 4 feet of heater hose to connect the filter to the valves. I did do something a bit unorthodox here, and put the valves for the filter on the block instead of at the filter. “Normal” thinking with the valves by the filter is changes with little to no fluid loss. My thinking was that I’d risk a few ounces of dribbling antifreeze in exchange for the ability to shut off and isolate a failed hose or filter.
I then refilled the radiator after checking all my valves and filter for tightness. I used the bleeder on the heater core to get air out. I’ll let it sit overnight, and take it for a spin tomorrow to get everything up to temp and see if it will take any more fluid or has any leaks. I did put the cord on the heater and loosely tied the cord up, I’m still working on where I want to keep that. On my tractor I cut the prongs off of a 3 prong outlet adapter and mounted that so I could plug the male end of the cord in when it wasn’t in use, and that is working pretty well.
All and all, it was pretty easy. The valves might have been easier with some crow’s foot wrenches, maybe. The filter should clean up any bad stuff in the coolant and help keep my coolant in shape chemical wise. I still have the ability to shut off the heater core in the summer, and now I can plug my truck in to go drift busting in the winter.
I wish I could remember the other thread about the block heater to give credit, maybe I’ll edit this post or add another with all the links to the stuff on Amazon and a link to the threads that inspired me. Also, I wasn't really sure which 5-ton forum this belonged in, I wouldn't really call it hot-rodding but it's not factory equipment either. I hope it is in the right spot and helps someone out.
Attachments
-
 47.4 KB Views: 279
 -
 77.1 KB Views: 284
 -
 53.7 KB Views: 303
 -
 52.1 KB Views: 290
 -
 56.4 KB Views: 282
 -
 64.6 KB Views: 283
 -
 83.9 KB Views: 285
 -
 54.3 KB Views: 321
 -
 61 KB Views: 379
 -
 64.8 KB Views: 314


