• Steel Soldiers now has a few new forums, read more about it at: New Munitions Forums!

  • Microsoft MSN, Live, Hotmail, Outlook email users may not be receiving emails. We are working to resolve this issue. Please add support@steelsoldiers.com to your trusted contacts.


Amateur hour rebuild / restore on a budget

joshuak

Active member
747
214
43
Location
Slower shore, DE
Cordial greetings moderators, fellow members and guests. I humbly present for your viewing pleasure,frustration,whatever, how I am embracing my recently acquired MV addiction. I acquired it unknowingly when I purchased an M1009, with the intention of using alternative fuel, but what I've discovered is so much more than that. The fun I've had this past 3/4 of year with my vehicle can only be understood by fellow enthusiast. It been a blast and I would like to share.
I come from a general labor, Environmental Engineering, current WWTP operator back ground. Not much to choose from for this particular endeavor, most of the work displayed was learned on the fly, excuse what some may consider, not proper technique. All I can say is: I'm getting her done.
Here is the willing patient, on the way home from recovery, about 6 hours away from home. So glad I did not turn her off or she turned off be herself, I would have been in a pickle, PO used a heavy duty charger to start and my recovery equipment consisted of tire changing equipment located in my wife’s Yaris (support vehicle). Didn't think about it at the time, somewhat irresponsible. Legal documents: bill of sale and insurance, at least I had that going for me.
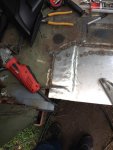
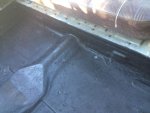
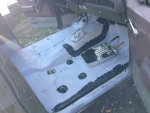
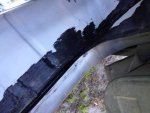
IMG_0180.jpg
 

joshuak

Active member
747
214
43
Location
Slower shore, DE
First order of business was to sand, convert rust, prime and paint the hood. I had not decided on camo or OD yet so I went with flat
black. I used rattle can Rust-Oleum products, the rust conversion was with their Rust Reformer black. Next on the list, was paint the wheels flat black after wire brushing, sanding, cleaning and taping off the tires.

IMG_0193.jpgIMG_0205.jpg
 

joshuak

Active member
747
214
43
Location
Slower shore, DE
Fact the matter was the camouflage was looking a little rough so I decided to go ahead and give the whole ride a rattle can special. Consisted of hand
sanding with 100 grit, cleaning / de greasing and painting, three coats. I chose a non reflective dark green. I am happy with the color but not so
much so with the quality of the paint. Look forward to color matching with Behr paint. My nephew approves .

IMG_0210.jpgIMG_0241.jpg
 

joshuak

Active member
747
214
43
Location
Slower shore, DE
Next order of business was fix the rot inside the cab floor pan and rocker panels, Passenger side first. I ordered replacements from LMC. Having no experience what so ever with this sort of activity, it took me awhile to decide on what method I was going try, either welding or seam sealer. I decided to go the welding route. For two reasons, one I wanted to learn how to weld and two the price of the application gun for the 3M, Lord Fuser, type sealers through me off. Fortunately I was able to borrow a 120v mig welder from work
for a weekend at a time. So, I started by removing rot, trying to leave straight edges.

IMG_0266.jpgIMG_0267.jpgIMG_0268.jpg
 

joshuak

Active member
747
214
43
Location
Slower shore, DE
I wish I could report that all my cuts lined up just right, with a nickel width separation and I tack welded every two inches apart all
along and repeated until I closed in the spaces. Half way through the process I had something like this:

IMG_0275.jpg

But no, reality is: I su@#ed at measuring twice and cutting once; I only got a little better as the project moved on. Definitely gotta
work on that.
IMG_0278.jpg

... And if I can’t laugh at myself, who can I laugh at. Space between replacement panel and original metal. No problem, I’ll filler in.
IMG_0280.jpg

I read somewhere only that coat hanger wire can be used as heat receptor when doing lap welds in order to avoid burn through. So
I thought to myself why not. Folks, I ended up welding and grinding and then welding and grinding some more. The finished product
withstood several attempts to hammer it apart, so I decided to roll with it. Not proud, but not ashamed.

Note to self: protect the area around you from the grinding sparks. My windows have little specks of metal or stone embedded in
them. Fortunately I figured this out before I started grinding away on the drivers side, so I did protect the fuse box and assorted
electronics.
 

max bowtie

Member
76
0
6
Location
Mount Airy, MD
Nice to see you getting her up to speed. I just got a M1009 a month ago and I absolutely love it! I've been running the wheels off it haha. Let me know if you ever come up towards Frederick, MD
 

joshuak

Active member
747
214
43
Location
Slower shore, DE
I chose to buy some 14 gauge steel at one of the local big box stores as opposed to buying the rear floor panels. I bent it as best I
could on the ground using ball point hammer and a couple 2x4’s as an anvil. It worked. Installed the piece and ended up with this:

IMG_0283.jpg
As I advanced with the metal work I applied primer, started using self etching, but stopped do to concerns about the next layer of paint (whatever) not adhering well. Being able to fix the corner rot put a humble smile on my face. What can I say: I’m easily amused.
IMG_0294.jpgIMG_0298.jpg
 

Attachments

joshuak

Active member
747
214
43
Location
Slower shore, DE
When I finished welding in the last piece, I wire brushed everything, converted the surface rust with phosphoric acid, cleaned then
primed.

I would like to make an emphasis of my good experience with phosphoric acid.

The following sequence of pictures corresponds to the area where the driver places his heel when having a foot on the gas pedal. To
prep the surface, I used a wire brush to remove the larger rust scales, then I applied a copious amount of the stuff and let it start
converting all those non-believing iron oxides into something I could remove somewhat easily; the conversion is:
phosphoric acid + Iron (III) Oxide = ferric phosphate, salt and water.

The instructions said to leave it soaking for 24 hr. then remove excess. I found best results when I removed the shiny black stuff as
it formed, exposing a new layer of surface rust to be converted and once converted, removed again, repeat until your happy or the
rust disappears, there’s no pleasing some folks :). First picture is the phosphoric acid converting at the liquid-solid interface. Second picture: removed the layer of ferric phosphate that formed after 2-4 hrs. Third and fourth picture same idea.

IMG_0297.jpgIMG_0303.jpgIMG_0315.jpgIMG_0320.jpg
 

joshuak

Active member
747
214
43
Location
Slower shore, DE
Drivers side floor panel and rocker panels required major surgery, I was hoping I would only have to take the door off, but no such luck, so off came the fender as well.
IMG_0312.jpgIMG_0315.jpgIMG_0316.jpgIMG_0318.jpg
 

joshuak

Active member
747
214
43
Location
Slower shore, DE
Repairs started, again worked much harder than I needed to. Still working on that whole measure twice cut once thing. Not hard
enough unfortunately. I measured I cut I placed half an inch short I mean really, again? Cheapskate in me said lets roll.

IMG_0329.jpgIMG_0331.jpgIMG_0332.jpgIMG_0334.jpgIMG_0335.jpg
 

joshuak

Active member
747
214
43
Location
Slower shore, DE
When I got done having fun with the phosphoric acid, I cleaned, primed, seam sealed, primed and got ready for applying a DIY bed
liner of sorts. It was funny, I made up my mind as to what bed liner I was going to use as many times as there are products out there. I ended up purchasing Duplicolor Bed Armor. I only used half the recommended amount (penny pincher), applied in three coatss. I’m quite happy with the results and it was easy to apply. I look forward to the start of next painting season, I will apply some more, hopefully by then I will have decided on a solution for floor mats.
IMG_0325.jpgIMG_0345.jpgIMG_0344.jpgIMG_0341.jpgIMG_0332.jpgIMG_0330.jpgIMG_0329.jpg
 

Attachments

joshuak

Active member
747
214
43
Location
Slower shore, DE
After troubleshooting through a not want to start episode with a healthy dose of TM-20, -34 and Steel Soldiers. I ended up with something like this:

IMG_0374.jpg


On the left hand side, before my petcock, yes I said it, you will notice a Mercedes Benz hand primer (10 bucks NAPA). I had high
hopes for that sucker: as in being able to prime the system (including filter), LOL@myself. I still think it has a place, just not there.
Maybe, place the hand primer between the intake hose and the filter base. Manually fill the filter, prime the intake hose to the filter,
then let IP prime the rest of the way after removing pink wire. Not sure, I’ll figure it out eventually or not.
 

joshuak

Active member
747
214
43
Location
Slower shore, DE
I wanted to share a picture with you of a swollen glow plug tip. It was to wide to fit through the opening and too long to be pushed
back into the pre combustion chamber. I read somewhere that you can put rope around it (inside the P.C. chamber) and snap it off. No
dice. DH, recommended starting it and letting blow itself out, I could not get a snug enough fit. I ended up banging on it with a nail
(tip cut off) until it bent enough to fit in the P.C. chamber and extracted it from there.
Besides fixing the issue and learning a little bit more, this activity was noteworthy because the Mrs. got involved. Her small fingers fit
really well and proved to be a great help. Her first mechanical adventure was a success , opening up the possibility of future
adventures. This, Christmas we are going to buy a plastic model engine, 6.2 Detroit Diesel if I can find it, and put it together together...
(I think that’s correct). Maybe next year she won’t mind if we get a multi fuel engine to continue practicing, attached to a M900 series
[thumbzup]. Probably not, but a fellow can dream, ‘till she says otherwise. Also, our other family member enjoying a ride in the ‘09.
IMG_0381.jpgIMG_0403.jpg
 

joshuak

Active member
747
214
43
Location
Slower shore, DE
Any way folks to wrap this up, I wanted to share with you a couple 2404 forms, as per the TM -10, -20 inspection upon receipt. Glad I
didn’t know about this procedure before hand, because my vehicle was definitely not mission capable. Some may argue it isn’t now,
LOL. I consider it my to do list, along with anything that pops up or breaks down.

View attachment 2404-10.pdfView attachment 2404-20.pdf

Last but not least, I thank each one of the contributing members of this site because, the only reason I have been able to enjoy my
MV is because of you guys and the little or big piece of the puzzle you have given me at the appropriate time. Whether it was intel,
humor, a kick in the butt to read the TM’s, shared experiences, etc. I have found a lot here, thanks people.
 

eme411

Member
Steel Soldiers Supporter
275
3
18
Location
pefferlaw ontario
looks like everything is going in the proper direction, your measurement issue may have been the body spreading after you cut the rocker out and not having a brace from the door hinge mounts to the striker to keep it from opening up, keep working , your getting there, get the TM's and read them , and keep the truck original , that way the books will always help,
 
Top
AdBlock Detected

We get it, advertisements are annoying!

Sure, ad-blocking software does a great job at blocking ads, but it also blocks useful features of our website like our supporting vendors. Their ads help keep Steel Soldiers going. Please consider disabling your ad blockers for the site. Thanks!

I've Disabled AdBlock
No Thanks