• Steel Soldiers now has a few new forums, read more about it at: New Munitions Forums!

  • Microsoft MSN, Live, Hotmail, Outlook email users may not be receiving emails. We are working to resolve this issue. Please add support@steelsoldiers.com to your trusted contacts.

5-Ton Power Steering Assist Cylinder rebuild

Alexsha

New member
318
3
0
Location
Cache Valley, UT
Like some, I recently found the power steering ram on the passenger side of the front axle of my M923A2 to be leaking. Time for a project!

IMG_20150330_091035.jpgIMG_20150330_091011.jpg

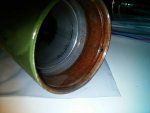
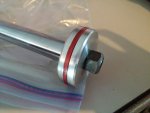
Here's why my seals failed:
IMG_20150330_091046.jpg
CARC paint is fairly abrasive. Having the seals rub on it just tore them up. Do yourself a favor and make sure the piston rod is clean all the way to the threads.

So when you have a nice rusty fluid coming out of the cylinder, you've got bad seals on the gland. You can get a kit on eBay for $50 that includes all the seals in the cylinder. "M939 Power Steering Cylinder Seal Repair Kit" should get you there.

NSN 5330-01-143-6486
PN: SK000164

You will also need replacement access covers and felt pads for the stud sockets.

Access Cover
NSN 5340-00-409-8936

Felt Pad
NSN 5330-01-089-3073

TM reference for removal and installation:
TM 9-2320-272-23-3 pg 0510-1

TM parts reference
TM 9-2320-272-24P-2 pg 0339-1

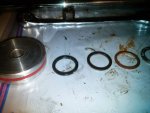
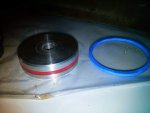
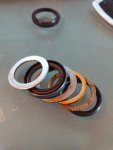
Here's all the parts in the seal kit:
IMG_20150402_160956.jpg

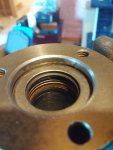
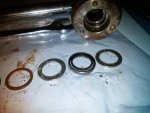
Here you can see the stud sockets with access covers in place (felt pads are under the access covers and help keep the grease in)
IMG_20150330_091015.jpgIMG_20150330_091112.jpg

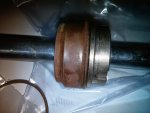
Remove cotter pins, loosen the end plugs and pull that sucker off. (You can see the felt pad in the 2nd picture)
IMG_20150330_091057.jpgIMG_20150330_093449.jpg

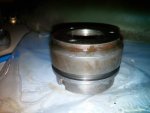
When you pull the hoses you get this lovely stuff:
IMG_20150330_100636.jpg
 

Attachments

Alexsha

New member
318
3
0
Location
Cache Valley, UT
I didn't take too many pictures at this point as I was covered in hydraulic fluid. It could have been motor oil though. Not sure. I'll need to do a full drain and refill soon. Plus replace the filter.

Anyhow, remove the socket from the piston rod AND TAKE A PICTURE OR MARK WHERE IT WAS THREADED TO FOR THE LOVE OF GOD.

Pulling the gland will probably be the hardest part. Mine was partly rusted in place. You can see here:
IMG_20150402_161009.jpgIMG_20150402_161036.jpg

To pull the gland, remove the 3 bolts from the end cap. You will get 2 plates and a plastic wiper ring off. My wiper ring was in pieces and just fell out. Once the plates are off you will see the gland. Put a punch in the small hole on the outside edge of the cylinder. This will allow you to pop out the split retaining ring that holds the gland in place. The gland is not threaded so you have to just pull it out. Rust is your enemy here. I would recommend putting the old bolts back into the holes in the gland and using them to help pull the gland out. I ended up having to use the piston as a ram, pulling up sharply on the piston rod.

There are 2 seals on the outside of the gland. An o-ring and a gasket. I ended up using wire wheel to clean the rust off the gland and from the cylinder wall. The wire wheels are find on the gland. I would recommend a flap wheel for the cylinder though. The steel doesn't seem to be as hard there as on the gland.

After some cleanup:
IMG_20150402_165245.jpg

The internal gland seals and their order (o-ring in 1st. Order is VERY important):
IMG_20150402_170100.jpgIMG_20150402_170231.jpg

Not pictured: there is a split ring retainer that goes in last to hold all the seals in.

Here's the old seals. CARC really messes them up:
IMG_20150402_163232.jpgIMG_20150402_163226.jpg

You also get a new piston wiper ring (there's a smaller o-ring under the wiper that gets replaced as well):
IMG_20150402_161023.jpgIMG_20150402_170922.jpg

Replacing the wiper ring was a real pain. Put the new ring in a pot of boiling water for a few minutes then quickly pull it out, set it in the groove and carefully work it around the piston. It takes time, but if you're careful it won't break or permanently deform. MAKE SURE TO PUT THE NEW o-RING IN FIRST.

At this point you just reassemble and put the cylinder back in place. Put the piston rod socket back to the same location as it was originally and you shouldn't have to do a travel adjustment, but you probably should anyway.

I'm considering putting some heavy grease in the space around d the gland where the retaining ring goes to prevent any water from getting in. A little added protection shouldn't hurt.

Re-installation and Travel adjustment:
Jack up the front axle and put it on jack stands so the wheels can turn. Turn the steering wheel full right and left many times. This will fill the cylinder and bleed out the air. Make sure to keep adding fluid to the reservoir. Once full of fluid and there's no air left you can top off the fluid then do the travel adjustment.

From TM 9-2320-272-23-3 pg 510-7: "To check for proper travel adjustment, measure the distance from center of ball stud to centerof ball stud for a distance of 25.50 in. (64.8 cm). If adjustment is incorrect, the front wheels
must be raised prior to performing the following steps."

This is a bit tough because the cylinder is covering the studs. What you're adjusting here is the cylinder so that at full right or full left you're not bottoming out the piston and losing turning radius. It's been snowing here so I haven't finished this, but I'm doing a little extra: By hand I'm pushing the wheel to max right and max left and marking on the axle what those limits are. Then with the engine on, use the steering wheel to go max right and max left to see if I've lost any turning. Adjust as needed.

I hope this helps someone.
 
Last edited:

WYomer

New member
118
2
0
Location
Wyoming
I've rebuild cylinders before and honing the cylinder walls is a recommended step. I'd drain, run a dowel in there with a rag to get most of it out, then use a three sided hone on the cylinder walls. Spray out with brake cleaner, lube and then reassemble.

This will take out any rough spots or wear area from when the piston seals failed and add microgrooves that hold lubrication extending glad seal life.
 

BKubu

Well-known member
Steel Soldiers Supporter
4,728
1,101
113
Location
Gaithersburg, MD
I once had the same problem with a leaking power steering assist cylinder. I don't recall the overspray issue so the cause may have been different. In my case, I had a truck that was being used in an Army mechanic's school that had like 125 miles on it when I got it (verified by CARNAC back in the day). Anyway, after having it for a little while, the cylinder started to leak. I added Lucas power steering fluid for leaks and, after a few bottles (yes, it took that long), the problem went away and never came back even years later. I suspect the rubber seals had dried out and the Lucas regenerated them. For others experiencing a similar problem not caused by an erosion of the rubber seal as experienced by the OP, I'd suggest trying Lucas.
 
Top
AdBlock Detected

We get it, advertisements are annoying!

Sure, ad-blocking software does a great job at blocking ads, but it also blocks useful features of our website like our supporting vendors. Their ads help keep Steel Soldiers going. Please consider disabling your ad blockers for the site. Thanks!

I've Disabled AdBlock
No Thanks