• Steel Soldiers now has a few new forums, read more about it at: New Munitions Forums!

  • Microsoft MSN, Live, Hotmail, Outlook email users may not be receiving emails. We are working to resolve this issue. Please add support@steelsoldiers.com to your trusted contacts.


Mounting a Craig box on a 923-a2

TCD

Member
119
7
18
Location
Mound.House, NV
Howdy,

This is a slow project that I will update as significant milestones are met.

I am mounting a Air Force Craig box (rough external dimensions are 8'w x 12'l x 87"h) on the bed of my 923-a2 as the base for a camper suitable for the South Western United States. Yes it is tall at slightly over 12 feet however I have friends with similar rigs who find the height manageable.

The Craig box is 100% aluminum and the bed of the truck settles less than an one inch when the box is set on it.

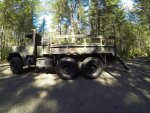
I started by removing the bed sides and setting the box on the bed for the first fit.

Truck-Box-Sideview-org-a.jpg


Because of the permanent front section of the bed the box just fits flush with the back of the bed. At first I thought I would use the front space for storage of propane bottles etc.


Truck-Box-Sideview-org-c.jpg

923-Bed-before-a.jpg


However I decided that I wanted to move the box forward because a) I wanted a back deck space, b) I wanted to keep the functioning of the tailgate and c) I felt the esthetics's and balance of the load looked better with the box forward.


So I cut off the front upper part of the bed which was not a trivial task!


923-Bed-after-a.jpg


Here is the box on the next test fitting:


Truck-Box-Sideview-new-a.jpgTruck-Box-Sideview-new-b.jpgTruck-Box-Sideview-new-c.jpgTruck-Box-Sideview-new-d.jpgTruck-Box-Sideview-new-e.jpg


Personally I like this fit much better!


Next I will finish the trim job on the front of the bed and start making the box to bed mounts. I am going to do something similar to the bed to frame mount of the 923 and the shop box mount on the Deuce so there is less flex stress on the box and hopefully I will not change the flex built into the bed by the original design.


I also did the tailgate mod posted by “TwistedOaks” at http://www.steelsoldiers.com/showth...e-lift-assist-using-spring-hinges-with-photos! This was an easy and great mod! Thanks TwistedOaks!

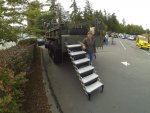
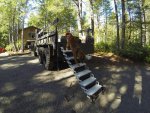
I am also spending a lot of time thinking about a gangway design that will allow my old Golden Retriever easy in/out access as he and I need to avoid steep stairs...

All thought and comments Greatly Appreciated!

Happy Tails,
tom n tyler
 

Karl kostman

Well-known member
Steel Soldiers Supporter
2,283
836
113
Location
Fargo ND
TCD that box looks great on the 939, how did you fasten the box to the bed? If your going to be doing much off road with this rig you might consider putting the sides back on the bed for extra support holding the box in place, of course depending on how you fastened it to the bed? It looks great so far!
Karl
 

TCD

Member
119
7
18
Location
Mound.House, NV
TCD that box looks great on the 939, how did you fasten the box to the bed? If your going to be doing much off road with this rig you might consider putting the sides back on the bed for extra support holding the box in place, of course depending on how you fastened it to the bed? It looks great so far!
Karl
Hi Karl,

I am working on the mounting system now and I will provide a detailed description and pictures in a few weeks when it is done. Here are my thoughts so far...

For the front mounts there will be two pieces of 3x3x3/8"(?) right angle steel bolted to the front of the bed at the width of the frame (with reinforcing plates behind the bed face) and two corresponding pieces bolted to the box's lower frame beam. Each bracket will have matching holes. I will then use two 939 front bed spring sets (both inner and outer springs) mounted as the springs are on the bed to frame connections with adjustable through-bolts.

For the back mounts I will attach one 3x3x3/8" right angle steel bracket to the box's lower frame beam corresponding to the width of the door. Then two holes will be drilled down through the bed, reinforcing brackets installed underneath and two Deuce bed spring will be mounted as the springs are on the bed to frame connections with adjustable through-bolts.

The sides will not fit on the bed with the box mounted. I am considering removing the four outside bolts that hold on the corner eyes and making plates that will bolt on using the bolts, The four side plates would extend down past the bed and stop the box from shifting sideways in the event of a catastrophic failure. I also need to fab tailgate latching points to secure the tailgate in a closed position.

Thanks for the comments and interest!

Happy Tails,
tom n tyler

Corner-Detail.jpg
 

TCD

Member
119
7
18
Location
Mound.House, NV
The box has been mounted and tested.

Howdy,

I have finished mounting the Craig box on to my 923-a2 and the setup has had limited off-road testing to-date. The spring setup has articulated as I hoped so I will be doing more on and off-road testing.

My mounting philosophy was to reduce stress on the box by allowing the bed and box to flex independently to a certain extent. I also followed the original bed mounting design of spring mounting the front and hard bolting the rear of the box.

A note about the springs I used. The springs used on the front of the 923 cargo bed required 100 PSI to collapse the first inch and 380-400 PSI to completely coil-bind the spring. The shorter and larger diameter springs used to mount a van body on a Deuce required 100 PSI to collapse the first inch and 400-440 PSI to completely coil-bind the spring. The shorter spring obviously provides less movement before coil-binding but also less side-loading on the spring and through bolt. I decided to use the 923 spring because it best fit the area under the bed where I wanted to put it. I plan on mounting several items in front of the box so the space will not be wasted.

I didn't provide any ""build" photos as the brackets are a very straight forward design. The angle iron is .250 x 3 steel and the brackets are all ten inches long. The extra lower holes in the front brackets (a total of five holes which you cannot see in the photos) are to allow for adding additional springs or hard bolting the front down if further testing warrants testing these ideas. I used 9/16" x 2" grade eight bolts to mount the brackets to the box and 9/16" x 1.5" grade eight bolts to bolt down the back of the box. I used the original bolts to mount the front springs.

Here is my first test setup (in typical conditions for me):

BoxMount-Bed-Test-1.jpg

Here are a few pictures of the front bracket setup:

BoxMount-Bed-FrontLower-1.jpgBoxMount-Bed-FrontUpper-1.jpgBoxMount-Bed-Front-1.jpg

Here are a few pictures of the rear bracket setup:

BoxMount-Bed-Rear-2.jpgBoxMount-Bed-Rear-1.jpg

Here is are a few pictures of the flex in the bed and box mounts:

BoxMount-Bed-gap-1.jpgBoxMount-Bed-gap-2.jpg

Next I will build a set of stops to hold the tailgate level with the bed when it is down to provide a small deck area. Then I will build a gangway paralleling the truck on the passenger side that goes from the "deck" forward providing a comfortable entrance to the box (approximately 10' long providing a 2:1 slope). I'm thinking of a gangway design that folds up and attaches to the side of the Craig box for easy deployment and storage. I am going to try to use PSP mat for the gangway.

All comments and constructive criticism Greatly Appreciated!

Happy Tails,
tom n tyler
 
Last edited:

CPDOG

Member
74
24
8
Location
SEABECK WASHINGTON
TCD

good morning from Seabeck WA.
your box mod is coming along nicely.
you mentioned looking for ideas concerning the stairs or a ladder at the rear of you truck.
my wife and I have an Alaskan camper we install and we just added a stair assembly to our truck that was made and designed not only for humans but our 4 legged friends too.
the company is called torklift, the sell camper, 4x4 etc gear. I am attaching pics and I have posted pics on the members ride section under "stairs/ladder on pour 5 ton crazy dog".

good luck with that camper mod too!

V/r
Columbus and Chris Partin
 

Attachments

TCD

Member
119
7
18
Location
Mound.House, NV
Howdy CPDOG,

I really like your stairs!

I have been working on a ramp/stair design where the ramp will parallel the truck bed and connect to the tailgate when it is down in it's level to the bed position (making a small deck). I am working on this design because I need a pretty long ramp for my Golden and I want to have something that will not project out behind the truck. I am sourcing the material right now and I will post some build pictures once the basic fabrication is complete.

Thanks for the comments!

Happy Tails,
tom n tyler
 

CPDOG

Member
74
24
8
Location
SEABECK WASHINGTON
TCD

hi bro.
the things we do for our furry buddies..huh??? ha-ha
please keep up on the pics too.

PS
we even put in a dog door on our cab...ha-ha. your little friend would love this ....

V/r
cpdog


GOPR0943.jpgGOPR0942.jpg
 

TCD

Member
119
7
18
Location
Mound.House, NV
TCD hi bro. the things we do for our furry buddies..huh??? ha-ha please keep up on the pics too. PS we even put in a dog door on our cab...ha-ha. your little friend would love this .... V/r cpdog View attachment 652904View attachment 652905
Wow your cab interior is so nice! I'm afraid that my truck interior is still decorated in a patina of quality military rust...

My Golden weighs in at a svelte 90 pounds and to lift him five feet is a little taxing on both of us!

Tylerin5Ton-a.jpg

So I'm also planning on building a folding ramp/stair system for the him on the passenger side of the cab. I'm also working on a swingout solid platform incorporated into the back of the passenger seat that could be folded up if I had a human passenger (an uncommon event). My Golden would be pretty disappointed not to have his head out a window and he's a little big for your nice bucket seats as he hardly fits on the passenger seat bottom cushion..

I have been thinking about a dog door in the box door and one between the cab and the box but that is a long ways off...

You mention in your other post that your stairs can adjust for different terrain and extend into almost a ramp if I understand correctly. Can you give me an idea of what your stairs cost? I'm thinking I need seven steps for my back assembly and I have noticed that several vendors also allow you to design your own build. Of course being a guy with a machine shop I've been thinking that I could just build exactly what I want... So I'm a little behind in this project ;-)

Good luck with your endeavors! I'll be posting more info as I get more things done...

Happy Tails,
tom n tyler
 

CPDOG

Member
74
24
8
Location
SEABECK WASHINGTON
TCD

we love your goldie!
we completely understand the lifting of the dogs into the back too. (we got 3)

as for the stairs, the max is 6 steps but we split/made up for the extra gap by mounting the step assy a little lower up top and adding the adjustable feet at the bottom.

as for the ramp effect, due to the scissor type construction it allows you to go way out and this will slope the steps a fairly decent amount (the dogs like this better, but we have trained them for stairs, but our older Shepard needs a little push from behind due to her hips, but this whole deal is way better that hand loading all 3 of them!!!). now for human traffic it can be done if you pay attention due to the steps are at a steeper angle vice being almost flat. but in our case they are almost never flat due to we don't park/camp in normal groomed campsites, our campsites are "something cool we seen and hey we want to stay here type sites!!!! ha-ha".

lastly you asked about cost, the whole setup as you see it here is about 500. of note this thing stays attached and when the gate folds up you can barely see it , with the feet on it you can see each foot sticking out but not much... it has a foldup handle assy that you can buy too. (we have this coming due to the company is giving to us free for a customer evaluation). if you like I can send pics when we get it mounted.


you deck idea is cool too. we only got a 10' camper just so we could have the 4' deck (I call it the teeke-teeke bar area..ha-ha) too plus more if we lowered the tailgate flat out.
as far as the door access is concerned we added a single motorcycle ramp here with good success (dogs use the crap out of) it was the type that had 4" wide strip with only 1/2' gaps in-between and the dogs didn't fall thru. it was one piece folder type with a slight arch in it. this one went to the door. and I used it too for removing batteries out of the cab. (just an idea)


good luck bro!
and keep the pics coming
and I wish I had your machine shop too!!!!!!!!!
V/r
CPDOG


DSCF0489.jpg
 

TCD

Member
119
7
18
Location
Mound.House, NV
Howdy CPDOG,

It looks like you have no problem with willing travel companions ;-)

First I'm going to build the small stairs for the passenger side of the cab to see if my design adaptation will work. If everything works out I'll tackle the longer set. It looks like I will need to have as many as ten steps for the back as I want to only have a 6" rise between steps...

Tyler let's me chauffeur him around from time to time in our other fun ride:

Tyler-2-small.jpg

So I expect a military trailer is also in our future and that is another reason I want the steps to go down the side of the truck.

I'm also working on the adjustable stop for the setting the tailgate in the down level position while still allowing the tailgate to close in the vertical position. I have found over my years of desert camping that a catch-all where I can toss fire wood during the day makes for a nice evening camp fire.

Hopefully I'll have some pictures of the cab steps and tailgate stops by the end of the month...

Happy Tails!
tom n tyler
 

CPDOG

Member
74
24
8
Location
SEABECK WASHINGTON
TCD

hello again!
your Goldie gets cuter every time we see him....ha-ha

adding a trailer adds a bunch of possibilities in the camping world.
we did the military campout in Chehalis WA last year and a lady there has a bike like yours and she took us for a ride...what fun.

concerning the tailgate thing you are working on, I am interested in your ideas on that , if you don't mind could/would you post some pics and ideas back on here for us to see?

V/r
CPDOG
 

TCD

Member
119
7
18
Location
Mound.House, NV
Howdy CPDOG,

For our summer trips the trailer can also carry gas, extra water and supplies to extend our desert travel.

Yup I'll post the design specs and pictures once I have built tailgate stops and know they will work.

tom n tyler
 

exssdru

New member
15
1
3
Location
Kalispell, MT
Very interesting to watch this project. I have a 83' 925A1 that I want to build a camper/toy hauler out of. I need the rear doors to be double-doors so I can get a quad in and out of it. I had not even thought of the necessity to make the camper articulate like you are doing, I would have thought that any articulation that needed to happen was happening below the bed. Does the bed really flex that much? If the existing bed is mounted with articulation, doesn't that keep the bed relatively flat?

I was wondering how to mount whatever I put in my truck, now I will be watching your thread to see how yours works. I too was considering an S280, but they are expensive and I would still need to make a double rear-door. I am not a fabricator guy, but it sounds kinda like a fun project to build my own shelter out of rectangular or square steel so I could build the exact dimensions I want, but building the doors to work as flawlessly as a nice S280 would be impossible. I go back and forth. Yours looks awesome and is a great inspiration for my upcoming project. Keep up the nice work!
 

TCD

Member
119
7
18
Location
Mound.House, NV
Howdy exssdru,

I am not an expert by any means and this mounting design is just my idea based on a desire to reduce stress to the box. I wanted to make sure that my box was not fighting the bed/frame flexing. So far I have had no problems as you can seen in the pictures above I am getting flexing between the frame and the truck as well as the frame and the box. I figure that any flex the springs allow reduces stress on the box. I am hoping that by reducing flexing in the box I will protect the internal construction from being damaged.

When the Craig box is placed on the bed of my truck the bed settles less than an inch (I do not have a weight yet as I have been sidelined by fuel problem). The Craig box is aluminum and there is very little impact on driving the truck off road with the box so far including some off-camber driving.

A friend has mounted several items on the back of 5 Tons including a "Van" body, a S-250 and several other enclosures. The Van body on the deuce is mounted with springs on the sides and then bolted down in the back. My design is a combination of the cargo bed and the van body system.

By far the slide-in S-280 or S-250 is the easiest but I felt that I wanted to maximize my space inside the box and I wanted to keep the weight to a minimum. The main downside to my setup (as I see it) is the height at 12'1" however my rig will be used in the Southwest deserts so height is not a big deal for me.

Here are three pictures that were taken by a friend while studying the flexing of a 5 Ton. This truck returned to normal" after several tests.

5Ton-twist-a.jpg 5Ton-twist-b.jpg 5Ton-twist-c.jpg

Right now I am working on the gangway to the back of the bed, a dog ramp on the passenger side of the cab and a tailgate stop. Unfortunately all of the camper work has been stopped while I get the truck running again. I plan on taking the box off and putting it in my shop for the winter to build out the interior.

I am by no means experienced in these matters and so I can't really validate my design for anyone else...

YMMV...

Happy Tails,
tom n tyler
 

exssdru

New member
15
1
3
Location
Kalispell, MT
Well, I would say that you have considerable experience from your own studying and trials. I am very happy you posted this, I would have never considered it. It is obvious that the bed flex is present from your pics, and I 100% agree with you that the floating/articulating mount that you have designed will reduce stress to the shelter and its internals.

I too want a gangway from the cab into the camper/shelter if it is possible when I put mine together. I was thinking that I would get rid of the wasted space where the spare tire is stored (move the spare tire to the roof or side of the shelter), and move my shelter right up next to the cab (obviously not touching the cab to allow for articulation). I would then have to design (or watch how you design, lol) a flexible and weather proof gangway from the cab to the shelter. I was thinking that if the shelter was close enough to the cab, I could rubberize the areas that I need to cut out and just use oiled canvas with enough slack in it to make a passable conduit to step through without the need for a floor or deck that would be stepped on inside the gangway.

What are your ideas on the gangway? Seeing what you have done so far, I place a lot more trust in your engineering and construction abilities than my own!
 

Nomadic

Active member
337
78
28
Location
Nevada
That is a nice camper setup you have. I like the design you came up with to keep the box from articulating less and how it was illustrated. Without the buffering of body twist, over time the box may start to leak in the rain depending on how the craig box is built.
 

TCD

Member
119
7
18
Location
Mound.House, NV
Howdy,

exssdru, I'm working on the cab gangway first as it will only be 6-7 steps and I then I will build the 12 foot version for the back. I'm planning on building both sets of steps with a 6" riser to aid my Golden and me getting up and down! Here is the current design I'm trying to replicate:

Folding-stairs-a.jpg Folding-stairs-b.jpg Folding-stairs-c.jpg

I'm planning the back gangway paralleling the passenger side of the truck and folding up and locking to the side of the box.

Nomadic, I think we are dealing with twist and I suppose that a trailer that freely rotates from the truck would only try to twist between the axles/suspension which are very close (or just one axle). I would make sure that any trailer tongue designed to freely rotate be capable of being locked when driving down the road! I really like the idea of a trailer that can be taken moderately off-road (to get the good camping spots) and then be unhooked and setup. I recently tried this with a F350 and 5th Wheel and I just could not get off-road enough...

My project has been delayed and it will only go slower as the weather get colder. I may move the box into the shop sooner than I planned. I'll try to keep this thread posted as I move along.

Happy Tails,
tom n tyler
 

CPDOG

Member
74
24
8
Location
SEABECK WASHINGTON
TCD

hello again.
I have seen the pic of what your after and it dawned on me that I have seen something like this. it was from my navy days on board the boat. our permanently mounted gangways were attached to the sides of her and they not only go up and down but also pivot about on a single pin to allow it to position itself any where in that 180 degree arc. I realize your going to be removing the ramp, but having the rotatable portion has many advantages considering how/where we park our trucks while camping.

good luck

V/r
CPDOG
 

TCD

Member
119
7
18
Location
Mound.House, NV
Howdy CPDOG,

That is exactly what I have in mind including the ramp along side of the passenger side of the truck! The passenger side door ramp (providing dog access to the cab) may be removable.

Thanks for your thoughts.

Tom
 

exssdru

New member
15
1
3
Location
Kalispell, MT
I saw this truck for sale on another website. I want to have my cab connected to the camper/shelter like this, but I don't want to keep the two from being able to articulate. I would be interested to know how or if they fused the cab and bed on this thing? I would think it should be possible to have a flexible connection between the two. Either way, the exterior represents about what I want to build. Ad some double doors or roll-up door at the end for ATV & motorcycle loading/unloading, and a few beds and a kitchen....

5 ton 3.jpg5 ton 2.jpg5 ton 1.jpg
 
Top
AdBlock Detected

We get it, advertisements are annoying!

Sure, ad-blocking software does a great job at blocking ads, but it also blocks useful features of our website like our supporting vendors. Their ads help keep Steel Soldiers going. Please consider disabling your ad blockers for the site. Thanks!

I've Disabled AdBlock
No Thanks