


Barrman
Well-known member
- 5,179
- 1,609
- 113
- Location
- Giddings, Texas
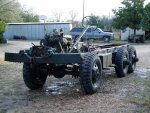
It seems there are at least a dozen people on here besides myself pulling a M35 apart down to the frame right now or are thinking about it. I painted my replacement cab a few days ago and pulled the original cab off Friday. I figured a few pictures and suggestions might help those of you still to do this.
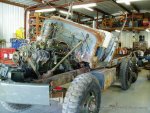
I have been told repeatedly to leave the steering column alone and pull the cab off up and back. Since my steering is great, I took that advice. But, that means what ever means used to lift the cab has to be able to move or the truck has to be moved during cab removal. I have an electric winch mounted to the roof of my metal building. I use the winch to remove and store the hardtop for my M715. It picked up my stripped down replacement cab just fine. It would not pickup my stock cab because I hadn't stripped it down to just the tub.
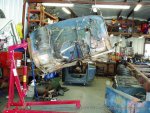
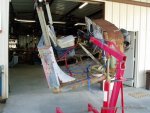
I tried an engine hoist and nylon straps. I broke 2 straps before I got them positioned so they wouldn't saw themselves in two. I can balance my replacement cab on the single hook of the hoist. I am not able to balance a cab on the single hook of the engine hoist however. I don't know why. Below are pictures of how I ended up doing it with captions.
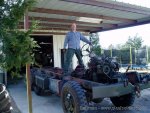
I was able to move the truck out from under the cab. But, it wasn't a controlled lift. Meaning that a cab I wanted to use again would be scratched and dented some.
You must remove the t-case shifter and the pto shifter handle otherwise the cab will not be able to go back and work its way off the steering column. They are easier to remove before you start instead of after the cab is a foot above the frame by the way. SO, pull them at the start instead of half way through like I did.
I would suggest 2 engine hoist each picking up a side of the cab or better yet, a gantry crane to anybody that is going to do this.
To sum up:
Remove all the weight you can. Seats, dash, all items on the firewall. ( left mine on so I could look at them and see how stuff was supposed to go during reasembly. I should have just taken pictures. Take all the stuff out from under the seat too. My 10 ton bottle jack was still there.)
Use two lifting sources or make some kind of spreader bar. The under floor crossmember is not a balanced point for cab lifting.
Have another adult help. One more person who could think and pick up at least 100 pounds would have helped a lot.
Remove all shifters from the start. Transmission, t-case and pto.
Once I figure out a way to get my replacement cab on without scratching, denting or dropping it I will post up with a follow up.
I have been told repeatedly to leave the steering column alone and pull the cab off up and back. Since my steering is great, I took that advice. But, that means what ever means used to lift the cab has to be able to move or the truck has to be moved during cab removal. I have an electric winch mounted to the roof of my metal building. I use the winch to remove and store the hardtop for my M715. It picked up my stripped down replacement cab just fine. It would not pickup my stock cab because I hadn't stripped it down to just the tub.
I tried an engine hoist and nylon straps. I broke 2 straps before I got them positioned so they wouldn't saw themselves in two. I can balance my replacement cab on the single hook of the hoist. I am not able to balance a cab on the single hook of the engine hoist however. I don't know why. Below are pictures of how I ended up doing it with captions.
I was able to move the truck out from under the cab. But, it wasn't a controlled lift. Meaning that a cab I wanted to use again would be scratched and dented some.
You must remove the t-case shifter and the pto shifter handle otherwise the cab will not be able to go back and work its way off the steering column. They are easier to remove before you start instead of after the cab is a foot above the frame by the way. SO, pull them at the start instead of half way through like I did.
I would suggest 2 engine hoist each picking up a side of the cab or better yet, a gantry crane to anybody that is going to do this.
To sum up:
Remove all the weight you can. Seats, dash, all items on the firewall. ( left mine on so I could look at them and see how stuff was supposed to go during reasembly. I should have just taken pictures. Take all the stuff out from under the seat too. My 10 ton bottle jack was still there.)
Use two lifting sources or make some kind of spreader bar. The under floor crossmember is not a balanced point for cab lifting.
Have another adult help. One more person who could think and pick up at least 100 pounds would have helped a lot.
Remove all shifters from the start. Transmission, t-case and pto.
Once I figure out a way to get my replacement cab on without scratching, denting or dropping it I will post up with a follow up.
Attachments
-
 80.3 KB Views: 766
 -
 73.6 KB Views: 768
 -
 80.3 KB Views: 775
 -
 85.3 KB Views: 765
 -
 74.7 KB Views: 759
")