• Steel Soldiers now has a few new forums, read more about it at: New Munitions Forums!

  • Microsoft MSN, Live, Hotmail, Outlook email users may not be receiving emails. We are working to resolve this issue. Please add support@steelsoldiers.com to your trusted contacts.


Miltrucks 4x4 Conversion

Miltrucks

Member
104
3
18
Location
Lancaster, Ohio
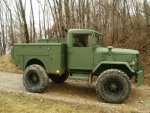
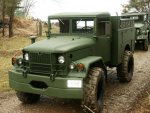
Finally posted up some pictures of the 4x4 conversion in the Photo Gallery section.

Got the wheels and tires on it today. Still a few things to finish up on it (extra lighting in the grill and in the rear), and mounting a 10KW diesel 300A welder in the rear.

Thing handles great. If anoyone is thinking about one of these conversions, it's not easy or cheap, but you get a nice product when done.


BTW - I have one complete set of front springs, hangers, mounts, shocks, etc left that I will sell - everything you need to do the conversion.
 

Attachments

wallew

Active member
Steel Soldiers Supporter
2,520
18
38
Location
San Angelo, Tx USA Planet Earth
Eric,
I FLAT LOVE the double bumper idea. I may just steal that. Talk about a 'killer' push bumper. You don't even need a tire. Just 'jump on it' type of thing.

I LOVE IT!!! GREAT JOB!! And I love the boxes on the back. Are they a stock item somewhere? Particularly the ones mounted behind the driver on top??

GREAT JOB!!

jim
 

Miltrucks

Member
104
3
18
Location
Lancaster, Ohio
Jim,

The double bumper idea came after some discussion. I didn't want the winch hanging out on the front - was trying to keep it short for use as a recovery vehicle in the woods. Am probably going to stick a 24V hummer winch out the front of the opening there in the center, just to have some extra capability.

If you really wanted to get fancy, you could bolt rubber track pads to the bumper for extra protection......

The tool boxes are 2 different styles. There is a long one right up against the cab which is the standard semi-tractor style tool box. The others are just military tool boxes I picked up at an auction one time.
 

spicergear

New member
2,307
26
0
Location
Millerstown, PA
The actual physical process of doint that single rear axle conversion isn't all that bad...BUT everything is heavy, doesn't balance, and you must have room to work or you're just flat screwed.
 

forklift

New member
62
0
0
I too, was woundering what you had on for tires and wheels. Are the wheel DOT? if so ...would you mind telling me where you got them and what they set you back? I'm puutting a dump cunversion on mine right now, but the super singles are actually the most important thing to me. thanks for any info, jake
 

Miltrucks

Member
104
3
18
Location
Lancaster, Ohio
To answer a couple questions......

The actual intall of the single axle is pretty straight forward and easy - everything is pretty much bolt on once you get your measurements right. It's all the other stuff (airlines, wiring, rerouting fuel lines and all the extras you end up doing) that take the time and expense.

The tires are Michelin XML 395-85-R20 on custom rims. They are not rubbing the bed yet, but once I get the 1000lb generator in the back, I believe they will. What I am going to end up doing I think, is trim the bed at the well flare point (about 1.5" and install some rubber fender flaring to cover where the tire sticks out.

The tires and wheels came from USA6x6 (some people have had good comments about the company, some have had bad comments about the company). The wheels are their custom double beadlock slotted 10" with a 6" backspace. From what I have been able to tell, this is the largest tire/wheel combo you can run on a deuce and still keep your full turning radius without setting out the wheels really far. They clear the frame and the Air-O-Matic box. I had them build with 16oz each of Dynabeads for balancing that I drop shipped to USA6x6. I just got the tires on it yesterday, so I haven't had it on the road yet, but from jus moving it around the farm, the truck feels a lot more stable with them on. With shipping, I think they were a bit over $2K for the 4 of them.
 

spicergear

New member
2,307
26
0
Location
Millerstown, PA
The wheels are NOT DOT approved. If memory serves, the only beadlock wheel DOT approved is a high dollar Hutchinson wheel.

Miltrucks- Please let us know as driving down a paved road look and see if the wheels are running true. Keep in mind that .030" is maximum allowed wheel tolerance run out by real wheel manufactures. The guy where you bought your's told me they *try* for under .125" :shock:
 

wallew

Active member
Steel Soldiers Supporter
2,520
18
38
Location
San Angelo, Tx USA Planet Earth
Eric,
Here are the Michelin XDY-1's I'm putting on the rear. The fronts get XDY-2's (same tread, just new instead of new retreads).

They are mounted on 6 lug bud wheels that are 22.5.

These tires are approximately 42 inches high and approximately 9 inches wide (8.5 not on the ground) with 30/32 rubber.

The wheels ARE DOT approved. They came off a UPS truck's rear double set of wheels. UPS runs these wheels until they feel they lug holes are too large. As they are running doubles with the 'stud' type inner lug nut, they choose a higher safety factor.

I purchased brand new lug nuts for $1.07 each. You need 12 left ones and 12 right ones. SO for about $26 (ttl included) I will be putting brand new lug nuts that resolves the issues that UPS was worried about it.

Sometime next week, I hope to mount them and post the pictures. These are gonna be an awesome tire. At least that's MY opinion.

edit - ERIC, where is the fuel tank?
 
Last edited:

Miltrucks

Member
104
3
18
Location
Lancaster, Ohio
Truck is painted with Gillespie Coatings 383 Green. I've had real good luck with this brand - thin down a little bit and it sprays on real well.


Fuel tank is mounted in the front of the maintenance bed. You can see some pictures of that in the album. Kept the military 50 gal and brackets and just bolted it right up. Makes a convenient spot to get a fuel source for the generator in the rear as well. Only problem is that you have to climb up in the bed to fill the tank, but it left enough room above it to mount and electric air compressor to use with the generator.
 

Miltrucks

Member
104
3
18
Location
Lancaster, Ohio
I have played around with a couple different mixtures (I have painted probably 15 military trucks / trailers over the past couple years).

What I found to work best is to add about 3/4" - 1|" of mineral spirits to each 1/2 gallon can of paint. On the gillespie gallons, I normally keep an empty can around. I mix up the gallon then then split it into 2 cans. There is a little ledge about halfway up in the gallon can and I just fill with mineral spirits to right around that ledge or a bit more. And then you mix up the paint again to get everything uniform.

It seems that this mixture comes out of the spray gun the best and I have had real good luck with the outcomes. You need to spray it in a couple coats this way, but looks nice when finished. I have used this for the 383 colors as well as the 24087.
 

Miltrucks

Member
104
3
18
Location
Lancaster, Ohio
Those XDY's look pretty good. I had a set of 12.5x20 XLs on the truck before, but they just didn't seem to have the grabbing power I wanted. Even with the Detroit in the rear, I couldn't grab enough with them. That is why I wen't with the wider more aggressive stance.

The truck was built for more offroad / farm / woods usage than highway usage.
 

m.walker

Member
788
5
18
Location
Independence,Mo.
Thats one of the best looking 4x4 conversions I've seen yet , with that bed it looks right . I really like the front bumper too ! All in all great job !!!
 
Top
AdBlock Detected

We get it, advertisements are annoying!

Sure, ad-blocking software does a great job at blocking ads, but it also blocks useful features of our website like our supporting vendors. Their ads help keep Steel Soldiers going. Please consider disabling your ad blockers for the site. Thanks!

I've Disabled AdBlock
No Thanks