• Steel Soldiers now has a few new forums, read more about it at: New Munitions Forums!

  • Microsoft MSN, Live, Hotmail, Outlook email users may not be receiving emails. We are working to resolve this issue. Please add support@steelsoldiers.com to your trusted contacts.


Receiver Hitch Install

unaffiliated

Member
394
11
18
Location
Coosa, Georgia
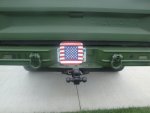
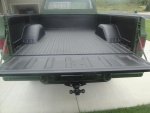
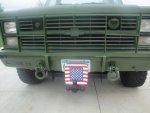
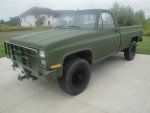
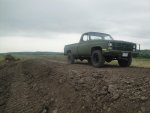
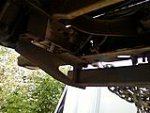
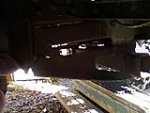
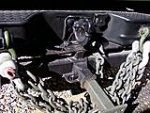
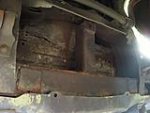
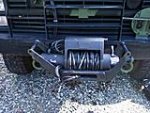
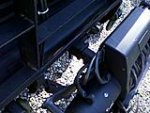
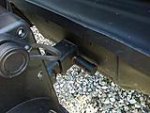
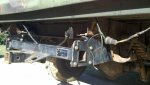
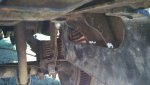
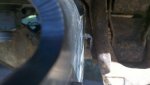
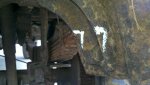
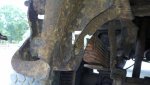
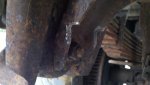
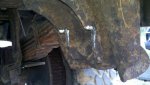
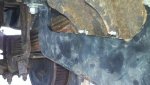
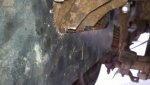
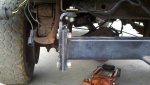
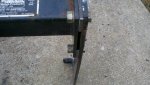
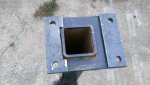
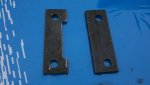
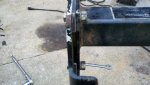
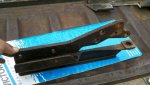
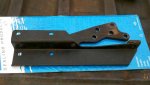
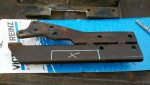
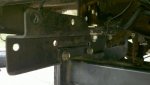
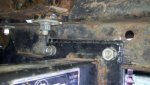
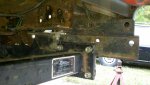
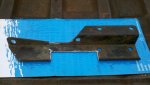
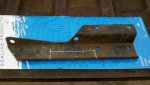
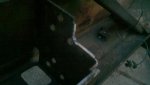
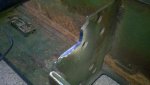
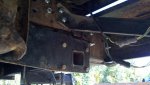
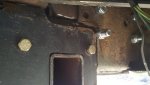
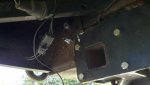
I got my M1008 for three reasons. 1) My girlfriend got tired of me tearing up her 2002 Dodge Ram 2500 4X4. 2) I wanted my own truck. 3) I think the CUCV's are awesome looking trucks. Anyway, I sell used Mercedes parts and I am always needing to haul junk cars on my car trailer. I thought about using a pintle hitch with the built-in 2 inch ball, but the bumper is so high my trailer would drag the ground in the back. I took the receiver hitch off an old '78 C10 parts truck I have to mount it on the CUCV only to find it wouldn't fit with the clevis mount brackets installed, plus part of the military bumper bracing was also in the way. HMMMM, what to do now? 1) The hitch was free when I put it on the C10 years ago. 2) I couldn't afford to buy one that would fit better. 3) I wanted to retain the clevis mounts and brackets. Well here is my solution. My installation pics and write up to follow in subsequent posts.
 
Last edited:

unaffiliated

Member
394
11
18
Location
Coosa, Georgia
I test fit the hitch a while back so I knew what had to be modified and/or fabricated. I call it "modicating" for short. The hitch mounting brackets needed to be spaced out a bit to clear the clevis mount brackets. More on that later. The hitch I used was made by Putnam. It is a class 4 hitch. The part number label was faded out so I have no idea what model it is. I am including a picture of the spec label for reference.
 

Attachments

Last edited:

J.Z.

New member
72
0
0
Location
Shakopee,MN
receiver hitch

Curious as to what you come up with..I was real surprised that not a lot of receivers had been mentioned...Front and rear receivers were some of my first mods I did when I bought my cucv 1008...
 

Attachments

unaffiliated

Member
394
11
18
Location
Coosa, Georgia
The first step was to remove the bumper and all the brackets for the clevis mounts. I tell ya, the military did not want the bumper to fall off. There are 28+ bolts holding the bumper, pintle and clevis mounts on. My truck came from Ohio so the bolts were pretty rusty and did not want to come off without a fight. I had to cut one of the bolts off with a die grinder. The rest just required a lot of sweat equity and a few beer breaks.
 
Last edited:

islandguydon

Well-known member
Steel Soldiers Supporter
3,724
782
113
Location
Michigan
unaffiliated

Here is a post I made for an electric winch thread, thought it may be helpful.

Don

Here is what I did to secure a Reese hitch on the front and rear to accept an electric winch. I had to die cut the front bumper to slide the Reese through, the hitch it's self is mounted on a 4"x4"x3/8" tube, cross mounted bolted and welded from both frame sides. The rear was a simple job. I only posted this in case you might get an idea to help out with your project. I am sure this would work out on any 2.5 Deuce or truck. Just takes some custom fabricating.

Personally I like what shovelheadmike did on his rig. [thumbzup][thumbzup][thumbzup]
 

Attachments

unaffiliated

Member
394
11
18
Location
Coosa, Georgia
Curious as to what you come up with..I was real surprised that not a lot of receivers had been mentioned...Front and rear receivers were some of my first mods I did when I bought my cucv 1008...
Wait till you see what I have planned for the front. Think old school wrecker. I know the purists will not approve but what the h%^&, it's my truck.
 

unaffiliated

Member
394
11
18
Location
Coosa, Georgia
I then test fit and loosely bolted the hitch in place. I marked the brackets for the rear spring mounts so that they could be trimmed. I will explain the spacing of the hitch later. You can see the marks I made for the area to be trimmed. You can also see the trimmed area in the next photo.
 

Attachments

unaffiliated

Member
394
11
18
Location
Coosa, Georgia
Okay, now for the hitch spacing. The hitch mounting brackets needed to be spaced 1/4 inch on each side to clear the clevis mount brackets. Fortunately the mounting brackets on the hitch I already had were bolted to the cross brace. It would not have worked otherwise. I bought some 1/4" x 1 1/2" bar stock from the local home improvement store. I think it was about $7.00, can't remember. I cut 4 pieces 4 1/2 " long with my cut off saw I marked and drilled 1/2" holes with my drill press. The pieces for the rearmost part of the cross piece had to be cut out to clear the cross tube (see photos). I did this with my cut off saw. I tried to do it with a bench grinder but it was taking forever. The cut off saw was probably not the ideal way to do it but it worked. I just cut a series of slots, then used the bench grinder to remove the excess and smooth them out. I bolted the pieces in between the cross brace and the brackets. I then mounted the hitch to the truck. You can see in the photos why I had to trim the rear spring mount brackets. The hitch brackets just did fit with the spacers.
 

Attachments

SGT Estum

New member
274
0
0
Location
Twin Cities, MN
Curious as to what you come up with..I was real surprised that not a lot of receivers had been mentioned...Front and rear receivers were some of my first mods I did when I bought my cucv 1008...
You didn't happen to score those at Burnsville Trailer Hitch off of Hwy. 13, did you?
 

unaffiliated

Member
394
11
18
Location
Coosa, Georgia
OK guys, I know I have been slack about finishing up on my install thread. I will try to finish up tonight. Anyway, I had to modify the clevis mount brackets to clear the hitch. The clevis mount brackets were welded to the bumper brackets. I ground off the tack welds to separate the two pieces. I then ground off the large spacer at the front end of the clevis mount bracket. The hitch just happened to be the same thickness and will take the place of the spacer.
 

Attachments

Last edited:

unaffiliated

Member
394
11
18
Location
Coosa, Georgia
I held the clevis mount bracket up to the vehicle with hitch installed in order to mark the area to be cut off. I used the cut off saw to make the cuts. The long cut was a little tricky with the cut off saw. I probably should not have done it that way for safety reasons. The third picture shows the bumper bracket and the clevis mount bracket still tack welded together. I just held the cut piece from the other side up to this one to mark the cut area. I ground off the tack welds just like on the other side. I bolted the newly modified pieces onto the truck. You can see why I had to cut off so much.
 

Attachments

unaffiliated

Member
394
11
18
Location
Coosa, Georgia
The next step was to modify the bumper itself. The large brackets welded to the bumper had to be trimmed to clear the hitch. I had marked them when I test fit the hitch side brackets a while back. I used my large grinder for this. Then came the hard part, actually mounting the bumper on the truck. I bought all new bolts and lock nut for this since the original ones were rusted up. The original bolts were grade 5, but I just bought standard bolts since there are 20 of them holding the bumper and clevis mounts on. That's not counting the 4 bolts in the pintle hitch and the 4 at the ends of the bumper that I didn't have to remove. I really don't think it is going to come off. The clevis mount brackets were already loosely bolted in place. I loosely bolted the long bumper brackets in place. Then I slid the bumper into place and proceeded to line up all the holes and put bolts in. It took me forever to tighten all the bolts by hand. I wish I had hooked up my air compressor before I started the bumper mod, but I didn't have a 220 volt outlet in the garage. That's another project for a later day. You can see in the pics how the bumper was cut to clear the hitch.
 

Attachments

unaffiliated

Member
394
11
18
Location
Coosa, Georgia
The last thing to do was wire up some trailer lights. There is no easy way to do this like on civilian trucks. I have a T Tap connector from a civi truck that is simply plug and play but it will not work on the Military version due to the wiring differences. So......I had to do what I absolutely hate to do. Yes, the dreaded scotch lock connectors. Actually the ones I had on hand were better than the normal scotch locks because they were already filled with dielectric grease and are made a little better. I just used my test light and found the correct wires to tie into. I will have to take a picture of that later. I forgot to do that.
 
Last edited:

unaffiliated

Member
394
11
18
Location
Coosa, Georgia
I used an 8 inch drop ball mount so that my trailer would sit level. I hauled 2 cars on my trailer the day I finished the job. The truck towed them with no problem what-so-ever. It actually rides smoother with a car on the trailer than it does by itself without the trailer hooked up. Now I need to purchase a trailer brake controller and hook that up. I hope you enjoyed my Receiver Hitch Install Thread. I actually had fun modicating my truck to make the hitch work. It was a lot of work but well worth it. I am glad I was able to keep the clevis hooks and the bracing that goes with them. Here is a picture of the finished product. You can't tell in the picture but both safety chains are hooked up.
 

Attachments

Top
AdBlock Detected

We get it, advertisements are annoying!

Sure, ad-blocking software does a great job at blocking ads, but it also blocks useful features of our website like our supporting vendors. Their ads help keep Steel Soldiers going. Please consider disabling your ad blockers for the site. Thanks!

I've Disabled AdBlock
No Thanks