• Steel Soldiers now has a few new forums, read more about it at: New Munitions Forums!

  • Microsoft MSN, Live, Hotmail, Outlook email users may not be receiving emails. We are working to resolve this issue. Please add support@steelsoldiers.com to your trusted contacts.


Starting my 5 ton crew cab project

Jeep Nasty

Active member
379
242
43
Location
NH
ImageUploadedByTapatalk1392673778.889061.jpgImageUploadedByTapatalk1392673795.214615.jpg
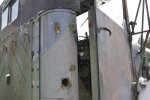
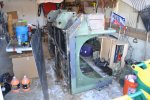
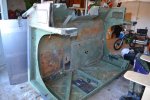
Today I took the first substantial step in starting my 5 ton crew cab project. This fall I picked up a donor cab and I've spent a little time here and they're getting it rough-cut and everything pulled out ready to start this project. Today I removed the bed on my m923a2 and put it on the snowbank next my driveway. From here I will start spending a couple hours whenever I can working on this project.
I would first like to thank KLawrence in advance for any ideas that I've already stolen on his build. Also, I'd like to curse his name for motivating me to do this through pictures that I saw I'm his threads and all the headaches I'm probably going to cause myself.

Do not hold your breath on daily updates during my build process, I will post them as I have them. This is going to be slow and it's going to take me a lot of time.

What you will not find in this build is, any revolutionary new ideas or expertise mechanical and/or bodywork. You will however encounter a bunch of WTF moments wondering what the heck is this guy doing and how is he managing to pull some of this crap off with no garage, few tools and even less training.

I have rarely had an original idea in my head and I will continue to steal ideas from other people's crew cabs threads so I thank them.

My threads will have a deep focus on accomplishing some of these building tasks with little to no tools, knowledge, cenclosed space, borrowed Welders and borrowing free time for beer from some folks that have a little bit of experience doing this but not much.

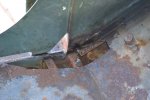
Today's first adventure involved me backing up to a retaining wall after getting all the bolts off and parking my jeep up in the snow with a couple of tow straps and then pulling the crew cab up, pulling the bed off by pulling forward and backing up and repeating. Before anyone asks about the excavator in the background, it was a loaner that broke down after using it for two hours and is currently not functional or I would be using that for some of the heavy lifting.

Anyway, wish me luck and I will probably be asking for advice on a regular basis.

I'm sure there will be a fair amount of comedy to follow as I've never done bodywork before, I'm not really good at welding and I don't have the proper equipment to do this. But, I did stay at a Holiday Inn Express once.
 
Last edited:

Jeep Nasty

Active member
379
242
43
Location
NH
Sorry about the spelling mistakes, I'll clean it up when I get to my desktop. I was using the talk/ type feature in my phone.
 

klawrence

New member
137
4
0
Location
Oxford PA
Good luck! Realised another tip from all this darn snow, put a bow in your roof. The snow on mine keep melting and freezing instead of running off.
 

Jeep Nasty

Active member
379
242
43
Location
NH
Good luck! Realised another tip from all this darn snow, put a bow in your roof. The snow on mine keep melting and freezing instead of running off.
Thanks, while I have your attention, during your build you use some lengths of 16 ga to initially mount the cabs together. Did those stay in place then build more around them, leaving an opening for the air vent door? Or, did you remove them and replace with a different piece. Also on the interior floor, did you cut out the old floor where patches were place or did you weld those on top of the existing floor?
 

Jim Timber

New member
91
0
0
Location
Metro/Brainerd, MN
I've gotta give you credit for taking the bull by the horns and trying something instead of conceding defeat before you ever started.

On mission critical parts, be sure you have someone competent check your work. Rolling down the freeway's a bad time to discover you didn't have enough heat in a weld.

I'll be looking forward to watching your build.
 

klawrence

New member
137
4
0
Location
Oxford PA
Thanks, while I have your attention, during your build you use some lengths of 16 ga to initially mount the cabs together. Did those stay in place then build more around them, leaving an opening for the air vent door? Or, did you remove them and replace with a different piece. Also on the interior floor, did you cut out the old floor where patches were place or did you weld those on top of the existing floor?
1x2 square stock is welded between the cabs then 16 guage over top. i cut out the cancer then welded on top of good steel..I still need to under coat the bottom.
 

Jeep Nasty

Active member
379
242
43
Location
NH
I had a little break in the weather and a couple hours to tinker yesterday. I removed the spare tire and carrier, the exhaust and exhaust mounting plate. I also relocated the 2 battery setup from under the passenger seat into the toolbox under the passenger door.DSC_0325.jpgDSC_0326.jpgDSC_0327.jpgDSC_0328.jpg
 

Rusty Nut

New member
87
0
0
Location
Chicagoish, Ill
Just Do it. I admire your moxy. Working in the snow with no forktruck- that's some challenge. I bet the sound of that cargo bed being dragged-off was unforgettable.

I'm rooting for you because I will probably try something similar. Please post lots of pictures and keep us in the loop on difficulties.

Get 'er done.
 

Jeep Nasty

Active member
379
242
43
Location
NH
I had previously switched to a 2 battery setup using 2 size: 4DLT batteries. I emptied the toolbox under the passenger door and drill two holes to run the wires through. This was the first time I ever used a step drill bit and I'm regretting not having bought them 15 years ago. Easily drilled the two holes, I sprayed the inside of the box with some rubberized undercoating and let it dry. I reused the rubber grommets from the inside of the cab for the new holes to run the wires through. I had to extend one of the smaller wires about 6 inches to make it reach, but was able to get the others in without a problem. I did not strap them down at this time but I plane on securing them somehow at the end of the build. The last picture should show the wire routed over the frame rail into the back of the box. I will tighten them up and wrap some type of heat shielding around them to protect them from the exhaust. After the crew cab is built I will reconnect the slave cable pin, once I find a suitable place after the transformation. My goal is to reuse as many parts as possible, So i'm sure I will mount it, where the stock cable can reach it from the batteries new location. I will keep cost as low as possible on this entire build, so my wife doesn't get to suspicious and make me live in it.
DSC_0316.jpgDSC_0317.jpgDSC_0321.jpgDSC_0322.jpgDSC_0323.jpgDSC_0325 2.jpg

Thank for the words of encouragement. I will try to be very heavy on the pictures for this build, I know when i'm looking to steal ideas, I'm very visual and always looking for more pictures.
 

rchalmers3

Half a mile from the Broad River
Steel Soldiers Supporter
1,925
30
48
Location
Irmo, South Carolina
G'awd, that climate you live in! What do your hands feel like working outside in the white stuff???

Moxy is your watchword. I have subscribed because I appreciate and acknowledge your professed inexperience and look forward to seeing you succeed anyway! I expect you will succeed precisely because you are unsure of yourself.

Go get'um, or whatever you New England folks say up there in the great white north!

Rick
 

Jeep Nasty

Active member
379
242
43
Location
NH
Very nice battery mod Chris! Did you install a cut-off switch!
it's in the works for down the road after I add the equipment needed for in cab audio and powered accessories. One the cab is done. But I needed to keep it wired to move truck around during build.
 

Jeep Nasty

Active member
379
242
43
Location
NH
The weather did not want to cooperate with me on my day off today. After getting my housework done I decided to venture into the cold and get a few things done anyway. I removed the passenger seat and then the Slave Cable pin. Then I removed the drivers seat and the floor mats and cab insulation. I took off the grab handles from both sides of the cab and cut down the air intake. I vacuumed out the inside to get a better look at my existing floor. I will obviously need to address some of the rust holes and do some patch work while i'm building the the new floor that will marry the cabs together.

My next step will be to finish some prep work on the second cab. I have to do some more cutting and I was lucky enough to get someone to lend me their small plasma cutter. I need to wire an appropriate outlet to my breaker in the garage so I can run the plasma cutter. Once I get that going, I will mount the horseshoe mount to the second cab and get ready to get the cab set into place. Prior to cutting the floor in the donor cab, I i will attached the doors, so the frame does not get out of whack while opening the width to match the rear of the first cab.
DSC_0316.jpgDSC_0318.jpgDSC_0319.jpgDSC_0320.jpgDSC_0321.jpgDSC_0322.jpgDSC_0325.jpgDSC_0326.jpgDSC_0323.jpg
 

Attachments

Jeep Nasty

Active member
379
242
43
Location
NH
More pics of rust that needs to be repaired & a picture of my new drivers seat. I can afford all new seats if I go with those white folding chairs.
DSC_0331.jpgDSC_0330.jpgDSC_0332.jpgDSC_0328.jpgDSC_0329.jpg

On a side note, does anyone have a quick fix for why the brakes on my two rear Drivers side tires would be locked up. My first though is they are in parking brake mode on that side and won't release for some reason. I'm still learning more about air brakes right now. Both tires on passenger side spinning in the snow and dragging locked left side.
 
Last edited:

Naterik

New member
15
0
0
Location
Zanesville, OH
It's possible that you have ice in your emergency lines on that side. But I'd say a better chance that your brake shoes are seized to the drums. Happens all the time on our commercial style trucks and trailers at work. Just a nice rap of a hammer or large wrench on the brake drum and they should loosen right up.
 

Jeep Nasty

Active member
379
242
43
Location
NH
It's possible that you have ice in your emergency lines on that side. But I'd say a better chance that your brake shoes are seized to the drums. Happens all the time on our commercial style trucks and trailers at work. Just a nice rap of a hammer or large wrench on the brake drum and they should loosen right up.
Must have been ice, it was 30 degrees warmer today and everything works fine. Is there a way to get water out of the brakes or will it vent out with use?
 

Jeep Nasty

Active member
379
242
43
Location
NH
Had a couple hours to work a little. I cut out some if the rust holes with a borrowed angle grinder and cutoff wheel. I also took a friends advice and bought a needle scaler at harbor freight on sale for $50. The needle scaler worked great removing a lot of the thick rust. I'm just about done with this cab for the moment until I get the initial mating of the cabs done. My second cab is in good shape and does not look like it will need any rust repair. I pick up the plasma cutter I'm borrowing tomorrow and my outlet should get wired tomorrow so I can use it.
 

Attachments

Last edited:

Jeep Nasty

Active member
379
242
43
Location
NH
So far my to-do list is coming along quicker than expected.

Crew cab build


Tool box - all done
Remove tools
Drill hole
Coat inside
Remove batteries and relocate
Cab. Done
Remove passenger seat, slave cable pin.
Cut air intake pipe, remove from cab.
Cut exhaust
Remove spare tire
Remove tire carrier
Donor cab
Cut out rest of floor
Remove horseshoe bolts. Done
Attach horseshoe mount to cab
Attach hinges
Attach doors
Cab lift
Set welding blanket underneath
2x8 frame under cab
Steel rod under rear
Rear cab
Plasma cut split
Cut patch holes.
Bottle jack in place
Weld front mount plates
Bolt or weld horseshoe mount int place
Hardtop
Remove drivers seat and floor mats
Cut hardtop in half
Move rear section back.
Swap windshield
Support frame for front half of hardtop
Crew cab
Cut out front cab back wall
Bridge cab floor with 1x2 stock
Build hardtop frame
Finish exterior wall
Close off interior compartments
Finish hardtop corners
Get someone who knows how to bondo


Primer seal interior and exterior
Bed liner interior
Paint exterior


Cargo bed
Measure and cut out section
Weld together
Mount back to frame
Finish exhaust
Finish air intake


Sent from my iPad
 
Top
AdBlock Detected

We get it, advertisements are annoying!

Sure, ad-blocking software does a great job at blocking ads, but it also blocks useful features of our website like our supporting vendors. Their ads help keep Steel Soldiers going. Please consider disabling your ad blockers for the site. Thanks!

I've Disabled AdBlock
No Thanks