• Steel Soldiers now has a few new forums, read more about it at: New Munitions Forums!

  • Microsoft MSN, Live, Hotmail, Outlook email users may not be receiving emails. We are working to resolve this issue. Please add support@steelsoldiers.com to your trusted contacts.


Hydroboost Repair-Leak Fluid Drivers Side Floor

CARNAC

The Envelope Please.
Supporting Vendor
8,277
617
113
Location
Corpus Christi, TX
Title will hopefully catch unnecessary future posts and let folks know what is going on and how to repair it.

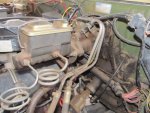
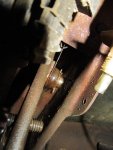
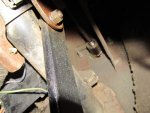
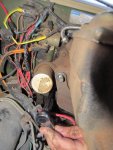
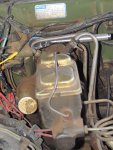
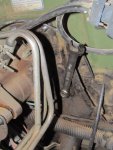
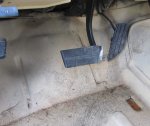
So I had what appeared to be oil in the drivers side floorboard. Some might first think radiator or oil leak. The fluid is too clean for my oil and it is too oily for antifreeze so that narrows it down. There usually won't be any sign on the engine side of the firewall since the normal point of leaking is on the rod that is protruding inside the cab.
 

Attachments

Last edited:

CARNAC

The Envelope Please.
Supporting Vendor
8,277
617
113
Location
Corpus Christi, TX
So first step is to summon up the courage to attack this on your own. If I can do it, you can. Keep in mind the manuals are written on a 6th grade level so that should help also.

Next is to download the portion of the manual that applies.

Next get the tools. You will need metric wrenches (ratcheting types preferred) in sizes 14 through 18 mm, SAE wrenches in 1/2 and 9/16, standard pliers, sockets of the same sizes and you'll need various length extensions to include 2 x 12inch extensions and a swivel, flat tip and cross tip screwdrivers, a short bungy cord(yes a short bungy cord).

For the M1009 you will need a part number 52-7248. I got mine from O'Reillys for $160 but $60 of that was core charge so I got that back.

For all other CUCV's except the 1009, there is a different hydroboost!!!!! Check the 20P manual to get the part number.

Be careful of ebay and other auction places. I saw a listing showing the M1008 hydroboost being sold as compatable for the M1009---it isn't.
 

Attachments

Last edited:

CARNAC

The Envelope Please.
Supporting Vendor
8,277
617
113
Location
Corpus Christi, TX
DO NOT DISCONNECT THE BRAKE LINES. The issue is your hydroboost not your master cylinder.

So unscrew the the 2 x 15mm nuts and pull the master cylinder off and use the bungy cord to hang the master cylinder from the hood so it is supported and out of the way. I had to use a 1/2 inch wrench on the back of one of the bolts because it was turning on me.

Next undo the the hoses on the hydroboost using the screwdriver on one line, the 18mm on one line and the 16mm on the other. Be careful with the threads and the tubing. It will take some pressure to get the lines pulled. Once loose, you can also pull the line retainer bracket from the bolts where the master cylinder was mounted. Once that bracket is off and the lines are off, it can be moved against the fender out of the way.

I can't get pictures in order but you get the idea.
 

Attachments

Last edited:

CARNAC

The Envelope Please.
Supporting Vendor
8,277
617
113
Location
Corpus Christi, TX
Disconnect your battery at this point if you haven't already done so.

Then I went inside of the cab and put a towel on the floor to protect me against the power steering fluid.

Unscrew the plastic cover under the steering wheel (4 screws) and the metal plate (2 more screws).
 

Attachments

CARNAC

The Envelope Please.
Supporting Vendor
8,277
617
113
Location
Corpus Christi, TX
Using a 14mm and a 9/16 wrench, undo the stoplight switch plate on the brake pedal. You will need to undo this to get the hydroboost rod off of the mount above it and it also makes room to get to some other bolts later on.
 

Attachments

CARNAC

The Envelope Please.
Supporting Vendor
8,277
617
113
Location
Corpus Christi, TX
Once the bracket is removed, use pliers to pull the retaining clip that keeps the hydroboost piston rod on the brake pedal arm. There is a washer that comes off after the retaining clip.

Then using the flat tip screwdriver, pop/gently pry the piston rod off of the brake pedal arm.
 

Attachments

CARNAC

The Envelope Please.
Supporting Vendor
8,277
617
113
Location
Corpus Christi, TX
Now locate the 2 x 15 mm nuts (one on each side) of where the hydroboost piston rod comes through the firewall.

Doing your best gymnist twist, get the 15mm socket on these and use the swivel attachment next and then 2 x 10 or 12 inch extensions and then the ratchet. This is the hardest part for us old farts. If you are old like me, you may want to stretch before attempting this.

The picture shows the piston rod in top right with 1 nut on either side. This was taken before I removed the brake light bracket.
 

Attachments

CARNAC

The Envelope Please.
Supporting Vendor
8,277
617
113
Location
Corpus Christi, TX
At this point all interior items should be free. Time to move back under the hood.

There are 4 x 15 mm nuts holding the hydroost on at this point. A nut is located on each corner of the mounting plate of the hydroboost.

Remove these 4 nuts and pull the hydroboost.
 

Attachments

CARNAC

The Envelope Please.
Supporting Vendor
8,277
617
113
Location
Corpus Christi, TX
Now pull the hydroboost out.

Once out, I had to pull the out the brake master cylinder rod. I don't have photos and the manual is limited on details, so here it goes. Wear safety glasses and keep in mind the item you will be working on is spring loaded.

On the end of the hydroboost there is a blunt rod that is held inside the hydroboost by a 8 or 10 spoke circular retaining clip. Use one finger of one hand to push in the clip. Use a pair of needle nose pliers to slightly bend a few of the spokes until the clip can be removed. Remove the clip and the rod and spring will follow.

Rebend the clip and reverse the procedure for installing in the new hydroboost.
 

CARNAC

The Envelope Please.
Supporting Vendor
8,277
617
113
Location
Corpus Christi, TX
Once the new hydroboost has the brake master cylinder piston in place, it's time to reassemble.

Hydroboost into fire wall. Connect 4 nuts on engine side of fire wall. Put on 2 cab side nuts. Pop hydroboost brake piston rod on brake pedal arm. NOTE: it will go on easy. If not, twist it 180 degrees and try popping it on again. Add washer. Add clip. Replace brake pedal switch plate.

Move to engine compartment. Slip power steering lines retaining bracket in place on 2 bolts on front end of hydroboost. Add hydroboost lines(3 of them). The getting the lines in the proper place will take some effort but be careful with the lines. CAREFULLY position and screw in the 2 compression nuts running to the top of the hydroboost. Attach the third line requiring the screwdriver. My clamps holding this third line required me to use a regular pair of pliers to bring the ends of the hose clamp together.

Add the master cylinder and 2 nuts.

Check power steering fluid level. Should be filled to required level of full hot or full cod depending on if the engine is hot or cold.
 

CARNAC

The Envelope Please.
Supporting Vendor
8,277
617
113
Location
Corpus Christi, TX
With the battery still disconnected, turn key and pump brakes several times.

Then connect battery and start engine. Let it run for up to 15 seconds then turn off. Check for leaks.

Check fluid level. Fill as needed. Don't be surprised if you don't have to add much, if any.

Now let the vehicle sit if possible. I let mine sit for 2 hours but this part is not in the manual.

Start vehicle and let run for 15 minutes and again check for leaks. Move steering wheel all the way to left and then back to the right all the way. Do this half dozen times during the 15 minute.
 

CARNAC

The Envelope Please.
Supporting Vendor
8,277
617
113
Location
Corpus Christi, TX
Check the fluid, if it still has bubbles, wait 15 minutes then run thevehicle for 15 minutes turning the wheel all the way to the left and right another half dozen times. Do this until it clears. It worked the first time for me.

Don't forget to remove bungy.

Check brakes several times and ensure you test drive the vehicle off the highway to ensure the brakes are working. Take it easy for a day or 2 to ensure the system is good to go and the brakes are working 100%. Keep in mind, I had a rebuilt defective hydroboost the first time I did this. No brakes but knew it after I installed it. After putting the old one back in, I had some pucker factor occasions when I went to slow down in traffic the next day. Never had to hit the emergency brake but it was tense.

Others may have another way of doing this and other shortcuts. If you do, great add them but make it clear to the novice what they should do.

I tried to dummy this down since the below is me going to mechanics school.
 

Attachments

Last edited:

CARNAC

The Envelope Please.
Supporting Vendor
8,277
617
113
Location
Corpus Christi, TX
Just returned from about a 50 mile drive and NO LEAKING!!

So it appears the Cardone 527248 is acceptable but remember the first one I got from O'Reilly's had to be returned as defective. Second one is working find and no more fluid on the floor.
 

sschaefer3

New member
212
3
0
Location
Tempe, AZ
I just did the Hydro/Hydra Boost on a 1986 M1008. His directions are awesome and perfect, except there is one more step on a ten-oh-eight.

First off the M1008 A-1 Cardone part number is: 527307 (52-7307) I found this at RockAuto for $112.89 and it ships from Baltimore.

It is the exact same part as original equipment.

Now the extra step, on the 08 you have to separate the booster from the mounting plate. It is held on by a strange large square sided huge bolt, recessed into a bowl. This makes using a huge crescent wrench impossible and a large channel lock impossible as well.

What I found on the web is that a few people make a special socket. Otherwise you need to knock it off with an air chisel. I just used a normal chisel and a hammer and got it off. Put it back on that way as well.

Here is a post where a Chevy dealer got it off with an air chisel:

http://coloradok5.com/forums/showthread.php?t=293942

Here is one of the tools/sockets you can get to remove the nut and some great info about the M1008 unit:

http://67-72chevytrucks.com/vboard/showthread.php?t=347480
 

TedO

Member
123
7
18
Location
San Diego, CA
new puddle

I found a new puddle next to the driver side tire. Under the hood the wiring harness that passes by the steering column has a greasy substance on it, and the area has a lot of dirt stuck to it.

I am guessing the leak has something to do with my brakes.

1) how are the brakes linked to the power steering? They use different fluids, so somehow the brakes power the steering, or the steering powers the brakes, yet the fluid connections are separate?

2) Can I get away with just a rebuild? It looks like the person on here saw a leak, and he replaces everything, master cylinder and hydro boost unit. Can I get away with just replacing the seal?

3) there is a person (captainfab)selling a special socket to remove the special bolt that holds a plate to the backside of the hydro boost unit. Do I need this? Do I need to remove the plate?

4) where can I find a rebuild kit?
 
Last edited:

Russm

Active member
244
69
28
Location
Ft. Wainwright, AK
I did this repair 3 times on my 1009.
First two times I got a rebuilt hydroboost. The piston that the brake pedal push rod pushes in was plastic(not sure on the technical name for this). It failed within a week both times.
The third time a got a new one and the piston was metal. No more problems.

Mr. Tedo for #1 refer to the TM. #2 is my bit here, rebuild at your own risk.

#3. My new hydroboost came with the backing plate. Was no need to remove it
 

PJL

Member
140
6
18
Location
Way south of Seattle, WA
I found a new puddle next to the driver side tire. Under the hood the wiring harness that passes by the steering column has a greasy substance on it, and the area has a lot of dirt stuck to it.

I am guessing the leak has something to do with my brakes.

1) how are the brakes linked to the power steering? They use different fluids, so somehow the brakes power the steering, or the steering powers the brakes, yet the fluid connections are separate?

2) Can I get away with just a rebuild? It looks like the person on here saw a leak, and he replaces everything, master cylinder and hydro boost unit. Can I get away with just replacing the seal?

3) there is a person (captainfab)selling a special socket to remove the special bolt that holds a plate to the backside of the hydro boost unit. Do I need this? Do I need to remove the plate?

4) where can I find a rebuild kit?
A diesel engine does not create vacuum which is where most gasoline engines get the brake boost assist*. The diesel uses a hydraulic booster which gets power from the steering pump. Which is not to be confused with the brake fluid itself.

*(I once had a turbocharged Audi that had the hydraulic assist system. Under boost there is no vacuum in the intake manifold.)
 

TedO

Member
123
7
18
Location
San Diego, CA
I did this repair 3 times on my 1009.
First two times I got a rebuilt hydroboost. The piston that the brake pedal push rod pushes in was plastic(not sure on the technical name for this). It failed within a week both times.
The third time a got a new one and the piston was metal. No more problems.

Mr. Tedo for #1 refer to the TM. #2 is my bit here, rebuild at your own risk.


#3. My new hydroboost came with the backing plate. Was no need to remove it

Thanks. Should I replace the master cylinder too ? There is a rubber seal, gasket 14004810. Does that come with the new hydraboost? I suspect that is where it is leaking. It isnt leaking into the cab.
 
Top
AdBlock Detected

We get it, advertisements are annoying!

Sure, ad-blocking software does a great job at blocking ads, but it also blocks useful features of our website like our supporting vendors. Their ads help keep Steel Soldiers going. Please consider disabling your ad blockers for the site. Thanks!

I've Disabled AdBlock
No Thanks