• Steel Soldiers now has a few new forums, read more about it at: New Munitions Forums!

  • Microsoft MSN, Live, Hotmail, Outlook email users may not be receiving emails. We are working to resolve this issue. Please add support@steelsoldiers.com to your trusted contacts.


Pre / Post Lubrication System...Done.

bottleworks

New member
920
2
0
Location
Central NC
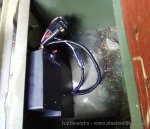
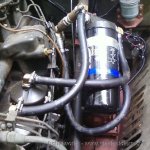
This is something that I have been gathering up parts for sometime. The stock oil system simply sucks for the type of situation it is in (it's not in the arctic). The stock system takes 12-15 sec until oil pressure is built up. The stock filters don't filter very well. A year ago I updated to dual Wix XD filters. Later, I changed to the OD Iron remote oil filter system. Both of those systems cut down the time-til-pressure significantly. However, most engine wear is caused at startup and most turbo damage is caused at shutdown. So, I set out to make a pre/post lube system. I looked at the systems available on the market. I didn't like them and they were too expensive. So I made my own.

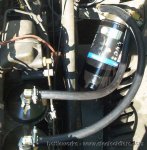
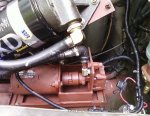
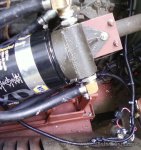
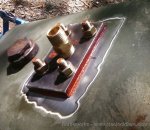
The pump is made from an M151 starter and a Mopar 318 (only the best) oil pump. I machined a seal retailer to fit on the snout of the oil pump and used a standard Lov-Joy coupling to connect the two together. It is then plumbed together with the remote oil filter.

Next came the oil supply.
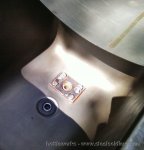
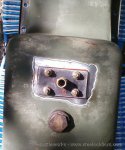
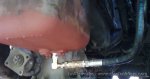
The systems that you can buy have you replace the oil pan plug with an adapter. I didn't like that, so I added a port at the bottom of the oil pan. It has a replaceable gasket that only take 4 nuts to get to. There is also a shutoff valve there if something were to go wrong.

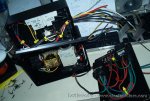
Finally the controller.
I wanted a system that I could touch a button and it started. When I turn off the truck, it started automatically for a preset amount of time. So, I made one. It took 1 latching relay, three standard Bosch relays, a one shot timer, a 3PDT relay, a heavy current solenoid, three diodes, and a 5 PSI oil pressure switch. Oh, and two voltage regulators & two LEDs for fun. You press the red button to activate, it then kicks the pump on (and both the "System Ready" and "Pump Active" LEDs). Once it finishes the oil system is at pressure and the pre/post lube system stay "ready" until the oil pressure drops below 5 psi. Once pressure drops below 5 psi, the pump kicks back on. Once the pump turns off, the system is shutdown and draws 0 mA. The timer has a range between .05 secs - 4 Hrs. Right now, I have it set a 30 secs. The pump can maintain cold oil pressure of ~45PSI and worm pressure of ~25-30 PSI.
 

Attachments

zak

Member
610
-4
18
Location
Ortonville, Mi
Is there a reason you didn't come out the side of the pan? An unwanted object might snag the hose. :cry: 
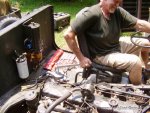
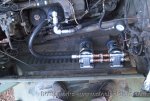
I like the use of the steering shaft for a mounting spot.
 

Jakob

Member
722
5
18
Location
Louisville, KY
I'm interested! Could you give a better break down on the parts? I'm not a wiring whiz, but I have a pretty good grasp. I just don't fully understand how you used all the components.
 

bottleworks

New member
920
2
0
Location
Central NC
zak said:
Is there a reason you didn't come out the side of the pan?
I wanted the lowest available spot. I figured it's no worse off then the commercially available setups. The idea of something snagging is a concern...somewhat. That's why the fittings are steel and why I used a hydraulic line. But it's not as bad as it seams in the picture. It would take an extreme object to get anywhere close to the line...such as the back of a Volkswagen. :eek: So, if something gets the line, it has probably also hit the engine and axle causing much worse damage.

I will see what I can do are a wiring diagram. It is extremely complicated, but at the same time, very simple. :?: I wrote it by hand on the back of a bank statement.
 

builder77

In Memorial
In Memorial
1,132
4
0
Great work. I am so happy to see someone pushing forward on these prelubers. What about deleting the male-to-male adapter that screws into the plate on the oil pan by just having the 90-degree screw into it. I worry about something hitting it too. At least that would pull it up an inch or so.
 

Elwenil

New member
2,190
40
0
Location
Covington, VA
Eh, just weld a bung into the lower edge of the pan facing to the side or rear. All that bolting and fittings is a nit extravagant. I'm a fan of K.I.S.S. Excellent work overall though. The electronics is enough to make me cringe, but it's definitely not my strong suit.
 

bottleworks

New member
920
2
0
Location
Central NC
builder77 said:
What about deleting the male-to-male adapter that screws into the plate on the oil pan by just having the 90-degree screw into it.
That's a good idea. A street elbow would do the trick.

Jakob said:
What did it run you to get all the parts?
Good question...I am not entirely sure. The electronics cost $60-70, M151 starter cost $25+ship, Maybe $50 for plumbing? Thats all I can remember. I bought different things over several months, so I lost track.

Elwenil said:
Eh, just weld a bung into the lower edge of the pan facing to the side or rear. All that bolting and fittings is a nit extravagant
Nope, no can do. Three main reasons...

1. If you weld a 3/8" fitting to the oil pan you are stressing a small amount of surface area. Every time the hose would flex, it would try to transfer some of that energy to the pan surface. The thin sheet metal of the pan would eventually crack.

2. You can't get close enough to the bottom of the pan by plumbing to the side of the oil pan. Part of this system is redundancy. If the engine's oil pump were to fail, the system will kick on automatically and try to save the engine. Say it lost so much oil that the pickup tube was exposed, the pump would kick on and try to get that tiny bit of oil in the bottom of the pan. Hopefully it would provide just enough time to get off the road and shutdown.

3. It would be too close to the winch drive shaft for my liking.
 

Elwenil

New member
2,190
40
0
Location
Covington, VA
Actually, if you are a good welder, you can avoid overheating the metal. Even if you are not, you can pack the area with clay to keep the temps down. For redundancy, you can weld in a sheetmetal plate to reinforce the area and distribute whatever stress may occur. Converting the line to a hard line up and around the PTO shaft and then use a support bracket to terminate the hard line and go to hose would alleviate any issues with the shaft and nullify any stress issues also. As for getting the bung near the bottom, it's very simple to heat the area and dimple it with a ball peen hammer to make a sharper corner. I've welded in bungs for drain plugs, oil scavenge lines, swinging pickups and turbo return lines and haven't had any issues with them yet and some have taken a bit of a beating. Please note that I am not criticizing your work, just offering an alternative way of doing things.

One could argue that the welding isn't a good idea, but one could also argue that drilling 5 holes is creating potential leaks and putting the line straight out the bottom risks getting the line snapped off by a tree branch getting kicked up, especially with the leverage created by the long fittings. Again, it's a terrific job, but I guess we have different tastes in what works best for us.
 

OPCOM

Moderator
Steel Soldiers Supporter
3,657
27
48
Location
Dallas, Texas
BW It's a very good job! The control box and the pump especially. The pump I have is on the weak side and has trouble priming itself, I'd like a better one. How much current does it take to spin it up?

Can you post a wiring diagram and schematic of the electrical system? It would be of great interest to others wanting to do the same thing that might not get all the electrical concepts. With a diagram, it could be explained.
 

Jakob

Member
722
5
18
Location
Louisville, KY
Welding isn't an option for everyone though, so a bolted in flange is still a good idea IMO. Either way has it's advantages and disadvantages.
 

bottleworks

New member
920
2
0
Location
Central NC
Here is the wiring diagram for the control system. Hopefully I didn't get anything mixed up from paper to the computer.


EDIT: took the diagram off line. Sorry...
 

SasquatchSanta

New member
1,177
18
0
Location
Northern Minnesota
Hey bottleworks --- that is one fine looking system --- you do good work Pilgrim [thumbzup]

My system only operates on manual mode. I have to press a button to run the pump. When oil pressure is achieved I stop pushing the pump buton and push the starter button. Having to press the pump button for 30 seconds (summer) 60 seconds (winter) is a PITA and there is no post shut-down protection with my system.

I'd like to upgrade to your controller system. Are you going to offer these systems or components?

I also like your pump a lot better than what I'm using. Mine gets the job done and doesn't have a problem generating 50PSI but I worry that parts could be an issue. I've thought of buying abother spare pump. We should talk before I do.

Was there a specific reason you used the single remote filter versus the twin 1970s?

Your comments about possible dangers of welding on a pan are concerning. As you can see from the picture below, we brazed two bungs in the side of the pan. The one in the front if for the pre-lube pump pick-up and the one in the rear is for the by-pass filter discharge.
 

Attachments

bottleworks

New member
920
2
0
Location
Central NC
Cranetruck said:
I'd say that one could probably very easily put all that in a small "black box" solid state wise except for the power relay for the pump....
SasquatchSanta said:
I'd like to upgrade to your controller system. Are you going to offer these systems or components?
No, I wasn't planning on. Bjorn is absolutely right about sizing it down. Only one relay in the controller has any real load on it. The bulk of the system could be done with transistors or mini relays. It could all fit in a 4"X6" Box (If I were ever to sell a controller, it would be one or the other). At the same time, the Bosch relays are generic, easy to find, and can easily be replaced if one were to fail.

SasquatchSanta said:
I also like your pump a lot better than what I'm using. Mine gets the job done and doesn't have a problem generating 50PSI but I worry that parts could be an issue. I've thought of buying abother spare pump. We should talk before I do.
Have you been having any problems with yours? I would bet your motor's wearables are common and easy to find. Bushings and brushes are cheap.

SasquatchSanta said:
Was there a specific reason you used the single remote filter versus the twin 1970s?
Well, look at the before and after pictures below of the two different filter systems. The original setup was a good step for getting better filtering for these engines, but I was having leaks at where the return hose connected back into the engine. I ended up getting a complete OD Iron filter setup for free thanks to Mike and Bjorn (Thanks again!). There has been zero issues with it. Now it will only cost $60 for the filter instead of $120 for two filters.


SasquatchSanta said:
Your comments about possible dangers of welding on a pan are concerning. As you can see from the picture below, we brazed two bungs in the side of the pan. The one in the front if for the pre-lube pump pick-up and the one in the rear is for the by-pass filter discharge.
I guess the key is for the lines going into the pan to be ridged with the engine. If the lines are able to vibrate at their own will against the engine, it will promote fatiguing. I see this on transit buses too many times. But they are on the road 10 hrs a day, 6 days a week.... With the miles these trucks will get...Who knows? No one knows for sure.

The way that I did mine, has that line connected to 1/2" of steel plate (a 1/4" plate on both sides of the pan). I believe it qualifies as overkill. I didn't want any question about long term strength.

If you do want a controller, I can price out the required components.
 

Attachments

SasquatchSanta

New member
1,177
18
0
Location
Northern Minnesota
Thanks for the insight bottleworks --- great looking system.

I haven't had eny problems with the pump I'm using --- I's sure it's way overkill for the application it's in.

Bjorn wrote:

Ernie, if you think pushing a button is a PITA, you'd hate this.
To me, simplicity is king. How many times do you have to pump your system to get pressure?
 

cranetruck

Moderator
Super Moderator
Steel Soldiers Supporter
10,350
74
48
Location
Meadows of Dan, Virginia
Ernie, I removed the system before it was fully tested, but did get a few psi after about 15 strokes.
The suction hose was only a 3/8 dia hose and the pump was made for a 1" one, so it wasn't optimized.

One of the features of the -2 engine is a higher capacity oil pump and pressure comes up in about 10 seconds. Perhaps in the future, I'll install some kind of pre-lube pump, but for now, I have plenty of other projects.
 
Top
AdBlock Detected

We get it, advertisements are annoying!

Sure, ad-blocking software does a great job at blocking ads, but it also blocks useful features of our website like our supporting vendors. Their ads help keep Steel Soldiers going. Please consider disabling your ad blockers for the site. Thanks!

I've Disabled AdBlock
No Thanks