• Steel Soldiers now has a few new forums, read more about it at: New Munitions Forums!

  • Microsoft MSN, Live, Hotmail, Outlook email users may not be receiving emails. We are working to resolve this issue. Please add support@steelsoldiers.com to your trusted contacts.

Indianapolis HMMWV Project

Milcommoguy

Well-known member
Supporting Vendor
1,706
2,255
113
Location
Rosamond, CA
You got it "fuel tank vent filter"

Don't swim in the deep end, without a snorkel kit.

Winner chicken dinner, CAMO
 
Last edited:

Wire Fox

Well-known member
1,252
161
63
Location
Indianapolis, Indiana
OK, next!

This is located just behind the air cleaner, there is a cushion clamp that it should be sitting in but is too loose to grab on to secure it. Looks like a Fuel Tank Vent but can't be sure. Can someone identify it for me?

The other obvious issue is that its not connected to anything, and for the life of me I do not see another nipple for another line to connect it to, any insight would be greatly appreciated.

View attachment 758131
You got it "fuel tank vent filter"

Don't swim in the deep end, without a snorkel kit.

Winner chicken dinner, CAMO
Yup, mine is exactly the same way: too loose to actually hold it reliably in-place. It's the fuel vent filter, like Milcommoguy says. The open side gets a vent line that attaches to a deep water fording kit, should you choose to install that later. As I see it, everything is working correctly for you...maybe just add a shim to help hold that vent filter in place?
 

83scrambler

New member
27
5
3
Location
Indianapolis, IN
Alright guys, its been a while, and again several things have started to progress.

Titled and licensed for the road here in Indianapolis, getting around just fine so far.

Reliable Starting - EESS Fixed!
I have the truck starting reliably on the original EESS box. Batts have been replaced, and grounding harness is installed. all thins and another smoked set of plugs led me to attacking the EESS box. I dug deep, and walked through the Yellow Label NARTRON EESS Printed Circuit Board and sourced/replaced the bad components. I am open to providing this service for others that find themselves in the same situation... glow plugs always on when the control switch is in the RUN position. Contact me through PM if you would like help with it.

I am heading down the path of keeping the 4 man passenger area as dry as reasonably possible. I have a new Breton Ind. green soft top headed my way (not sure when yet), and sourced some 2018 Pacifica seats that should be here this Saturday. I have two 4 man bulkheads, one of which I will be using on my build, another I will be selling... let me know if you or you know someone that might be interested in it. My ultimate plan for this is to fit the soft top to it with some of the high strength Velcro and shingle it in a way that does not allow water to ingress. I need to get a hold of one of the bulkhead gap panels and will affix it as needed to block water entry.


QUESTIONS:
1. Does anyone need help with their yellow label NARTRON EESS? I am considering starting a separate post for this to open up to more folks.
2. Does anyone out there with the 4 man bulkhead brackets mind pulling several dimensions for me in an effort to make some out of some AL I have in the shop?
2a. what are folks doing to seal the water out as the divider is in no way water tight, i prefer to modify as little as possible, but see this being a challenge.
3. Does anyone need a 4 man bulkhead / divider? Also considering posting in classifieds if no one bites within a reasonable amount of time.
 

Wire Fox

Well-known member
1,252
161
63
Location
Indianapolis, Indiana
Item 3. Closed cell foam. Just like for metal roofing installs, you can use foam add seal. Typically one would cut it so that it fits to the truck bed corrugation perfectly, and the other flatr side will seal against the divider. This should block a pretty good amount of water.

Sent from my Nokia 6.1 using Tapatalk
 

ikoinu

Active member
Steel Soldiers Supporter
139
43
28
Location
Los Angeles, CA
I would be interested to see what components you replaced on the board.

Installed a manual setup to get around this, works perfectly but if the unit is fixable then I might as well fix it.
 

83scrambler

New member
27
5
3
Location
Indianapolis, IN
Issue de jour

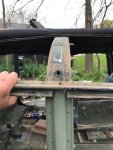
I am in the process of replacing my soft top and ran into loose side rails... so loose that in fact they have wallowed out the hole where the fastener once was located and was at one time assumedly tight.

Anyone ran into this and have any thoughts about how they prepped for repair? Less welding up and redrilling, I'm at a loss. Preference being that replacing the B-Pillar does not have a place ont he list of possible ways to resolve.

Welding it up is equally challenging until a spoolmate gun introduced to the family of tools, but will likely come in hand other places so not out of reach.

Soft Top Side Rail 1.jpg
 

sf1954

Member
Steel Soldiers Supporter
38
20
8
Location
Richmond, Va
I had the same problem but on the windshield frame. I drilled the hole and installed a riv-nut. I did it 2 years ago and I think I used a 1/4/20 riv-nut. Hope this helps.
 

Weller

Member
220
8
18
Location
Kern County, CA
Great news that you are titled and licensed, looks like its coming together well.

"It would be interesting to know where the HMMWV spent its life, not sure if there are ways to tell through the markings or not."

I wonder about this on all my vehicles/shelters. Nearly all have had something sprayed on them (horse head, alien head, etc.) and its made me curious.
 

Wire Fox

Well-known member
1,252
161
63
Location
Indianapolis, Indiana
Issue de jour

I am in the process of replacing my soft top and ran into loose side rails... so loose that in fact they have wallowed out the hole where the fastener once was located and was at one time assumedly tight.

Anyone ran into this and have any thoughts about how they prepped for repair? Less welding up and redrilling, I'm at a loss. Preference being that replacing the B-Pillar does not have a place ont he list of possible ways to resolve.

Welding it up is equally challenging until a spoolmate gun introduced to the family of tools, but will likely come in hand other places so not out of reach.

View attachment 763337
I had this issue, too. I was able to sneak a rivnut in there just right to get it hold in place. If that fails, you can place in a wellnut that will expand a bit larger and should hold up a few years before the rubber dry rots. The wellnut was actually what was there when I picked up my HMMWV, but it had rotted and torn. Welding in a new plate of aluminum or some fill is definitely the long term fix when you're ready.

Sent from my Nokia 6.1 using Tapatalk
 

83scrambler

New member
27
5
3
Location
Indianapolis, IN
Back at it and now installing the front two Pacifica seats.

Down to the passenger side seat, which due to where I want the seat to be mounted, require that the battery box be removed and the batteries to be relocated. Just purchased the battery tray for under the hood from a well known H1 retailer located in Ohio.

Curious, and yes have recently asked in anohter months old thread, what battery cable lengths have people used to complete the battery move? What are the lesson's learned onthe swap that I should be aware of?

Any input on the above would be greatly appreciated!
 
Last edited:
Top
AdBlock Detected

We get it, advertisements are annoying!

Sure, ad-blocking software does a great job at blocking ads, but it also blocks useful features of our website like our supporting vendors. Their ads help keep Steel Soldiers going. Please consider disabling your ad blockers for the site. Thanks!

I've Disabled AdBlock
No Thanks