• Steel Soldiers now has a few new forums, read more about it at: New Munitions Forums!

  • Microsoft MSN, Live, Hotmail, Outlook email users may not be receiving emails. We are working to resolve this issue. Please add support@steelsoldiers.com to your trusted contacts.


M1009 rust remediation time (take 2)

SandBar

Full Time Patriot
755
231
43
Location
GA/FL
Painted the grill and headlight bezels, installed a small air horn and got ready to install the 4" lift kit. I know, I need to get more rust repair done but this lift kit is in my way every day in my office (good excuse to install). Took it out back and climbed some berms in 4 low for fun, checked out functionally ;)
 

Lild

Member
68
2
8
Location
Nashville,nc
Next time u patch an area u want just enough new metal to extend under the metal of the area to be repaired. Makes welding a ton easier. As for the primer u want epoxy primer over the bare metal, wont hurt to put over body work as well. If your not in a hurry to the epoxy will stand up to weather until your ready to prime & paint. Next to epoxy urethane primer is what used in auto repairs. ALL rust needs to either be neutralized with a chemical that turns rust into a paintable surface or completely removed. If not it will be a matter of time before it comes back. But so far for being new at this your doing pretty good & seem to be enjoying the experience. Keep it up, look forward to your progress.
 

SandBar

Full Time Patriot
755
231
43
Location
GA/FL
Finally got back to rust remediation. Doing the other side now (see cut out metal in pic below). 4" lift kit is now installed, now learning how to mount the new tires manually (brutal). Hope to be working on the area under the windshield next, then fro, there it gets easier. Working top down on this :)

cucv_lift.jpg
 

SandBar

Full Time Patriot
755
231
43
Location
GA/FL
35" tires are on (airsoft internal balance), and started fixing sheetmetal on the passenger side (you can see where I am repairing the B pillar in two steps). Now I can see the rear is sagging a bit. Will do a 2.5" shackle flip or a zero rate depending on how the measurements look. So far so good.

cucv lift and 35s.jpg
 

SandBar

Full Time Patriot
755
231
43
Location
GA/FL
light bar.jpg

Picked up a code 3 light bar and painted the center OD. Mocked up on the truck, looks pretty cool. Oh and it works!
 

FatBuddhaBoo

Member
330
8
18
Location
Jacksonville, Fl
Looking good so far, and thanks for the detailed pics as I have pretty much the same weld repairs to do. Never heard of the Eastwood Rust Encapsulator...gotta get some of that!
 

lindyp38

New member
788
0
0
Location
ulster county ny
Finally got back to rust remediation. Doing the other side now (see cut out metal in pic below). 4" lift kit is now installed, now learning how to mount the new tires manually (brutal). Hope to be working on the area under the windshield next, then fro, there it gets easier. Working top down on this :)

View attachment 422970
im curious as to the repair ull do under the windshield...as mine is rusted on both lower corners......thanks mario
 

SandBar

Full Time Patriot
755
231
43
Location
GA/FL
The rust encapsulator is great, I bought a couple cans with 24" 360 degree nozels too. While I have the b pillars open I coat the inside where I cannot see REAL good.

On the front window rust, I plan to pull the front clip. I am doing this also because although my fenders look ok, the attachment points on the actual fenders are rusted. I scored two fenders and inner wheel houses for 100.00 on CL. Then I will pull the hood and pull the windshield.

This will be a great time to work on the IP and get at the firewall to see if there is any damage I can not see. I bought a bunch of key sheet metal off a guy, metal you cannot get at LMC truck. I hope to have the B pillars complete in a week or so, inclused of seam sealer and primer.

"Are you watching? Good, because I am only going to do this once"
 

SandBar

Full Time Patriot
755
231
43
Location
GA/FL
So a long story short, my neighbors axle grenaded on him and he had no money or time to go get a new one (his work truck). I just happens that my stock rear end was what he needed. SO I gave him mine for a pittance (and helped him pull it). That left me needing a new rear end. After scouring craigslist and finding a sea of danas and semi floats I decided to check the local junk yards. The only 14b FF locally was a 1 ton with no spring perches and the guy wanted 500.00.

Low and behold I talk to one on the phone and they say they have a 1987 2500 Suburban with the 454 and 8 lug axles. I quickly get to the yard with a friend and trailer. I see it from a distance and it is mostly there, and most important of all the axles are confirmed 14 bolt, full float. We get to work and find no rust, spins well, no odd sounds. In fact, someone loved this burb a lot, flowmasters, overloads and really clean.

About the time we get the u bolts all the way out and all the lines disconnected the owner comes by and asks if we are done as they are closing in 5 minutes. I reply "yes sir, we will hurry". Well, we had it dropped to the ground in 5 minutes, then had to get a large engine hoist, drag it out from under the truck (those are HEAVY for 2 people to drag sideways through sand!!). They ended up staying open an extra 30 minutes for us, it cost 202.00 out the door which I thought was great. Grand total an hour to unbolts it and 30 minutes to load up.

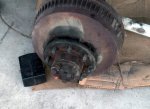
We got home and I met me neighbor out front where we took my axle out and placed the 14b ff under the truck (with the help of a 3d person) in about an hour and a half. I will work on bolting it up later today, now to find some 8 bolt rims. I am thinking I will do the el dorado disc brake swap too. Oh and I have no idea what the ratio is on this, but I will pop the cover to inspect and change fluid as well. Good times.

It looks rusty as it is humid out this morning but it is actually rather rust free and just dirty:

14b under cucv.jpg14b close up.jpgr
 

SandBar

Full Time Patriot
755
231
43
Location
GA/FL
Turns out the 14b FF is geared in 3.73. With my 35" tires and OD it puts the 6.2 at 1700 at 65 MPH. Not terrible, maybe I will go with a manual conversion one day. :)
 

SandBar

Full Time Patriot
755
231
43
Location
GA/FL
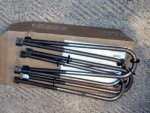
Well my RC lift u bolts do not fit the newly acquired 14b FF axle. I thought I was stuck mail ordering new ones, NOPE.

I found a place in town that makes u bolts while you wait. Grade 8, case hardened with hardware for 50.00 in 15 minutes. They are made from 5/8 stock and look great. You know it is good when you see the local big rigs in their shop getting new leafs and other such hardware fabbed and installed.

Axle goes on tomorrow. I had to cut the rubber brake line that goes from the axle up to the body (rear). Hooking up the parking brake looks fun.

ubolts.jpg
 

SandBar

Full Time Patriot
755
231
43
Location
GA/FL
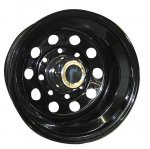
So I decided to keep the tires I have now (decent 35s) and bit the bullet and bought 2 new rims. I wasted enough time looking locally for some 15" 8 lugs so I found a decent set online and the best shipped price possible. I ended up with Pro Comp Wheels Crawler Series 87 Black Monster Mod Wheels, $130.00 shipped for two. Should be here by the weekend.

In other news, my 3010/3050 u joint will be here today along with my replacement brake line. Fairly simple things, but required for movement. Updated pics coming soon.

rim.jpg
 

SandBar

Full Time Patriot
755
231
43
Location
GA/FL
Back to replacing rusty metal with good thick rust free metal.

Another tip that I picked up and just makes good sense. Cut as little as possible, don't just hack out large sections assuming the entire area is bad. Here is a case in point. There were to areas on the outer b pillar where the paint was bubbles and flaking from rusting underneath. Had I just removed the entire area I would have replaced a lot of good metal. Instead I took a wire wheel and removed all of the paint and rust to see what lay underneath. Low and behold it was just two affected areas, so I cut them out. I have found that donor metal is much thicker than any of the replacement panels I have received to date. So some donor b pillar leftovers will make for good patches here.

I sprayed the inside with eastwood rust encapsulator, then green primer. The metal under the outer skin was great, very minor surface rust compared to the upper b pillar I did previously.

2013-05-06_14-22-27_302.jpg

Stay tuned, next I learn how to remove and apply seam sealer and remove the front clip to fix that rust under the front window. I keep telling myself that the really fun parts are post rust removal! :)
 

Warthog

Moderator
Super Moderator
Steel Soldiers Supporter
13,775
227
63
Location
OKC, OK
I have a M1009 that lived in the Chicago area. I think there is more rust than good metal.

Your work gives me some hope.


Great work!!!
 

SandBar

Full Time Patriot
755
231
43
Location
GA/FL
I had my share of naysayers, it comes down to preserving it rather than crushing it. Some even told me to replace the whole cab. Yah right, I don't give up that easy :)
 
Last edited:

SandBar

Full Time Patriot
755
231
43
Location
GA/FL
I hear that, I would say mine is half gone. Good thing these have full frames under them. I am saving the inside b pillar and floor for last. Thankful the frame looks so good. I think the local government purposefully drive up against sharp branches to try to remove paint :)
 

SandBar

Full Time Patriot
755
231
43
Location
GA/FL
Slab is poured, now two days until the block walls are started. Progress on somewhere to work indoors!

concrete pour.jpg
 
Top
AdBlock Detected

We get it, advertisements are annoying!

Sure, ad-blocking software does a great job at blocking ads, but it also blocks useful features of our website like our supporting vendors. Their ads help keep Steel Soldiers going. Please consider disabling your ad blockers for the site. Thanks!

I've Disabled AdBlock
No Thanks