-
Steel Soldiers now has a few new forums, read more about it at: New Munitions Forums!

Picked up 6 MEP-802A gensets and will be documenting making them all runners here
- Thread starter pclausen
- Start date

More options
Who Replied?- 1,975
- 3,093
- 113
- Location
- Pepperell, Massachusetts
Yes, I can add some to your order.Does anyone know where to pick up those hold down springs for the relays?
How many would you like?
- 3,586
- 5,191
- 113
- Location
- MA
You can find the spring here: https://www.alliedelec.com/product/te-connectivity/4-1393159-8/70198576/
Also available through Mouser, Newark, etc. Nice work on the rebuild.
Also available through Mouser, Newark, etc. Nice work on the rebuild.
- 15,959
- 22,319
- 113
- Location
- Burgkunstadt, Germany
Does anyone know where to pick up those hold down springs for the relays?
I have never seen where you can get just the clips. When you order the socket, the clip comes with it. Kurt might be able to tell you where he found the sockets, and you might be able to write them a mail.
Carefully labeled all the wires before removing the block.
The only problem I have with this method of rewiring is, if someone made a mistake before you, you just made it again. I never marked wires, I just took the schematics and checked the wire number to the terminal number.
Open the three documents and look at them from first to last page. Then decide if they might help you with wiring.
Attachments
-
3.5 MB Views: 8
-
4.2 MB Views: 8
-
683.6 KB Views: 6
- 1,975
- 3,093
- 113
- Location
- Pepperell, Massachusetts
Hold downs already on order
- 15,959
- 22,319
- 113
- Location
- Burgkunstadt, Germany
Did not see the second page!! gettin old. 
Thanks for those manuals Guy! I had the 3rd one, but not the first 2. I'll print out all 3 and go through all the wiring completed so far and check off each one as I go.
Thanks for getting those holds downs ordered Kurt. Sent you an email just now.
Got TB4 back together again:

Looks a lot better than before. Still need to double check the wiring against the docs Guy sent.
Thanks for getting those holds downs ordered Kurt. Sent you an email just now.
Got TB4 back together again:
Looks a lot better than before. Still need to double check the wiring against the docs Guy sent.
Made some decent progress tonight.
I stole a couple of these rubber lined holders from the donor 802:

And was then able to properly hand the main harness going across the area that will be covered by the control box soon:

Also got the rear lower frame in and door mounted. All those pieces were banged up pretty bad, but came out ok.
Next I started working on the fuel filter stuff, and it was a total mess. No air would blow through the line feeding the injectors. I soon discovered why:


I also discovered that the washers I used on the exposed head bolts were these banjo fitting washers, so I get to redo those, but just one bolt at a time, so I don't think I'll have to re-torque the head bolts under the valve cover. Now I remembered the reason I had a couple of these packages laying around next to the head:

I cleaned up the faces of the banjo fittings, but one side got a pretty big nick in it:

The other side looks ok:

I think with those banjo washers with the build-in O-ring, they will seal ok.
I do need new rubber washers for the bleed screws on the filter housing:

I got the filter housing soaking in kerosene overnight. The banjo fitting and bleed bolts are in Evapo-Rust. Once they are rust free, they will join the filter housing in the kerosene.
I stole a couple of these rubber lined holders from the donor 802:
And was then able to properly hand the main harness going across the area that will be covered by the control box soon:
Also got the rear lower frame in and door mounted. All those pieces were banged up pretty bad, but came out ok.
Next I started working on the fuel filter stuff, and it was a total mess. No air would blow through the line feeding the injectors. I soon discovered why:
I also discovered that the washers I used on the exposed head bolts were these banjo fitting washers, so I get to redo those, but just one bolt at a time, so I don't think I'll have to re-torque the head bolts under the valve cover. Now I remembered the reason I had a couple of these packages laying around next to the head:
I cleaned up the faces of the banjo fittings, but one side got a pretty big nick in it:
The other side looks ok:
I think with those banjo washers with the build-in O-ring, they will seal ok.
I do need new rubber washers for the bleed screws on the filter housing:
I got the filter housing soaking in kerosene overnight. The banjo fitting and bleed bolts are in Evapo-Rust. Once they are rust free, they will join the filter housing in the kerosene.
I'm drawing a blank on locating those bleed screw seals. Part Number 186-6289. Any leads on where I might be able to get some?
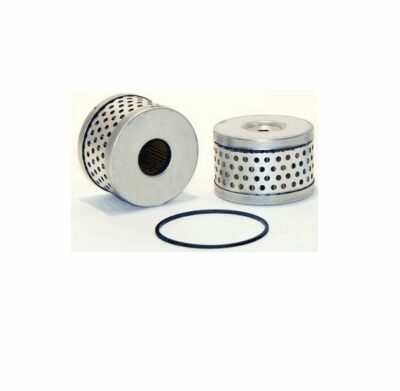
I did go ahead and order 2x 2 packs of these:
Each kit includes all of the following:
So $10 bucks per kit. Considering this is GMG, this is an item they actually don't rape you on.
You get all the parts circled in red:

Item 17 circled in orange is the one I'm having a hard time locating. Looks to be a plain flat rubber washer. Maybe I can match it to something at the local hardware store?
I did go ahead and order 2x 2 packs of these:
MEP802A-MEP803A-MEP812A-MEP813A Fuel Filter 2 Pack FF4012, Onan 186-6279 | eBay
MPN: FF4012. SKU: FF4012. Will also fit these machines: Benford 100; 150(Lister-Petter LPA2 Eng.)., 15CWT; 23CWT, 1-71 Series(Lister LT1, LT2, ST1 Eng.)., 200(Lister-Petter LPA3 Eng.)., 2-60; 2-65 Series; 2-75P; 2-75R; 2-90P; 2-90R(Lister LT1, LT2, ST1 Eng.).
www.ebay.com
Each kit includes all of the following:
| 186-6279-01 | Bowl Seal (1x) |
| 186-6279-02 | Element Seal (1x) |
| 186-6279-03 | Seal (2x) |
| 186-6279-04 | Element Filter (1x) |
So $10 bucks per kit. Considering this is GMG, this is an item they actually don't rape you on.
You get all the parts circled in red:
Item 17 circled in orange is the one I'm having a hard time locating. Looks to be a plain flat rubber washer. Maybe I can match it to something at the local hardware store?
Last edited:
- 3,586
- 5,191
- 113
- Location
- MA
Could always just pick up a whole new bowl: https://surplus.saintois.com/en/mep-802a/416-fuel-filter-2910-01-110-8184-284359-186-6278.html
- 15,959
- 22,319
- 113
- Location
- Burgkunstadt, Germany
The screw has a SMR code of: KFOZZ. If you look that up it says:
Items with these codes are not to be requested/raquisitioned individually.
They are part of a kit which is authorized to the maintenance category
indicated in the 3rd position of the SMR code. The complete kit must be
requisitioned and applied.
That should tell you what to do. Kit part # is: 393331
If you look in the back of the TM to the part number cross section, you will find the part number and the NSN for it: 2815-01-139-4010.
Try both kit part number and NSN in your search.
There are tools for you to use in the TM.
- 3,586
- 5,191
- 113
- Location
- MA

LISTER-PETTER 393331 pare parts pack 2815011394010 | eBay
Find many great new & used options and get the best deals for LISTER-PETTER 393331 pare parts pack 2815011394010 at the best online prices at eBay! Free shipping for many products!
www.ebay.com
Made some decent progress this evening. First up was the straighten out the 2 small "door sill" panels on the sides. This is what one of them looked like before:

And after:

Not perfection by any means, but they both bolted up just fine after some quick work in the vice and a pein hammer.
All wiring, fuel lines and oil drain work done on the right side of the engine:

Wiring complete on the left side of the engine:

Muffler and intake installed:

Control box mounted:

Both the flip down and top cover piano hinges are in really bad shape. Control panel flip down:

The rod is almost gone. I'll see if I can find some stock at Lowe's or something. The front top flip down hinge was not in much greater shape:

The return line well nut was also completely gone:

That rubber was hard as a rock. Was finally able to get it off except for the brass insert:

Dropped the fitting on Evapo-Rust. Hopefully tomorrow after a shot of PB Blaster, I can unscrew that brass insert from the fitting.
Slowly getting there. This 2006 unit was in really rough shape...
And after:
Not perfection by any means, but they both bolted up just fine after some quick work in the vice and a pein hammer.
All wiring, fuel lines and oil drain work done on the right side of the engine:
Wiring complete on the left side of the engine:
Muffler and intake installed:
Control box mounted:
Both the flip down and top cover piano hinges are in really bad shape. Control panel flip down:
The rod is almost gone. I'll see if I can find some stock at Lowe's or something. The front top flip down hinge was not in much greater shape:
The return line well nut was also completely gone:
That rubber was hard as a rock. Was finally able to get it off except for the brass insert:
Dropped the fitting on Evapo-Rust. Hopefully tomorrow after a shot of PB Blaster, I can unscrew that brass insert from the fitting.
Slowly getting there. This 2006 unit was in really rough shape...
- 3,586
- 5,191
- 113
- Location
- MA
Yeah that well nut design blows. Ive used PB blaster and channel locks on that stupid little insert.
- 15,959
- 22,319
- 113
- Location
- Burgkunstadt, Germany
If you put this part # in epay, you will come up with a strip of brand new hinge material.
AA07060408
AA07060408
Thanks @Guyfang placed and order. That will be a LOT easier to deal with than trying to repair the old ones. I did go ahead and steal the control panel flip down hinge from the parts unit for now.
Got the new well nut on the fitting:

Installed well nut, front section and completed the pluming with wiring for the fuel tank:

Completed the rest of the coolant system:


Need to steal the 2 plugs from the parts unit water pump since the new one didn't come with one:

So that's pretty much it as far as getting the 2006 unit running until my pieces come in for the fuel bowl.
So I turned my attention to the 2007 unit. This is one of the ones that I had the machine shop redo the head on. It was all put back together, but I don't remember why I sat it aside back then.
Here it is on the right. The one of the left is the one waiting on fuel filter parts:

I learned my lesson on the 2009 unit and drained the old fuel out:

Filled with fresh fuel and went to the prime position. After 2 seconds the fuel pump stopped with a "NO FUEL" fault indicator. Tried a few more times, same thing. When it quite, I could hear the fuel dripping back into the tank.
So I unplugged this guy:

And now the fuel pump would keep running in the prime/run position. I let it circulate for about 10 minutes, then tried to fire her up. It cranked fine, but was completely dead. I did check and the fuel solenoid does engage. Tried 5 or 6 times for maybe 20 seconds each. Completely dead.
I guess the next step is to loosen the high pressure lines at the injection pumps to see if I get fuel there, correct?
Got the new well nut on the fitting:
Installed well nut, front section and completed the pluming with wiring for the fuel tank:
Completed the rest of the coolant system:
Need to steal the 2 plugs from the parts unit water pump since the new one didn't come with one:
So that's pretty much it as far as getting the 2006 unit running until my pieces come in for the fuel bowl.
So I turned my attention to the 2007 unit. This is one of the ones that I had the machine shop redo the head on. It was all put back together, but I don't remember why I sat it aside back then.
Here it is on the right. The one of the left is the one waiting on fuel filter parts:
I learned my lesson on the 2009 unit and drained the old fuel out:
Filled with fresh fuel and went to the prime position. After 2 seconds the fuel pump stopped with a "NO FUEL" fault indicator. Tried a few more times, same thing. When it quite, I could hear the fuel dripping back into the tank.
So I unplugged this guy:
And now the fuel pump would keep running in the prime/run position. I let it circulate for about 10 minutes, then tried to fire her up. It cranked fine, but was completely dead. I did check and the fuel solenoid does engage. Tried 5 or 6 times for maybe 20 seconds each. Completely dead.
I guess the next step is to loosen the high pressure lines at the injection pumps to see if I get fuel there, correct?
I loosened the high pressure lines at the injection pumps. I have fuel there.
Here's the action of the fuel solenoid while cranking:
And here's what the exhaust looks like:
Maybe there is just old fuel still in the lines from when I attempted to get it started 6 years ago and then let it sit? I think I never was able to get it to start back then, and then just moved onto another set, but I don't remember for sure...
Last edited:
- 108,561members
- 163,815threads
- 2,304,772posts
- 1,263online users