Capt.Marion
Active member
- 1,811
- 15
- 38
- Location
- Atlanta, GA
Steel Soldiers now has a few new forums, read more about it at: New Munitions Forums!


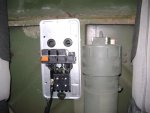
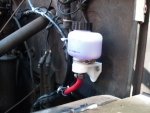
I made mine from a piece of scrap pressure rated 4" pvc pipe. The top cap has a large threaded plug(for filling) that I installed a schrader valve in(for pressurizing). The bottom cap has a nipple that connects to a steel brake line that runs directly to the MC cap. If I want to bleed the brakes I just air up small air tank to 25-30 psi, connect to tank to the schrader valve and then go around opening bleeders.
note, the core of the schrader valve is threaded out so that it can still vent.
I painted it green and mounted to the back wall of the cab.
The vent line also connects to the airpak/booster and to either the main draft tube (from the engine) OR to a separate vent line that vents near the air cleaner.What else does the vent line service? It is a T connection to the master cylinder cap.

Are you using this as a remote reservoir also?I made mine from a piece of scrap pressure rated 4" pvc pipe. The top cap has a large threaded plug(for filling) that I installed a schrader valve in(for pressurizing). The bottom cap has a nipple that connects to a steel brake line that runs directly to the MC cap. If I want to bleed the brakes I just air up small air tank to 25-30 psi, connect to tank to the schrader valve and then go around opening bleeders.
note, the core of the schrader valve is threaded out so that it can still vent.
I painted it green and mounted to the back wall of the cab.
yes, with the schrader valve loose it acts as a reservoir (it easily holds 1 quart of fluid, would probably hold 2)Are you using this as a remote reservoir also?
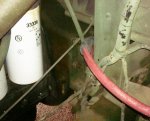
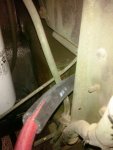
I completed the install today with the brake fluid hose in place. It is a 5/16 hose about four feet long. I ran it from the remote reservoir to the MC. It was a kind of strange fit going under the cab, sharp metal angles and other wiring and such. I got concerned about the possibility of metal rubbing through the hose at the wrong time! The solution was easy. I got some 1/2 inch ID rubber hose, cut it length wise and put the brake fluid hose down the six inch length of the hose. The brake fluid hose is a tight fit, the outside hose is going no where and any rubbing will be on the rubber hose. Put the hose in place, tightened the worm clamps and finished.
I would replace the hose with brake line with a small hose at the end. That much hose is asking for trouble and a leak.I completed the install today with the brake fluid hose in place. It is a 5/16 hose about four feet long. I ran it from the remote reservoir to the MC. It was a kind of strange fit going under the cab, sharp metal angles and other wiring and such. I got concerned about the possibility of metal rubbing through the hose at the wrong time! The solution was easy. I got some 1/2 inch ID rubber hose, cut it length wise and put the brake fluid hose down the six inch length of the hose. The brake fluid hose is a tight fit, the outside hose is going no where and any rubbing will be on the rubber hose. Put the hose in place, tightened the worm clamps and finished.
I had considered that possibility. But, it was quicker to install, I did put the 1/2 inch rubber hose on the spot I considered most like to rub and leak. I will post a pic if it ever stops raining here.I would replace the hose with brake line with a small hose at the end. That much hose is asking for trouble and a leak.

We get it, advertisements are annoying!
Sure, ad-blocking software does a great job at blocking ads, but it also blocks useful features of our website like our supporting vendors. Their ads help keep Steel Soldiers going. Please consider disabling your ad blockers for the site. Thanks!