• Steel Soldiers now has a few new forums, read more about it at: New Munitions Forums!

  • Microsoft MSN, Live, Hotmail, Outlook email users may not be receiving emails. We are working to resolve this issue. Please add support@steelsoldiers.com to your trusted contacts.

winch installs

JohnnyBM931A2

Member
877
1
18
Location
Crystal Lake, Illinois
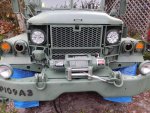
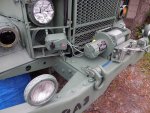
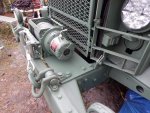
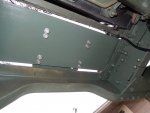
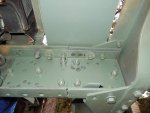
Here are some pics of my rear winch setup. Integrated with height adjustable receiver mount.

View attachment 604996 View attachment 604997 View attachment 604998 View attachment 604999 View attachment 605000 View attachment 605001
That's a cool setup :) Honestly, you don't even need those pins on the adjustable vertical legs.. Just hook the front of the winch cable around that lower receiver mount, and you can use the winch to raise/lower it. That would make it "infinitely" adjustable (unless you plan on using the winch to pull stuff on to your trailer, which means that idea wouldn't work.)
 

Swamp Donkey

The Engineer
Steel Soldiers Supporter
1,450
119
63
Location
Gray, GA
I finished hardwiring my winch. I had made the panel next to the winch to hold the remote connector and a slave port. I had the winch wired directly to the slave port and powered the winch with a slave cable run around the truck until I got all the supplies together.


I used the slave port as the junction for the new 3/0 welding cable to tie into the leads from the winch. This gave me a clean junction and a powered slave port in the front. The cables were loomed and secured with loop clamps. I used solder lugs with solder pellets and marine adhesive heat shrink on all the ends. The Overload Interrupt Module ended up in plain sight where the status light is visible while running the winch. For those whose OIM was painted, yes there is a status lights on it. The master switch is a Blue Sea 3000, rated at 600A continuous and 900A intermittent.

Pictures won't upload. Will try again later...

20160131_163535.jpg

20160131_163553.jpg
 
Last edited:

Recovry4x4

LLM/Member 785
Super Moderator
Steel Soldiers Supporter
34,014
1,814
113
Location
GA Mountains
That Blue Sea stuff can be pricy but it is top shelf. I'm lucky to have a West Marine here at work with a whole isle of Blue Sea stuff.
 

Swamp Donkey

The Engineer
Steel Soldiers Supporter
1,450
119
63
Location
Gray, GA
That Blue Sea stuff can be pricy but it is top shelf. I'm lucky to have a West Marine here at work with a whole isle of Blue Sea stuff.
I agree on the Blue Sea stuff. I figured since this was probably the largest circuit on the truck, I'd do it up real good. I'm actually not going to stay with that switch though. That switch is a single circuit ON/OFF switch. There is another model that is a two circuit, multiple position switch that I'll swap it out with. I could then have a master switch for the truck and the winch all in one switch, with the ability to power one or the other, or both at the same time. Unfortunately I didn't think of this until after I received the first one.
 

74M35A2

Well-known member
4,145
313
83
Location
Livonia, MI
Finally got my el cheapo winch install finished today. Went with 12 volt since I have 8 deep cycle AGM batteries for the coach power in back.
8 batteries? Are you serious? That's over $1000 just in batteries. You know, if you add 2 more and series them up, it will be 120V and not even need an inverter if you want to power light bulbs, toasters, brush type motor appliances, and your own electric chair.
 

QUADJEEPER

Member
Steel Soldiers Supporter
797
6
18
Location
Winter Springs, FL
8 batteries? Are you serious? That's over $1000 just in batteries. You know, if you add 2 more and series them up, it will be 120V and not even need an inverter if you want to power light bulbs, toasters, brush type motor appliances, and your own electric chair.
Ha ha. I like the electric chair idea. No, that's part of my solar system. Check out my thread " Survival 109 build " for the details.
 

Swamp Donkey

The Engineer
Steel Soldiers Supporter
1,450
119
63
Location
Gray, GA
Got 2 out of 6 pictures to upload in the previous post. The 2 that uploaded were slightly larger than the others so...who knows.
 

Hard Head

Member
Steel Soldiers Supporter
540
21
18
Location
Greenville SC
Caiman MRAP (12) (1).jpgBe careful not to use too long of a bolt or over torque as you could damage the winch housing. Torque between 35 and 50 ft lbs! The 3/4" thick Warn Caiman mounting plate shown in the picture uses 8 - 40 mm 10.9 flange bolts. I used 8- 35 mm on the RG-33 bumpers when I send out with a winch since it is approx 1/2" thick. The bolt flanges practically touch one another. Warn recommends 10.9 or better grade bolts. 10.9 = grade 8 SAE.
 
Last edited:
Top
AdBlock Detected

We get it, advertisements are annoying!

Sure, ad-blocking software does a great job at blocking ads, but it also blocks useful features of our website like our supporting vendors. Their ads help keep Steel Soldiers going. Please consider disabling your ad blockers for the site. Thanks!

I've Disabled AdBlock
No Thanks