• Steel Soldiers now has a few new forums, read more about it at: New Munitions Forums!

  • Microsoft MSN, Live, Hotmail, Outlook email users may not be receiving emails. We are working to resolve this issue. Please add support@steelsoldiers.com to your trusted contacts.


M706/v100 WIP Link

M813rc

Well-known member
Steel Soldiers Supporter
4,056
2,716
113
Location
Near Austin, Texas
Good job Shane, having spent most of today in and under my 1/1 scale version, I can say yours looks a whole lot better than the kit originally did.

I have some photos of the underneath if they would be helpful to you.

One note- I saw on one modeling site where they were talking about cleaning off the lip around the edges of the hull front and rear plate. Don't! That lip is there on the real vehicles. Same goes for the roof edge around the top of the hull. A lot of the weld lines on the other plates are very prominent. I'll dig through the pictures and post a couple for you to show what I mean.

I'll be updating my restoration thread to show the progress to date, probably tomorrow. If you don't see details you need there, let me know, I'll take some more pictures for you, or dig some out of my file.

Cheers

Edit: Well, even though I scaled down that first pic, it got further reduced on the upload, but you can still see the edges. Note also in pic two that non-standard tow points have been added above the regular ones on this V100.
 

Attachments

Last edited:

sapper141

New member
12
0
1
Location
Alberta, canada
Hi Rory
I've got a build blog going on Armourama that you can check out here:
Armorama :: correcting the M706/V100 to make Catch22
I've been following you progress since the beginning even before the kit came out and collecting the pictures where I could find them. it's nice to find them in one spot.
Have you decided on the V that it will represent to play with the guntruckers or are you just going plain Jane. If you decide on a specific unit I might be able to help you there. I've been helping a decal producer to make accurate decal markings for the kits. this is the site
Spearheads Frontier
these are a couple of the examples so far:
D356086
D356085
Okay I do have picture request I could use some shots of the engine bay, the rad hanger and where the batteries sit .
Seeya and Thanks again
Shane
 

M813rc

Well-known member
Steel Soldiers Supporter
4,056
2,716
113
Location
Near Austin, Texas
Shane, sorry, I missed this when you posted it. Hopefully these will suit your needs, if not let me know, I'll take some more.

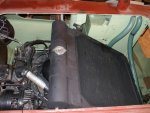
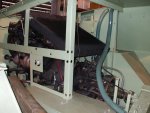
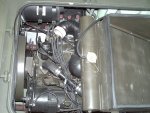
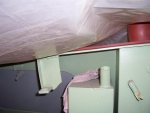
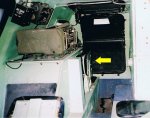
The batteries mount in two simple racks just inside and below the engine access door. They are held down by a bracket on top with two J-hooks that latch into loops on the rack sides. There is a heat shield between the batteries and the engine, it mounts on the tabs visible on the back of the wheel well and the fan shroud mounting box (just below/beside the exhaust port). Heat shield comes up level with the top of the upper battery. The air filter hangs from the roof above all this, if I can find a picture of another V with that installed, I'll attach it.

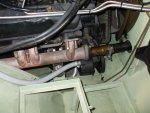
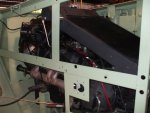
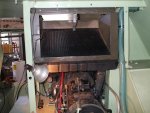
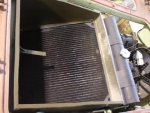
Radiator mounts each have a couple of rubber grommet vibration dampers.
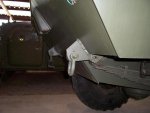
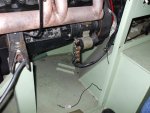
The blue hose across the transmission doesn't belong there, it is the forward bilge pump vent line and goes between the radiator corner and the wheel well, it is just loose to give clearance while putting the radiator in.
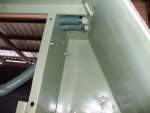
I included one showing how the hoses go through the fire extinguisher nook and vent overboard through a shrouded exit point in the hull. The fire suppression hose mounts to the fixture visible in the firewall below the bilge hoses.
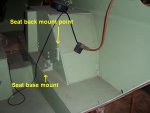
Since we are talking about the bilge pumps, I included a shot that shows where the one under the engine mounts to the hull floor, the other one is a bit forward under the transmission.

Hopefully all the details mentioned can be seen in the enclosed pictures, but the quality gets reduced way down when they get posted. If there is something you can't make out, let me know, I may be able to either crop that bit and post it higher res, or take a closeup. Or I can email the full size pics to you.

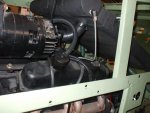
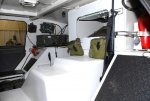
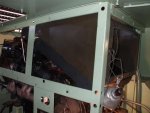
Nothing like good closeups to show the defects in one's paintwork, eh? I can see several spots of primer where I missed with topcoat green :roll:. You can also see where the exhaust joint leaked and spewed all that great black stuff you get when you fire up a rebuilt engine for the first time. Once the restoration is done, I will wash the interior out, it is full of shop dust and dirt now.

Cheers
 

Attachments

Last edited:

M813rc

Well-known member
Steel Soldiers Supporter
4,056
2,716
113
Location
Near Austin, Texas
In order to show the upper radiator mounts in more detail I cropped the big picture to just that area, hopefully it will post more clearly.

Also, there is a box that forms an intake tunnel for the radiator. The top seals with foam/rubber to the intake in the top door (under the pagoda), the 'front' makes a seal with the front engine bay panel, that door in the panel opens into the radiator box to draw the air out of the crew compartment for ventilation/smoke removal.
If you run the engine without this box and the side panels in place you won't get adequate airflow through the radiator and the engine will overheat pretty quickly.
I added a picture with the vent door open. That V belongs to a SS member and is a beautiful restoration.

One pic shows the box in place in another V. Note that the air intake hose is disconnected from the air cleaner canister, which is in the top left of the picture.
The other pic shows mine on a shelf, topside down- the long angled side mates to the radiator, the front is to the left (clear as mud??).


Cheers

Edit- added more pics, including one of the drivers side radiator mount point.

.
 

Attachments

Last edited:

sapper141

New member
12
0
1
Location
Alberta, canada
Thanks Rory
I didn't know that the interior vent hatch had to be opened to operate. I always thought it was a substitute vent when needed. The pictures are a great help. Is the interior supposed to be sea foam green or white? I've painted mine Sea foam.
Now for the sad part , all that detail work that I've put in so far is getting covered over in field gear and I'm even being conservative on how much stuff I'm putting in. And all the nice engine work is for the most part hidden under the Rad:roll:. Oh well as most builders with AMS say at least I know it's there and thanks to digital cameras so can everybody else too.:smile: The same could be said for the things you found on your own project.
Wait until you see the next project that I'm scratch building an M56 scorpion. Now that I finally got the operators manual:grin: and all my other refs squared away
I'm still trying to find out from Jeff what unit he served with so I can do the unit markings on the upper bow plate. You can't see them to clearly in the 2 pictures of Catch 22
Seeya Shane
 

M813rc

Well-known member
Steel Soldiers Supporter
4,056
2,716
113
Location
Near Austin, Texas
Maybe I didn't word that clearly - the hatch in front does NOT have to be open to operate, it can be opened as needed to draw air through the hull for ventilation or to draw smoke out of the interior during festivities. So long as the air comes through the box, the radiator doesn't care if its from in front or above.

Early V's, and almost all other US armour, were white inside until early-mid 60's (65??), then the switch was made to seafoam green. Since yours is a later version, green would be appropriate.

Jeff and Catch 22 were with the Co A, 504th MP, 16th MP Group. With the markings on top of the nose they are hard to read, but look the same as the markings on the nose of the one below, I can't make out the unit # (A-??) on Catch 22. Maybe Jeff can tell you that.

I saw your thread on the V model, very nice, I'm waiting to see the engine work you do. And yes, even though you won't see that much of it, it is good to know its there. Maybe you could leave a side panel inside off?

Cheers

.
 

Attachments

Last edited:

B3.3T

Well-known member
1,285
86
48
Location
SW Ohio
I must correct you, Rory, on interior colors. Many armor vehicles have white interiors into the present. M-88 and M-113 for example. All through the 60's and after, M-114, M-60, and some M-706's, too.
 

jimk

In Memorial
In Memorial
1,046
45
48
Location
Syracuse, New York
TM 9-2320-245-24, section 4-11 (page 42), dated Jan 1972, says sea foam green (24533) is appropriate. Maybe the white you are referring were the exception(s). I think a few runs, overspray and lots of grubby fingerprints were appropriate too, irregardless of what was written. Comments wecomed.
 

Attachments

M813rc

Well-known member
Steel Soldiers Supporter
4,056
2,716
113
Location
Near Austin, Texas
Correction taken B3.3T, and that is why I used the terms "almost all" and "appropriate". :-D Despite what some think, there are no absolutes when it comes to MVs, and always exceptions to the rules. We can stay with the V100 as an example. It was stated in another thread here a while back that there were no camo V100s in Vietnam, which statement had to be quickly modified to Army V100s since the USAF ones were delivered in camo. Shortly thereafter up comes a picture of an Army V with camo on it.

So, most armour built from mid-60s on was "supposed" to be painted seafoam green inside, but that doesn't necessarily mean all were. On that note, I have only been in one M60 with a white interior, and noted it at the time (c.1980) as an oddity. It was an old Army tank, one of a batch coming in for a refurb and subsequent Marine use. But I would hazard a guess that lots of them painted white during production stayed white inside their whole careers. You don't repaint the interior of something like that unless you have to. And I wasn't a tanker, so maybe only the ones I got in were green.
Being a prolific model builder during my Marine days (late 70s to late 80s) I was very concious of colour, etc. Of the other armoured vehicles I was in regularly as talking cargo, namely LVTP-7s (AAAAAAV-7 or whatever it is called now, we just called them Amtraks), and Army M113s, I don't recall seeing any with white interiors. Again, that doesn't mean they weren't there.

Paint is a very variable thing, which is why I really get a kick out listening to the Jeep guys argue at length over the "correct" shade of OD.

Cheers
 
Last edited:

B3.3T

Well-known member
1,285
86
48
Location
SW Ohio
The detailing is super, but the XM-706E1 had full bench seats on each side. Only the USAF XM-706E2 had the flip down seats. Carbs were never painted black- too hard to find leaks.
 

M813rc

Well-known member
Steel Soldiers Supporter
4,056
2,716
113
Location
Near Austin, Texas
B3.3T is correct on the benches. The turreted models had single piece full length benches that fold up. They look like they would block the doors either up or down, but rather surprisingly they don't, they are easy to step over in either position.

That said, it is your model, and you can finish it as you like. Who is to say that some crew didn't modify their V to suit their own taste, eh?

Another example on the topic of there being no absolutes in the MV world- my V has the tunnel radio operators seat. This is normally only seen in the USAF E2's, but my E1 has one. The base for those is welded in, so its not like you could just unbolt one from another V and put it in there. Looks original.
One possible explanation is that according to documents, my V was actually ordered for the ARVN, but was delivered straight to the US Army instead as part of an ENSURE request (Expedited Non Standard Urgently Requested Equipment) filed in Feb 1968 after Tet. This explains my .30/.50 turret also, again non-standard for a US vehicle.

I have added some pictures of the radiator shroud I mentioned before. It is not attached, its just sitting in there to show positioning, I'm still in the process of restoring that bit.

Cheers

1- M706 bench seat
2- Radio op flip seat in an E2
3-5 Radiator shroud in place
6- Flip seat mount points in my V

.
 

Attachments

Last edited:
Top
AdBlock Detected

We get it, advertisements are annoying!

Sure, ad-blocking software does a great job at blocking ads, but it also blocks useful features of our website like our supporting vendors. Their ads help keep Steel Soldiers going. Please consider disabling your ad blockers for the site. Thanks!

I've Disabled AdBlock
No Thanks