• Steel Soldiers now has a few new forums, read more about it at: New Munitions Forums!

  • Microsoft MSN, Live, Hotmail, Outlook email users may not be receiving emails. We are working to resolve this issue. Please add support@steelsoldiers.com to your trusted contacts.


Air pack rebuilding question

Barrman

Well-known member
5,173
1,596
113
Location
Giddings, Texas
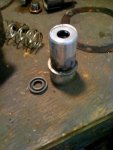
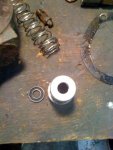
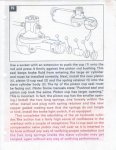
The air pack has a hydraulic side and an air side along with another part that deals with turning the air on and off. I have one apart at home and want to replace every part the kit came with. I am having trouble with the seal on the air side for the piston rod. Below are two pictures showing the new seal sitting next to the housing it is supposed to fit into.

The only way I can see to get the old seal out is bend the metal end of the housing back. I have a few extra housings sitting around and tried to gently bend the metal back on them. 3 out of 3 broke.

The more I look at the pack, the more I wonder if this seal will actually even make a difference. The piston rod goes through another bigger seal crossing over from air to hydraulic which seems to be the one that will keep the two parts seperate since its cups face the hydraulic section. The seal pictured seems to be more for keeping the air on the air side since the cups face the air piston.

Any suggestions or outright claims to just leave it as is and move on?

Thanks, Tim.
 

Attachments

rflegal

Member
Steel Soldiers Supporter
128
11
18
Location
New Mexico
:pVery timely as I am about to start this same rebuild - thanks for the excellent graphics. I have downloaded the TM and studied it quite a bit before starting but this info will be quite helpful. - Bob
 

Barrman

Well-known member
5,173
1,596
113
Location
Giddings, Texas
Thanks BC. That was what I was looking for. I am using my TM 9-8022 manual which doesn't show that. I am working on the Gasser, so figured the old manual would have less things that don't apply. -34 will come out tonight.
 

number9

Member
455
0
18
Location
Lexington, KY
Man I'm glad I seen this post and learned that is the air pack and has hydraulic on it too. Didn't know that. Mine is leaking air where the fitting with the red "X" on it screws into the housing. When I was looking at my truck on the base lot, I started to take all the lines loose and drop the housing out. GLAD I DIDN'T DO THAT :!:

So, how do you know when the air pack needs rebuilt?
 

Attachments

dabtl

Active member
2,053
7
38
Location
Denton, Texas
Go to Northern Tool or Sears and get a pack of the picks. Then take one curved or bent to the seal in the air piston. It comes out easily. Replace the seal as shown. It is easy.
 

Attachments

Last edited:

WillWagner

The Person You Were Warned About As A Child
Super Moderator
Steel Soldiers Supporter
8,392
2,408
113
Location
Monrovia, Ca.
There USED to be a sticky here that had step by step rebuild pics and narritive. I searched and couldn't find it. Maybe Bjorn will see this and locate it. He is EXTREMELY good at finding the unfindable!
 

Barrman

Well-known member
5,173
1,596
113
Location
Giddings, Texas
9,
if yours is just leaking air at that fitting, drain the air tanks, pull it apart and replace the fitting or whatever you need to do to fix it. That is the air side.

Most air packs work just fine in their job of boosting the brake pressure to the wheel cylinders with very little driver foot effort. You should hear a slight SSSSSH after you let go of the brake pedal from the air filter when the engine is off and you push the pedal with air in the system.

If you suspect it isn't boosting, then start to pull the back cover off and see if the big air piston moves. You have to remove the J pipe first. If the piston is not locked up, the spring behind it will be pushing the end cap off as you loosen it. You can stop right there because a piston pushing against you means it moves. I suggest this way first because as you loosen the rear cap, any brake fluid leaking out is not supposed to be there and means you need a rebuild. An easier way of checking function is to pull the J pipe and put an air fitting on the back of the can. Put shop air to it and you should hear all your brakes engaging. If you do, loosen the back of the can and see if fluid is leaking. No fluid and the air/hydraulic parts are good.

Put the J pipe back on the valve body, but have the can end off the can. Everything else should be hooked back up and sealed. Fire up the truck, let the air build and then shut off the truck. Push the brake pedal or have a helper push. As you push, air should come through the J pipe. If it does, hook it back up and drive on. If not, then the valve needs work.

Problems with the boosting are not near as common as packs that boost great but use fluid up. Find the vent line that goes from the air pack to the air filter housing. The master cylinder vent line T's into this line. Undo the vent at the pack. If you have fluid dripping out then your valve body is not right in at least one way and needs rebuilt. Remember the check for fluid in the air cylinder by loosening the rear cap? That is another way fluid can get to the vent by going past the seals of the hydraulic part, past the seal I started this thread to ask about and then past the seals on the air piston to be pushed out with the air once you let go of the brake pedal.

Pretty much most of our air packs are 40 years old or so. Things wear out with age and use. Kits are on Ebay in the $20-$40 price range, master cylinder kits are available from places like OD Iron and AB Linn for less than $30. Wheel cylinders are $25 or so a piece with rebuild kits around $5.00 each. DOT 5 from places like Sprucemountain runs about $40 a gallon to your door. OD iron has hose kits so do others.

Spending $200-$250 for kits, hoses and BFS along with a weekend to redo all the brake parts that can wear out is really pretty darn cheap. You get piece of mind, an under standing of how what should be considered the most important system on the truck works and you get to skid the tires when the truck is empty and you are on non paved roads.

If you do the entire system at once, order a pair of 1 piece new front axle boots from ID iron, buy OTC #1907 wheel bearing socket from NAPA, a tub or two of bearing grease and knock out all the turning/stopping/stuck on the side of the road issues you are likely to have pop up for the next 10 years or so that are not engine/transmission/ujoint/fuel related for another $100.

Just a side note. I was using the older "long" style can for all my references when writting this. The newer "short" style can is pretty much the same but, as far as I know. No kits are available for it and long style kits don't work. I could be wrong about that however.
 

rflegal

Member
Steel Soldiers Supporter
128
11
18
Location
New Mexico
There is a place selling the entire bushing with the seal in it for $8.50 + ship. I bought one, worked perfect :razz:


1 M35 2-1/2 TON BRAKE PUSH ROD BUSHING 8345004 NOS


Item number:250364902750
 

gimpyrobb

dumpsterlandingfromorbit!
27,785
747
113
Location
Cincy Ohio
You are correct Tim, the new style(with the short air chamber can) are not rebuildable with the kit for the old style(long air can). I have pics in one of the threads I started, let me look.
 

acesneights1

Member
1,449
21
20
Location
CT
9,
if yours is just leaking air at that fitting, drain the air tanks, pull it apart and replace the fitting or whatever you need to do to fix it. That is the air side.

Most air packs work just fine in their job of boosting the brake pressure to the wheel cylinders with very little driver foot effort. You should hear a slight SSSSSH after you let go of the brake pedal from the air filter when the engine is off and you push the pedal with air in the system.

If you suspect it isn't boosting, then start to pull the back cover off and see if the big air piston moves. You have to remove the J pipe first. If the piston is not locked up, the spring behind it will be pushing the end cap off as you loosen it. You can stop right there because a piston pushing against you means it moves. I suggest this way first because as you loosen the rear cap, any brake fluid leaking out is not supposed to be there and means you need a rebuild. An easier way of checking function is to pull the J pipe and put an air fitting on the back of the can. Put shop air to it and you should hear all your brakes engaging. If you do, loosen the back of the can and see if fluid is leaking. No fluid and the air/hydraulic parts are good.

Put the J pipe back on the valve body, but have the can end off the can. Everything else should be hooked back up and sealed. Fire up the truck, let the air build and then shut off the truck. Push the brake pedal or have a helper push. As you push, air should come through the J pipe. If it does, hook it back up and drive on. If not, then the valve needs work.

Problems with the boosting are not near as common as packs that boost great but use fluid up. Find the vent line that goes from the air pack to the air filter housing. The master cylinder vent line T's into this line. Undo the vent at the pack. If you have fluid dripping out then your valve body is not right in at least one way and needs rebuilt. Remember the check for fluid in the air cylinder by loosening the rear cap? That is another way fluid can get to the vent by going past the seals of the hydraulic part, past the seal I started this thread to ask about and then past the seals on the air piston to be pushed out with the air once you let go of the brake pedal.

Pretty much most of our air packs are 40 years old or so. Things wear out with age and use. Kits are on Ebay in the $20-$40 price range, master cylinder kits are available from places like OD Iron and AB Linn for less than $30. Wheel cylinders are $25 or so a piece with rebuild kits around $5.00 each. DOT 5 from places like Sprucemountain runs about $40 a gallon to your door. OD iron has hose kits so do others.

Spending $200-$250 for kits, hoses and BFS along with a weekend to redo all the brake parts that can wear out is really pretty darn cheap. You get piece of mind, an under standing of how what should be considered the most important system on the truck works and you get to skid the tires when the truck is empty and you are on non paved roads.

If you do the entire system at once, order a pair of 1 piece new front axle boots from ID iron, buy OTC #1907 wheel bearing socket from NAPA, a tub or two of bearing grease and knock out all the turning/stopping/stuck on the side of the road issues you are likely to have pop up for the next 10 years or so that are not engine/transmission/ujoint/fuel related for another $100.

Just a side note. I was using the older "long" style can for all my references when writting this. The newer "short" style can is pretty much the same but, as far as I know. No kits are available for it and long style kits don't work. I could be wrong about that however.
This is an excellent post. However I just rebuilt one and am still getting brake fluid out of the vent. I took it back apart to check all the cups and make sure they were installed correctly and they were. The bore in the hydraulic side looked good. The bore on the air chamber had a few pits in it. I honed it as best I could. I don't hear air leaking when brake is applied and held but could air be leaking by the air piston and then pressurizing the hydraulics and causing brake fluid to come back into the front side of the air chamber ?
we took this unit apart twice to no avail. Any ideas ?
 

Barrman

Well-known member
5,173
1,596
113
Location
Giddings, Texas
I haven't thought "air pack" in a while. Brake fluid can only be getting into the air side through the seals between the two halves or at the valve that turns the air on. Did you check the diaphragm on the side?

Another crazy thought is the master cylinder vent. Could the fluid in your vent line be coming from that vent?
 

acesneights1

Member
1,449
21
20
Location
CT
The vent of the master is disconnected. Which diaphragm ?
i don't remember changing one except on the air piston. The rest of the kit was springs and rubber cups
 

WillWagner

The Person You Were Warned About As A Child
Super Moderator
Steel Soldiers Supporter
8,392
2,408
113
Location
Monrovia, Ca.
IIRC, the TM is incorrect. It shows a seal being installed backward. It has been ages since I did one but have done 10+ of them. I had the same issue with the first due to the TM directions. I think Recovery4x4 was the one that turned me on to the issue, maybe he will see this and post up.
 

hndrsonj

Senior Chief/Moderator
Super Moderator
Steel Soldiers Supporter
7,583
358
83
Location
Cheyenne, WY
IIRC, the TM is incorrect. It shows a seal being installed backward. It has been ages since I did one but have done 10+ of them. I had the same issue with the first due to the TM directions. I think Recovery4x4 was the one that turned me on to the issue, maybe he will see this and post up.
I seem to remember hearing this.
 

rustystud

Well-known member
9,071
2,388
113
Location
Woodinville, Washington
023.jpg022.jpg

That 'O' ring in the aluminum shaft collar is just one way hydraulic fluid can enter the air chamber. The other way is through the hydraulic actuating piston which controls air pressure. If that seal is bad or the walls rusted it will cause a hydraulic leak into the air chamber.
 
Top
AdBlock Detected

We get it, advertisements are annoying!

Sure, ad-blocking software does a great job at blocking ads, but it also blocks useful features of our website like our supporting vendors. Their ads help keep Steel Soldiers going. Please consider disabling your ad blockers for the site. Thanks!

I've Disabled AdBlock
No Thanks