• Steel Soldiers now has a few new forums, read more about it at: New Munitions Forums!

  • Microsoft MSN, Live, Hotmail, Outlook email users may not be receiving emails. We are working to resolve this issue. Please add support@steelsoldiers.com to your trusted contacts.


It's all in the timing

CGarbee

Well-known member
2,448
510
113
Location
Raleigh, NC
Bill's info on how to time a mule is dead on, unless you have one of the A5's that was converted to electric start at Ft. Campbell in the mid-eightees... They have a different pulley, so you have to set them by looking for the marks on the gears, and you have to set them offset one tooth...

Bill, NickD, and I, spent a fair amount of time on the phone about a year ago figuring out how to time my Mule... :)

Good luck.
 

Charlie

Member
126
2
18
Location
Alabama
The best way to check the timing is exactly the way Bill shows on his web site. If your belt guard is missing, you don't have any timing marks, but you can still tell if the mag "clicks" when the crankshaft pully mark is in about the 2:00 position.
To answer your orignal question, yes, both gears have V marks on them. Set the magneto gear one tooth to the left (clockwise) of the drive gear. Oh, I forgot, you have to remove the governor and the governor drive coupling to be able to se the gears and the marks.
 

JDToumanian

Active member
1,655
14
38
Location
Phelan, CA
I wasted a lot of time before installing my magneto yesterday.... Trying to figure out it's proper orientation, and proper plug wire connections. Instead of staring at it and pouring through TMs, realize (like I did after about 2 hours) that the magneto fires for BOTH cylinders simultaneously, for every revolution of the magneto gear. That means it doesn't matter which plug wire is connected where.... Either wire can go to either terminal on the magneto. Maybe that's obvious to most, but it wasn't to me.

Here's a related question...

Why does Bill Watson recommend setting the magneto gear clockwise one tooth off, and the timing to between the 18 and 28 degree marks? The TM shows the timing gear marks lined up and the timing set to 3 degrees static which should be 18 degrees over 500 rpm.... I set my timing per Bill's website, but thought about it later. There must be a reason, even if it's something as simple as being able to remove the plug wires without removing the magneto, since with it set per the website the magneto is turned so it's terminals are more accessible than if set per the TM.

My engine is now finished...... YAY!!! 8)

Jon
 

Attachments

clinto

Moderator, wonderful human being & practicing Deuc
Staff member
Administrator
Super Moderator
Steel Soldiers Supporter
Supporting Vendor
12,596
1,123
113
Location
Athens, Ga.
I can't answer your timing question Jon, but I have to say, that's the nicest Mule engine I have ever seen. If the rest of the Mule is that nice, you need to take it and enter it in the next MVPA National Convention.
 

rod

New member
165
2
0
Location
Alabama - The Heart of Dixie
Jon,

If you set the engine timing according to the TMs, the mule will run Ok. If you set the timing one tooth off like it is shown on Bill Watson's website the mule will have a lot more pep and run better. a couple of years ago, myself and Chuck (aka Charlie here on this site) took our tools to a swap meet. We retimed 5 or 6 mules that weekend at the swap meet. When we finished a mule we would put the owner on the mule and ask him to take it for a spin. We could tell by the smile on their face as they pulled back up that they were happy with the extra pep of the mule engine.
 

JDToumanian

Active member
1,655
14
38
Location
Phelan, CA
Thanks for the explanation Rod! I figured the reason must be to run it a bit advanced for better performance.

Thanks for the compliment Clinto! It's funny how projects evolve... Originally I was just going to "get it running." Then when I found the original engine seized and full of water, I was going to "throw in a genset engine." The new genset engine was so nice I decided to 'detail' all the parts I put on it, and carefully straightened, sandblasted and painted all the sheet metal pieces. Then I decided the entire mule deserved that treatment, so it has turned into a full blown restoration. I'm sure it will be nice but I never thought of entering a contest.... Intriguing idea...

My progress has stalled a bit, I've become bummed that I can't find the rear engine guard and engine hatch cover. I was going to have everything finished for Tower Park in April but I haven't even been working on it. :cry:

Jon
 

Charlie

Member
126
2
18
Location
Alabama
You've picked probably the two hardest parts to find! Bill and I have discussed building repordiction engine guards, and that's still ongoing.

I was buying the M274A1 guards from Bill and modifying them to look like A5 guards, but I think Bill's out of the A1 guards now. Here's the last one I modified.

I'm going to go look at a pile of mule stuff next week and I'll let you know if I find an engine cover and/or guard.
 

Attachments

Charlie

Member
126
2
18
Location
Alabama
The mule "parts" that I went to look at turned out to be a pretty good looking A2. I've decided not to part it out, but will put an engine in it and get it running later this summer when I get a break from customer work. Sorry!
 

Attachments

clinto

Moderator, wonderful human being & practicing Deuc
Staff member
Administrator
Super Moderator
Steel Soldiers Supporter
Supporting Vendor
12,596
1,123
113
Location
Athens, Ga.
Since Bill's site is now gone, I captured these images and texts from an archived copy.


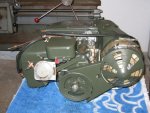
STEP 1: Remove spark plugs and find 28* & 18* (see pic) on belt schroud
Picture_069.jpg

Turn fan drive pulley clockwise(much smoother and precise using a crescent wrench) See Pic

Picture_089.jpg

If you hear the magneto click in the area shown in the first Pic you are OK.


If you do not hear clicking in this area then proceed to STEP2.


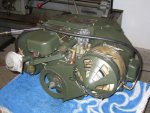
Step2: Remove the top engine schroud


Step3: Remove the spark plug wires from the magneto


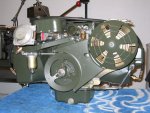
Step4: Remove governor and turn engine "clockwise" until you see a "V" on the large gear. STOP at this point.


Step5: Remove magneto from engine. Holding magneto in left hand, rotate magneto drive gear "clockwise" untill you hear a click.


Step6: Insert magneto back into engine (see pic 4) for proper place to insert magneto into large gear.

Picture_097.jpg

rotate fan drive pulley clockwise (see first pic) and rotate magneto in engine until magneto "clicks"


YOU HAVE NOW TIMED THE ENGINE!!
 
Top
AdBlock Detected

We get it, advertisements are annoying!

Sure, ad-blocking software does a great job at blocking ads, but it also blocks useful features of our website like our supporting vendors. Their ads help keep Steel Soldiers going. Please consider disabling your ad blockers for the site. Thanks!

I've Disabled AdBlock
No Thanks