• Steel Soldiers now has a few new forums, read more about it at: New Munitions Forums!

  • Microsoft MSN, Live, Hotmail, Outlook email users may not be receiving emails. We are working to resolve this issue. Please add support@steelsoldiers.com to your trusted contacts.


My Master Cylinder Rebuild with Photos

DeucesWild11

Active member
1,265
12
38
Location
Putnam County, NY
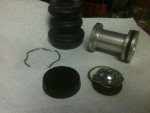
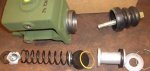
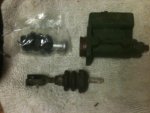
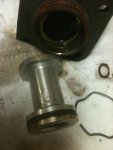
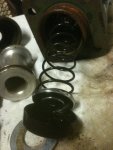
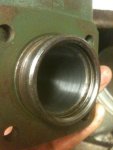
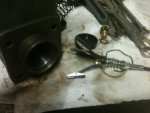
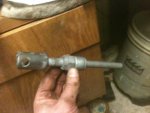
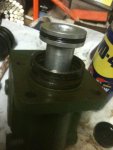
So here I am again but now with my Master Cylinder rebuild. After my Airpack rebuild the brakes were allot better but I was loosing pressure in the pedal while it was being held down. If you are interested you can see the Airpack rebuild here: http://www.steelsoldiers.com/deuce/82753-my-airpack-rebuild-photos.html I checked for leaks but couldn’t find any. Some suggested it may be an internal leak in the MC. So with a $26 (or so) rebuild kit from Saturn Surplus I decided to tackle it and hopefully fix the issue. This rebuild is a whole lot easier than the Airpack. Hey Gimpy I didn’t break anything taking it out! Ha! So here are the pics for those of you that want to see the internals of the MC rather than just what’s in the TM’s.

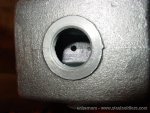
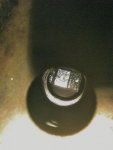
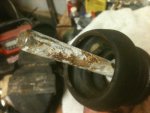
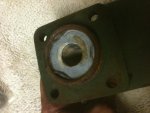
So the breakdown is pretty straight forward. Pull out the round locking clip at the end (at least that’s what I call it) and just slide everything out, I took allot of pics so I could remember how it all goes back together. Be ready for some fluid to come out as you pull the pieces out of the cylinder, it get’s a bit messy. I didn’t find anything that looked that bad in there. Once everything is out, hone the cylinder to remove any fine scratches or imperfections in the cylinder that may cause a leak. I used the same Honing tool that I used for the Airpack (the small one).

Then just put it all back together again. Real easy to do, I started mine at 7:30 last night and was done by 10:30. Now I just have to bleed the system and try it out. Hopefully that will fix my problem. I’ll find out tonight!
 

Attachments

gimpyrobb

dumpsterlandingfromorbit!
27,785
747
113
Location
Cincy Ohio
Good info, but I usually blast the resavoir with brake cleaner first. I think it should also be mentioned that you should look into the MC and make sure there are 2 holes not one that goes into the piston chamber.
 

DeucesWild11

Active member
1,265
12
38
Location
Putnam County, NY
Hmm, I did do the brake cleaner blast, but looking at it I only have one hole. Another one right next to it that looks like it was drilled out but doesn't go all the way down into the piston chamber, was that a later model upgrade??
 

Warthog

Moderator
Super Moderator
Steel Soldiers Supporter
13,775
227
63
Location
OKC, OK
Here is what comes in the Rebuild kit.. Also I couldn't find the TM for the MC rebuild. If anyone knows it please post the TM# so others can find it. Thanks!

Never looked for it before because they are so simple to rebuild.

Took at look thru all the Deuce TMs I have. No rebuild info, just replacement.

Looks like they didn't want anyone rebuilding them and just had them replaced.

I did find a great instruction section for rebuilding the AIrPack in the TM 9-2320-209-34-2-1, Chapter 12.
 

DeucesWild11

Active member
1,265
12
38
Location
Putnam County, NY
Gimpy, went looking through some brake lockup threads specifically this one: http://www.steelsoldiers.com/deuce/6933-brakes-locking-up-4.html

Found a pic of what looks to be the big vent hole and the small vent hole. I believe I only have one, perhaps this is a M/C from another version of truck because some of the other parts don't look like mine either. I only have that Compensation port which looks similar to this small vent hole.
 

Attachments

DeucesWild11

Active member
1,265
12
38
Location
Putnam County, NY
Gimpy, thanks for the link this TM has a good reference to the M/C TM9-1827c Ord. Maint. Wagner Lockheed Brakes which is on Jatonka's site. See the pic below. I pulled that out of the TM, I assume you are referring to the bypass port. I will have to take another look at mine, perhaps it is clogged and just looked like it didn't go all the way down to the cylinder. Thanks!
 

Attachments

DeucesWild11

Active member
1,265
12
38
Location
Putnam County, NY
OK, so I took another look at the MC the hole that I have next to the intake port does not go all the way through to the cylinder, my MC only has the one hole. That's contradictory to the diagram above but hey that's the facts. I took a pic and will upload tomorrow. Anyway, I filled the MC, bled the Airpack FIRST, then the wheels. Not much air came out at the wheels but allot at the Airpack. Probably since I changed the MC the airpack was pretty much the only thing to get air to it. PS. I also have a MICO parking brake up front in the cab if you are familiar with those. The brake line from the MC goes up to that first then back down to the airpack. That probably explains why I didn't get much air out of the lines at the wheels.

Anyway, all bled out I took her out on night ops.. ha! Took her to a stop sign held down the brake for a while and NO loss of pressure.. That was it the MC did the trick.. Now my brakes are finally 100%. Went down a few steep hills and was on the brakes hard.. preformed like it should PERFECT!!

Thank you to all for your help on this. I couldn't have done it without the great people on this site!!!
 

jets1959

Member
594
9
18
Location
Lakewood, WA
OK, so I took another look at the MC the hole that I have next to the intake port does not go all the way through to the cylinder, my MC only has the one hole. That's contradictory to the diagram above but hey that's the facts. I took a pic and will upload tomorrow. Anyway, I filled the MC, bled the Airpack FIRST, then the wheels. Not much air came out at the wheels but allot at the Airpack. Probably since I changed the MC the airpack was pretty much the only thing to get air to it. PS. I also have a MICO parking brake up front in the cab if you are familiar with those. The brake line from the MC goes up to that first then back down to the airpack. That probably explains why I didn't get much air out of the lines at the wheels.

Anyway, all bled out I took her out on night ops.. ha! Took her to a stop sign held down the brake for a while and NO loss of pressure.. That was it the MC did the trick.. Now my brakes are finally 100%. Went down a few steep hills and was on the brakes hard.. preformed like it should PERFECT!!

Thank you to all for your help on this. I couldn't have done it without the great people on this site!!!
Glad everything is now sorted in your brake system!!!!
 

DeucesWild11

Active member
1,265
12
38
Location
Putnam County, NY
I have not rebuilt them. I have not had any leaks at the hubs so I assume they are OK for now. I do however want to take the wheels off and inspect them as the weather gets warmer.. They could probably use a rebuild as well.

Here is a pic of the MC, the little hole is the regular port and the one next to it doesn't go all the way down into the MC. Second pic is the MICO brake I have set up on the truck. I guess it was added because it was a Firetruck and has the rear PTO. Just another way to have the brakes locked up while the truck is running I guess.
 

Attachments

m816

New member
483
6
0
Location
Chatham, NJ
Glad to see you settled your brake issue. I just want to know why it took three hours to rebuild a master cylinder? Did you drink a lot of beer? Did a lot of your friends stop by or what? Did your wife shut you down in the middle of the job?:funny:
 

caliber1

New member
995
8
0
Location
Elcho, Wisconsin
Here is what comes in the Rebuild kit.. Also I couldn't find the TM for the MC rebuild. If anyone knows it please post the TM# so others can find it. Thanks!
DW, when I went to take mine apart, I turned to grab a tool and the spring and guts blew out. Question, where does the thin copper gasket and flat rubber gasket go? I think the rubber goes in first before the check valve and spring. Didn't even find one when I took mine apart. :whistle:
 

gringeltaube

Staff Member
Super Moderator
Moderator
Steel Soldiers Supporter
6,882
2,261
113
Location
Montevideo/Uruguay
....... I think the rubber goes in first before the check valve and spring. Didn't even find one when I took mine apart. :whistle:
Correct. And that "thin copper gasket" (which it is not) goes between cup and piston.


...... why it took three hours to rebuild a master cylinder? ..................................
.... He just couldn't find the 2nd hole.......... :mrgreen:


(...... which of course is there and going all the way into the cylinder, although only about 0.02" in diameter)

G.
 

Attachments

Last edited:

caliber1

New member
995
8
0
Location
Elcho, Wisconsin
Thank you sir. That's kinda what I thought, saw wear marks on the old piston that looked the size of the copper ring. Couldn't figure out where else the rubber thing would go either. Looked through the trash and everything for the original. Murphy mut have grabbed it.:whistle:It is now freshly rebuilt and in my back seat, will install tomorrow. Thanks again.
 
Top
AdBlock Detected

We get it, advertisements are annoying!

Sure, ad-blocking software does a great job at blocking ads, but it also blocks useful features of our website like our supporting vendors. Their ads help keep Steel Soldiers going. Please consider disabling your ad blockers for the site. Thanks!

I've Disabled AdBlock
No Thanks