• Steel Soldiers now has a few new forums, read more about it at: New Munitions Forums!

  • Microsoft MSN, Live, Hotmail, Outlook email users may not be receiving emails. We are working to resolve this issue. Please add support@steelsoldiers.com to your trusted contacts.


M939 brake chamber diaphragm problems

Floridianson

Well-known member
Steel Soldiers Supporter
7,390
2,437
113
Location
Interlachen Fl.
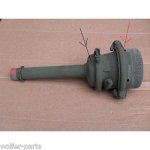
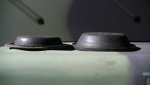
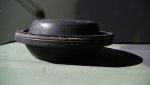
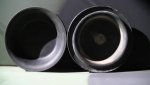
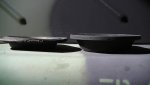
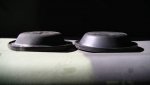
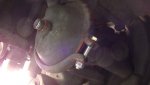
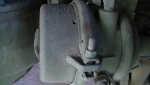
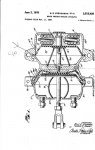
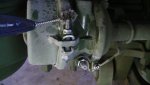
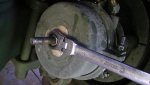
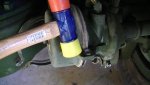
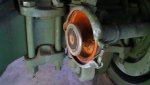
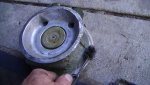
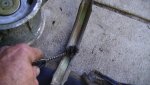
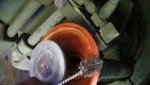
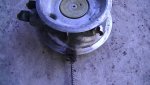
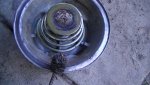
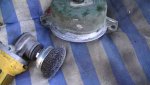
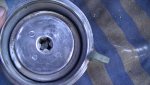
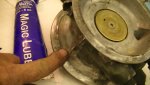
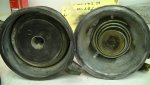
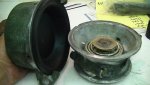
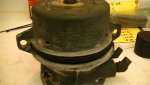
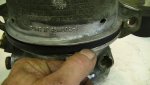
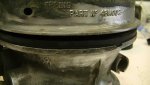
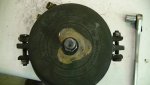
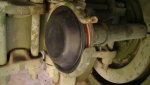
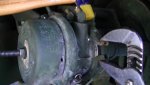
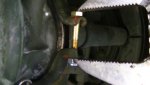
I have a 1982 M925 with the chamber showen in the pic. I took it compleately apart and here is what I found. The truck parts place had the D12 and D16 diaphrams. The D12 fit the lower marked in black but was thicker at the seal edge. The D16 has a taller hat or depth to it and there is a sealing lip that it must fit into to seat correctely. I watched a vid here on SS from Acme66 and if you watch he had a sealing problem the first time because the diaphragm was not seated into the lip on the lower unit. I will be calling monday to a shop that says they know these chambers. I have a feeling these units with the tabs that require the parking brake spring cap to be taken off sideways ( pic marked in red) are nonrebuildable uppers. I did get mine rebuilt useing the D16 but had to flip the diaphragm the outher way to get it installed.It's working and holding air but I just think it's not right) I have done outher chambers before where you remove the band clamp and the top cap comes stright off but never seen this type. I had to remove both upper and lower chambers from the truck to work on this unit in the shop and get the D16 to seal right in the lip. I will post some pis later and report back with what the axle shop says.
 

Attachments

Last edited:

srodocker

Well-known member
6,549
68
48
Location
Lacey, Washington
So I just redid my service chamber and noticed how thick the lip was on the new 12 diaphragm as well. Still getting a leak from that side of the axle as well. Going to take it apart and re do it and see how it goes. Let me know what the shop says. I got my 12 diaphragm from napa btw.
 

Floridianson

Well-known member
Steel Soldiers Supporter
7,390
2,437
113
Location
Interlachen Fl.
Is your chamber just like this one. If you watch Acme66 vid it does not show you how much trouble he had getting the top cap back on while on the truck. As I said I had the whole assembely off the truck and I tryed a little trick. When you have the lower unit off one side you can see the plunger and spring and the outher side the plunger is seated right up to the housing. I turned the housing so the spring side was down and placed it on a small block and compressed the spring till the plunger was sticking out the outher side. Then I placed a wedge in the outher side to keep it open. It took some fighting to get the D16 to stay in place and in the retaining lip of the spring/plunger side of the lower unit while putting on the Top spring brake cap. I had to go around with a screwdriver and check and push it into the correct place. Then pry up the lower unit plunger and remove the wedge. I could have just released the cage bolt to remove the wedge I put in but I would have had to recage the unit before I reinstalled it back on the truck. I am still saying that the D16 I got is the wrong one and is placed in backwards to the one that came out. There should never be so much fighting to just replace a diaphragm in my .02 !!! As I said before I have done plenty of brake chambers before just not this type off military and never seen ones with the retainer hooks on the cap and have to be slid sideways to remove it. It might be easer if the diaphragm was correct but you still have to get the lip of it correctley into the lower units upper lip to seal correctley.
As for the D12 it did fit into the lower chamber but getting the clamp back on was a real pain as the bolt needs to be longer to get the nut back on. I compressed it with my real big pump plyers and tapped around the edge as we are to do while installing any band clamp. The band clamp sits just a tad bit higher in the groves and yes I cleaned with wire brush the band clamps both top and bottom units and the units themselfs real well.
 
Last edited:

Floridianson

Well-known member
Steel Soldiers Supporter
7,390
2,437
113
Location
Interlachen Fl.
Ok took some pics of old and new diaphragms. As you can see the #16 has more hight but same diameter. The #12 has same hight and same diameter. The #12 seems to be alittle thicker and to make it easy on me I increase the bolt size from and went with nylock nut on the clamp install. I still have one rear chamber leaking air when the truck is aired up ,shut down and the parking brake released. It comes from the weep holes in the top cap in the pic. The company I was going to call today must be closed as they did not answer but will try Monday. I thought this was going to be easy. The diaphragms do have numbers. # 12 says Rockwell AU283 then 2297-D-2448 and the #16 has Anchorlok divison, Royal Industries and just a small stamp G1.
 

Attachments

Floridianson

Well-known member
Steel Soldiers Supporter
7,390
2,437
113
Location
Interlachen Fl.
Here you can see the anchorlok has a lip and the diaphragm must seat into it on the top can. I just have the feeling if we can't get the correct size diaphragm they are going to be a pain to change and I don't think you will be able to do it with the unit on the truck correctley if not.
 

Attachments

Floridianson

Well-known member
Steel Soldiers Supporter
7,390
2,437
113
Location
Interlachen Fl.
Ok sorry to make such a fuss but I like to see parts looking the same. Talked with some friends and thanks use 12 and 16 no problem. Replace top parking brake pancake while on truck yes. I wanted to do both top and bottom so for my first time doing anchorlok wedge I took off the whole unit. For me it was easer and maybe a better job. Took me one hour from air lines off to uncage and done.
I first cleaned the threads on all bolts and lube. Removed air lines of course. Oil up cage bolt and cage the chamber. As per TM no more than 50 ftlbs. Remove the bolts holding on brake chamber clamps. Tap the cap sideways on the tab with plastic hammer till it's off. Remove bolts holding on the lower unit and spread clamp enough to remove it. I took my time and cleaned all mateing edges down to clean metal outside and in on the chambers. I had some rubber safe lube and just thin film on all mateing areas. Took diaphragm and placed it in the top canister and slid it over the lower unit. If you push the cap and diaphragm together it should line right up and I used my finger nail to seat the rubber into the lip of the lower unit. With the whole unit out it is so easy to see and do. Replaced clamps and took them down together bit by bit tapping with plastic hammer till seated correctely. Back to the truck and install #12 into housing and put the unit on. I replace all the lower bolts with 2 1/4 inch long and nylok as most of the bolts had a slight bend and it help in reinstall. I held the lower clamp with my big pump plyers and taped with plastic hammer till seated while makeing shure you air line connections are in the correct place for install. I then took the new bolt and held it and the clame with my plyers just enough to get the nut on 2 threads. Then tighten slowley while tapping till tight. Replace air lines,uncage and place it where it belongs.
I think it would be a good idea and I will prime and paint the units after degreassing/washing to seal exposed metal.
Also I did two chambers yesterday and double checked all the clamping bolts and got a little on all of them. Thanks
 

Attachments

dannyd2450

Member
43
3
8
Location
miami / florida
Your my hero! I tried this yesterday to find that the diaphrams I ordered where the wrong size... I know, but this is all new to me and NO ONE in DadeCounty is willing to look at it. So, I have to figure it out... Your pics make it much easier. Anyhow.. Are all the diaphragms #12? I got her caged, pulled off, and cleaned up.. BUT, stopped at tha point when I realized what I had was smaller. Since I stopped, I never got to the next diaphragm, I'm thinking I should get those too; and be done with it.. Are they both the same size?
 

Floridianson

Well-known member
Steel Soldiers Supporter
7,390
2,437
113
Location
Interlachen Fl.
Each side rear would take one #12 in the single and one #12 in the double chamber. Then one #16 in the parking brake chamber. So you would need eight #12 and four #16 just to do the compleat rear tandems. Napa should be able if not have them.
 

dannyd2450

Member
43
3
8
Location
miami / florida
James,

Thanks for answering my question and not attacking me for asking. After going through (and being denied) by every possible mechanic in the area, I was able to do it myself with your guide. I spent MAYBE $100 on the diaphragms and saved who knows how much IF one of the mechanics would have taken the job.

Thanks again!

The only comment I would add is to stick to the #12 and the #16's from NAPA (like you stated). I already had some #12 from Eriks.. But the Eriks diaphragms are so thick, it becomes hard to put back together. The Napa ones bolt right in.

Thanks!

danny
 

juanprado

Well-known member
Steel Soldiers Supporter
5,508
2,710
113
Location
Metairie/La (N'awlins)
I wanted to share that there are 2 #16 pancake diaphragms available. Most counterman would probably not be aware unless they dug into the catalog. I have not yet tested personally but the height of the pancake is because there are 2 different strokes 2.25 vs 2.50.

Midland haldex makes both. Part numbers DP16 & DP16L. Napa sells them

http://epi.hbsna.com/products/dept....4B6FB1959D5BA53655A0&dept_id=2939&parent_id=0

Thanks for the write up as I used it for tech support to change my front axle diaphragms and get size. :)

I would like to add that changing the bolt to a longer one makes it much easier to get the clamp on. It is just a regular bolt, not a shoulder one like some 30/30 chambers. 5/16 coarse 3 inch all threaded made it a snap! thanks for the tip GoldnEagle
 
Last edited:
Top
AdBlock Detected

We get it, advertisements are annoying!

Sure, ad-blocking software does a great job at blocking ads, but it also blocks useful features of our website like our supporting vendors. Their ads help keep Steel Soldiers going. Please consider disabling your ad blockers for the site. Thanks!

I've Disabled AdBlock
No Thanks