• Steel Soldiers now has a few new forums, read more about it at: New Munitions Forums!

  • Microsoft MSN, Live, Hotmail, Outlook email users may not be receiving emails. We are working to resolve this issue. Please add support@steelsoldiers.com to your trusted contacts.


LMTV Upgrades

kenet3621

Member
179
4
18
Location
Blythewood SC
I completed the 110 volt to RV connector and wiring so I can have electrical hookup at RV parks or just about anywhere else.

I used a 25' 30 amp RV cable with handles (from Amazon) and cut the end off.

I then wired it into an Amphenol MS90556C44412P connector (eBay for $99). I don't think I need 3 phase power for my needs so I did not connect all the Amphenol pins.

Van Connector completed.jpg

The completed hookup including an adapter for regular 3 prong outlet.

Van to RV plug (5).jpgVan to RV plug (2).jpg

Connector attached to van plug.

Van Connector completed (2).jpg IMAG1462.jpg

I used an eight foot piece of welding cable for the ground strap.

I was able to make coffee in the van for the first time this morning!

Next will be replacing the fluorescent bulbs (or maybe take down the fixtures and install LED lights).
 
Last edited:

kenet3621

Member
179
4
18
Location
Blythewood SC
I was asked more about the install of my backup camera. More information...

QUESTION: I got my kit today I was wondering how you're wired your camera. can you give me some hinters? Did the connection wire to the camera reach? or did you have to get an extension?

MY ANSWER: I added an 18" extension to the camera pigtails and wired them to my clearance lights that are under the van body.

The monitor in the cab had wires long enough to go to the 12V connections in the relay panel so no extension needed.

The video cable was not long enough so I bought an extra 25' cable and had plenty to run along the right side of the frame. I put the video cable inside plastic coil wrap.

I always use heat shrink on my connections and so far have not had any fail due to water or dirt.
 

kenet3621

Member
179
4
18
Location
Blythewood SC
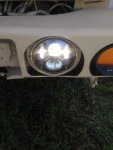
H4 was very simple.

I got the bulbs, housings and a wiring connector on Amazon... just search for these items...

1) DC 12V 100/90W H4 Super White LED


2) IPCW CWC-7006 7" Plain Round Conversion Headlight

3) uxcell 2 x H4 9003 Ceramic Wire Wiring Harness Sockets

I had to Dremel out a bit of metal (less than 1/4" on each tab) on the conversion headlight backing (no grinding on the truck part) to make them fit.

Then simply a matter of cutting the old wires and splicing the new ones on.

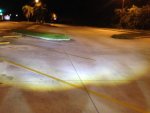
A huge difference in range and I really like the whiter light of the H4 vs sealed beams.
 
Last edited:

kenet3621

Member
179
4
18
Location
Blythewood SC
Weather was nice enough today so I could work on the fuel can holder. I was told never to trust the fuel gauge on an LMTV!

I found 4 new Scepter Fuel Can 5 Gallons and 2 fuel tank brackets (M35A2 2.5 Ton Truck Fuel Tank Bracket) on eBay and mounted them behind the existing fuel tank.

The brackets are a bit long so I will cut them off closer to the front lip of the rack.

I took a couple of pieces of 3" x 1" steel angle and I have a rack for the fuel cans

IMAG1566.jpg

IMAG1567.jpg
I will put a third piece of angle across the top of the cans making a locking bracket to hold them in the rack and keep them from being removed.

A little camo paint and this update will be completed.

I don't have spouts for the cans but my thought is to just siphon from the fuel cans into the main tank.
 
Last edited:

Lmtv772

Banned
651
18
0
Location
Florida
I would rather go the LED route, like Tim Burk did, than to grind away on the trucks.
These LED have life time warranty, are a lot better on the electrical system and a lot brighter, too
10367551_10208315272664408_6542009002076608038_n.jpg
photo courtesy, T.Burk
 

Lmtv772

Banned
651
18
0
Location
Florida
or install some Speaker LED, that's what I did.
sp.jpgsp1.jpg
They are as good as the light of day. Plug and play. no filing, cutting or re designing.
 

kenet3621

Member
179
4
18
Location
Blythewood SC
Sorry for any confusion on my post. I did not grind on the truck but ground the tabs on the headlight holders. They were too wide to fit the notches on the truck so a little "tuning" and they fit perfectly.

The LEDs are very nice looking that maybe a 2016 upgrade! Thanks for the information.
 
Last edited:

Oxyacetylene

Active member
Steel Soldiers Supporter
518
179
43
Location
Stoneville, NC
I like what you are doing with the van enclosure. I bought a non-running M1079 that I sold and kept the van enclosure. I wanted to put that on my M1078, but now I am thinking I will just eventually try to get a running M1079. I contemplated replacing the electrical panel inside with a normal single phase panel, provided I could find one about the right height. Then I thought about removing one of the big round connectors going outside and replacing it with a standard 30 amp generator inlet. I haven't done the measuring, but I also wondered if there is enough room in the front outside mounting bracket to put a regular window a/c with heat and mount a small 2kw inverter generator. There is plenty of room for a window unit, but not sure about that and a small generator beside it.
 

kenet3621

Member
179
4
18
Location
Blythewood SC
You have some great ideas about the ac/heat and generator. Keep us posted on how your work goes.

I talked to a guy at the Georgia Rally who used an RV plug for power to his electrical system. He is on Steel Soldier as QUADJEEPER. He can probably help you on things electrical.
 
Last edited:

Hwhomes

New member
72
0
0
Location
Moses Lake WA
I predict you will use it once. Three people plus all that time. What's wrong with pickup camper style jacks? For they way they demonstrate it I can't imagine not using a fork lift.
 

kenet3621

Member
179
4
18
Location
Blythewood SC
Here is a picture of the completed fuel can holder. I will be doing some more painting on the brackets. The cans do not bounce or jostle around in the rack.
I also have 2 cans of water mounted inside the van. Thanks for the suggestion!

IMAG1578.jpg
 

Lmtv772

Banned
651
18
0
Location
Florida
I predict you will use it once. Three people plus all that time. What's wrong with pickup camper style jacks? For they way they demonstrate it I can't imagine not using a fork lift.
When I go camping I'll have more than 3 peeps around :) LMTV are like a magnet
 

kenet3621

Member
179
4
18
Location
Blythewood SC
The instruction plates on the van were unreadable so I ordered new ones and tried to match as close as possible the originals.

Old plates:
Van Plates (2).jpgIMAG1162.jpgIMAG1160.jpg

New plates mounted to van body:
IMAG1606.jpgIMAG1608.jpgIMAG1609.jpgIMAG1611.jpg

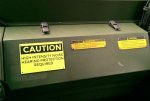
In the cab I removed the winch instruction plate since I do not have a winch and replaced it with a new "hearing protection" plate:
IMAG1603.jpg

The whole truck will have a bath once the weather turns nice for a bit.
This spring I will remove all the peeling paint and touch up all the exterior.
 
Last edited:

mkcoen

Well-known member
Steel Soldiers Supporter
5,637
380
83
Location
Spring Branch, TX
The instruction plates on the van were unreadable so I ordered new ones and tried to match as close as possible the originals.
If you can't find a particular replacement plate but have a picture or drawing of what you need TexAndy may be able to replicate it for you. He takes anodized aluminum plates and etches them with a laser. I know he was making tags for mock Mark 19s for a guy we met at the MVPA convention last year. He also can etch photos or line drawings of vehicles on the same material if you'd like a display plate for shows.
 
Top
AdBlock Detected

We get it, advertisements are annoying!

Sure, ad-blocking software does a great job at blocking ads, but it also blocks useful features of our website like our supporting vendors. Their ads help keep Steel Soldiers going. Please consider disabling your ad blockers for the site. Thanks!

I've Disabled AdBlock
No Thanks