• Steel Soldiers now has a few new forums, read more about it at: New Munitions Forums!

  • Microsoft MSN, Live, Hotmail, Outlook email users may not be receiving emails. We are working to resolve this issue. Please add support@steelsoldiers.com to your trusted contacts.


My MEP-803A

csheath

Active member
713
196
43
Location
FL
Purchased a MEP-803A from GL on 11/28/2016 for $1185 after fees. Picked up in Atlanta Ga on 12/08/2016. First thing I noticed was a big gouge I overlooked in the photos. It didn't hit anything that would hurt the unit's functions and may have been why the bidding didn't go crazy.
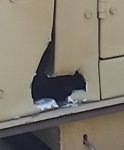
gouge.jpg

Loaded unit in the back of my 2003 F150, extended cab XLT with the 4.6 V8 and tow package. Truck handled fine with the load and cruised effortlessly at 70 MPH. Actually didn't drive much if any different than it does unloaded.
20161208_142157.jpg

Friday, 12/09 I had a bunch of errands to run and didn't get much done but I did drag the unit out of the truck and onto a trailer. I have an old flatbed I built years ago. I put ramps from the truck tailgate to the trailer and strapped the ramps to the truck bumper. I put a chain to two of the lift eyes on the generator and connected a wench cable from the trailer mounted wench to the chain then drug it off. I had to put tension on the cable then pry under the genset to coax it along and repeat several times before I got it all the way off.
20161209_145947.jpg

20161209_170641.jpg

Today, 12/10 I had time to look it over and work on it a little. First I opened the document can and found some paperwork from the reset. Unfortunately they were sealed in a zip lock bag with about 2 cups of water in it. I guess it was from condensation. The zip lock would not open and I had to cut the top off. I peeled all the pages apart and laid them out on paper towels to dry.

The reset didn't seem to be very involved on this unit. It just describes fluid changes and a few gauge replacements followed by a load test. The reset and load test were performed in May of 2010 and showed 2616 hours. There were some accessory documents from July 2010 when it was transferred out I guess. One of those referred to an output test and I guess that was when the other hour and a half was put on it..
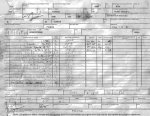
reset-pg1.jpg reset-pg2.jpg load-test.jpg

I went to Walmart and purchased a couple of group 24 marine start batteries for $61 each. I discovered they are a bit large when I installed them. They fit the battery trays perfect but they just barely make contact with a mount tab protruding off the engine block on both sides. I decided to go ahead and use them and cushioned that area with a piece of cardboard. I don't think it has enough pressure on it to wear a hole in the battery cases but time will tell. Edit: I exchanged these for group 26 batteries that fit in the space without contacting the engine block.

The alternator tension and pivot bolts were loose and the belt was laying loose off the pulleys. The wires were tight on the back of the alternator and did not appear to have been removed. I put the belt back on and tightened the loose bolts.

I didn't see anything else loose or missing so I added a couple gallons of fuel, replaced the oil filter, filled with oil, put distilled water in the radiator, and tried to start it. I used the dead start first to get some oil pumping then used the start switch to warm it up and crank it. The first few times it started it would die as soon as I released it from the start position. On about the 4th try it started and remained running. It tapped a little then quieted down so I guess that was the lifters pumping up. Smoked ever so slightly then exhaust went clear.

https://www.youtube.com/watch?v=9M7QxchAzr8&feature=youtu.be

It wasn't reading any voltage or hertz but the fuel lines were leaking so I didn't run it long. I will have to pull the top off so I can get to the fuel lines and replace those. After that I need to add antifreeze and start working on getting power to read and then on to load testing. I assume this is a wet sleeve engine that requires diesel antifreeze but I admit I haven't researched that either.

The only questions I have right now it why it wasn't reading anything on voltage or hertz? Is it because I didn't have a load on it?

I also found this cap inside that doesn't seem to have a hole to fill. Looks like it might have gone to an auxiliary tank or something. Did I overlook the hole this goes to or does it not belong to this unit?
20161210_164053.jpg 20161210_164100.jpg
 
Last edited:

jamawieb

Well-known member
1,413
514
113
Location
Ripley/TN
Great job getting it going.

For some reason your generator has no output. You should always have hertz and voltage reading, with or without load. Did you plug anything into the outlet to see if you had power there?
The cap is a bung adapter. You will have a threaded pipe that goes onto the bottom, that is a dip tube. That bung adapter fits jerry cans and 55 gallon drums for aux fuel.
 

csheath

Active member
713
196
43
Location
FL
Great job getting it going.

For some reason your generator has no output. You should always have hertz and voltage reading, with or without load. Did you plug anything into the outlet to see if you had power there?
The cap is a bung adapter. You will have a threaded pipe that goes onto the bottom, that is a dip tube. That bung adapter fits jerry cans and 55 gallon drums for aux fuel.
No I saw it was leaking fuel at the lines up top on the injectors so I didn't want to run it long. That load test was done at 2616 hours and it is only reading 2617.5 now so I don't expect a big problem on the output. May just have something turned off. I hope someone here has a simple answer. I am guilty of not reading up as much as I should have before starting it. I don't even know where to set the dials for 240V single phase. It's set at 208v now. :)

I suspected that cap was for an aux tank and it looked like it would fit my jerry can. Thanks for the info on that.
 
Last edited:

jamawieb

Well-known member
1,413
514
113
Location
Ripley/TN
If you fold down the access door, where your gauges are located, you will see a black box mounted on the back wall, that is the voltage regulator. To the left of the black box, you should see a fuse mounted to the wall also, check and make sure that fuse is still good. In the early years, continual cranking with no start, would cause huge voltage spikes, that would damage the voltage regulator or the stator inside the generator head. They added the fuse as a fix to the problem
 

csheath

Active member
713
196
43
Location
FL
If you fold down the access door, where your gauges are located, you will see a black box mounted on the back wall, that is the voltage regulator. To the left of the black box, you should see a fuse mounted to the wall also, check and make sure that fuse is still good. In the early years, continual cranking with no start, would cause huge voltage spikes, that would damage the voltage regulator or the stator inside the generator head. They added the fuse as a fix to the problem
Well that is bad news. I did check and mine does not have the fuse added. I hope I didn't blow my stator cranking it 4 times.
 

Light in the Dark

Well-known member
Steel Soldiers Supporter
3,582
5,165
113
Location
MA
You need to make sure your AM-VM gauge is set to the appropriate 208v position, if that's how you intend on running this unit (by the setting I see in the video, it is set to 120/240 Single Phase). Do not adjust this gauge while the set is running. Your gauges are looking for voltage/amperage where there is none (if your master voltage switch inside the operator console really is set to 208 3ph now).
 
Last edited:

Light in the Dark

Well-known member
Steel Soldiers Supporter
3,582
5,165
113
Location
MA
Unless what you want is 120/240 single.. then the AM-VM is set correctly, and you just need to make sure the switch in the back of the operator console is also set to 120/240 single. Does that make sense?
 

jamawieb

Well-known member
1,413
514
113
Location
Ripley/TN
How long did you try to crank it each time? like 30 seconds each time? I doubt you did any damage unless you just keep holding the start for an extended amount of time. I would try to start it again and hold the start switch for about 10 seconds after its running, to flash the field. Then hit the ac interrupter switch, to closed and see if you have power to the lugs or power to the convenience outlets. There is a flash relay (I think K15) that is the flash relay and if that is not working or has come loose in travel, it would cause your problem. Check out the TM troubleshooting guide and it will lead you through several things to check also.
 

csheath

Active member
713
196
43
Location
FL
How long did you try to crank it each time? like 30 seconds each time? I doubt you did any damage unless you just keep holding the start for an extended amount of time. I would try to start it again and hold the start switch for about 10 seconds after its running, to flash the field. Then hit the ac interrupter switch, to closed and see if you have power to the lugs or power to the convenience outlets. There is a flash relay (I think K15) that is the flash relay and if that is not working or has come loose in travel, it would cause your problem. Check out the TM troubleshooting guide and it will lead you through several things to check also.
I don't think I ran the starter for 30 seconds at any attempt. I did hold it on start on the 3rd try for a few seconds but it still died when I released it. Then on the 4th attempt it started and remained running.

The switch on the panel is where it was when I got it. The switch behind the panel is set to 208 3phase.

I will move the switch behind the panel to 120/240 single phase and try it again. I don't want to run it much till I repair the fuel leaks.
 

jamawieb

Well-known member
1,413
514
113
Location
Ripley/TN
That would explain why you don't see voltage. The reconnection switch needs to be set to 120/240, since your AM-VM switch is set to 240 single phase. You should still have a hertz reading no matter what, so that may just be a bad gauge since the military had to replace some other gauges recently. But try to throttle the generator up to see if the hertz move, you may not have it running fast enough to register on the gauge. Your hertz, correlate to RPM's of the motor
 

Haoleb

Member
197
7
18
Location
Raymond, Maine
Lets not forget.. The gauge may be broken. If you do not have one already I would suggest picking up a halfway decent multimeter to be able to troubleshoot and verify the operating conditions of the unit.

You want to be able to verify that the unit is putting out 60Hz and whatever voltage you want. You can also adjust the gauges to read what they are supposed to be reading but you'll need an external meter to do that of course.
 

csheath

Active member
713
196
43
Location
FL
I set the dial behind the panel to 120/240 single phase. Connected my meter to L1 and L3. Started the engine and still had no reading on the gauges and none on the meter. I toggled the interrupt switch closed for a second and started reading 236 volts on my meter. Still no reading on the gauges. Had 5 volts at the back of the voltage gauge. Stopped and went back to the fuel leaks. Will pick back up on the gauges later.
 

TrailLifeBill

Member
Steel Soldiers Supporter
178
4
18
Location
Brunswick, GA
When I got mine - I had a similar issue - but when I exercised the switch that selects what output you want back and forth several times (engine not running) it seemed to clean the contacts and I got voltage. I suppose at some point, I need to get contact cleaner and give it a proper cleaning, but it hasn't given another problem in 2 months since I've had it (probably have started it a half dozen times for 15-20 min short test, and did an hour on load bank last week with no issues).
 
Last edited:

Guyfang

Moderator
Staff member
Moderator
15,932
22,245
113
Location
Burgkunstadt, Germany
Get the manuals. They are in the manual section of SS. Read troubleshooting, NO AC OUTPUT. But first fix the leaks. There are a number of threads, from DAYBREAK, that give you good info on what you need for service parts and antifreeze. Slow down. One step at a time partner. Lots of great info here already.
 

csheath

Active member
713
196
43
Location
FL
Slowing down. :) Won't have enough daylight to work on it any more till next week. WILL have time to read more and study.
 

lonesouth

Active member
322
29
28
Location
Tallahassee, FL
sounds like you had output on the lugs after moving the reconnection switch to 120/240. Work the AM-VM switch a couple times to try to clean up the contacts, may try some contact cleaner if that doesn't work. Also, go ahead and ground the unit while you are testing.
 

csheath

Active member
713
196
43
Location
FL
Ordered radiator hoses and some dryer elements off ebay. Going to pull the thermostat and try to match it and a radiator cap at the auto parts store. I think I can see a 7 on the radiator cap so I assume it's a 7lb cap. Will stick my ground rod in the dirt and exercise the AM-VM switch before I start it again. I used some 1/8" ID vinyl tubing I had for the small return lines. Thinking I will use 1/4" tygon on the larger ones with the crimped connection. Haven't really looked at the supply lines to see if there are any flex hose on it.

I'm just going to add an inline fast acting fuse on the VR. If it blows too easy I will do the time delay type. I've seen current get past those time delay fuses and cause damage up the line before they blow.

I have always hated that cloth wrapped hose so I refuse to use it. Seems they used cotton to cover the worst rubber they could find.
 
Last edited:

Haoleb

Member
197
7
18
Location
Raymond, Maine
Here is the radiator cap for that unit..

[h=1]Stant 10228 Radiator Cap - 7 PSI[/h]
I had to order off amazon. My local parts store did not have anything like that.
 

csheath

Active member
713
196
43
Location
FL
Always ground the set before starting. If you don't do anything else, ground he set.
Should I go ahead and remove the bonding strap or leave it in place until I have the unit sorted out and load tested? Whenever I get to connecting I will use a 4 wire setup. But I don't think that will be necessary for load testing.

Haven't finalized my plans for building a load bank yet. I have a fan and I ordered four 5400w dryer elements. I am planning to make a housing to put the elements in and blow air over them. I also plan to connect two of the elements in series to lower the current draw. That should bring me to a 54 amp load total. I suppose I will rig a panel with a 60 amp breaker and switch the elements individually. Everything will be enclosed and insulated so it isn't possible to contact anything hot.

I tested my well with a a clamp ammeter that records peak current. It spiked to 48 amps on start and settled in to run just under 10. Haven't tested my 3.5 ton AC/heat pump but it's possible it will start to high for this unit to handle. I will look into adding a soft start for it if I have to. It's on a 40 amp breaker so I may be safe but the well is only on a 20. I guess that 48 amp spike is absorbed in the controller before it can trip the breaker. I can toggle loads at the house panel so everything doesn't try to run at once. I did that with a PTO generator after the hurricane and it worked out okay. The weather was moderate and we had no need for AC or heat. I hope this unit will operate the heat pump and AC when I want it.
 
Top
AdBlock Detected

We get it, advertisements are annoying!

Sure, ad-blocking software does a great job at blocking ads, but it also blocks useful features of our website like our supporting vendors. Their ads help keep Steel Soldiers going. Please consider disabling your ad blockers for the site. Thanks!

I've Disabled AdBlock
No Thanks