- 6,882
- 2,260
- 113
- Location
- Montevideo/Uruguay
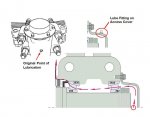
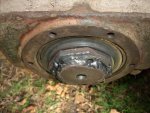
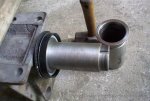
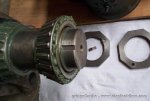
A common problem found when restoring older deuces is that grease and bearings inside the rear spring seat are long gone and the brg. cones had severely worn out their seats on the shaft. Often even the spindle nuts and thread are dangerously worn! Replacing the roller bearings with solid cone inserts alone like some newer models already have, wouldn't cure the problem.
So either find another part or repair yours! Not an option where I live!
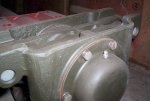
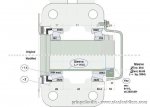
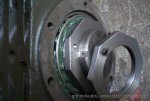
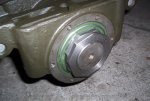
Material + labor to replace the whole steel bar was way too much $$ so I tried something different which I think could be an upgrade at the same time: turned both shaft ends (spindles) down to obtain an even surface (61.9 ->59.6mm diam.), re-threaded the ends, sleeved the spindles (-> 66.68mm) and installed the stronger #3994 bearing cones - which actually use the full width of the #3992 cups (same as the inner wheel bearings).
Difference in width is about ¼" so to maintain the seat centered I removed 2mm off of the bracket and also 1.4mm of the (inner) brg cone flank (there is enough material there).
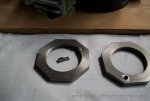
I also had to fab custom nuts (for a 3-½" 8-point socket, same as for the M105) and find a way to secure them without a lock ring. It took a while to figure this out.... (as so often, pics are better than 1000 words....)
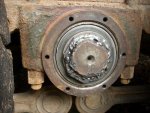
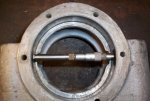
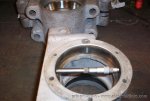
Just out of curiosity I also checked the bore (seat) for the bearing cups #3992, for roundness. To my surprise they all seem to have a tendency for deformation adopting an oval shape, way beyond tolerances. I had to scrap one of them (with a difference measured over cross of almost 0.01" (= 0.2mm !!!) and managed to refurbish another 4 which "only" were 0.1mm off.
Since the smaller size always appears in the vertical direction, once assembled and properly preloaded we sure have a tremendous additional strain on upper and lower bearing races respectively, added to the normal forces from the vehicles weight and load. No wonder that the normal maintenance and/or just replacing the std. bearings doesn't help for too long!
It will take some time though, to find out how much of an improvement this really was.
Probably someone else here has been that far and could throw in some ideas or has a better remedy to fix this in a more practical/economical way ?????
Gerhard
So either find another part or repair yours! Not an option where I live!
Material + labor to replace the whole steel bar was way too much $$ so I tried something different which I think could be an upgrade at the same time: turned both shaft ends (spindles) down to obtain an even surface (61.9 ->59.6mm diam.), re-threaded the ends, sleeved the spindles (-> 66.68mm) and installed the stronger #3994 bearing cones - which actually use the full width of the #3992 cups (same as the inner wheel bearings).
Difference in width is about ¼" so to maintain the seat centered I removed 2mm off of the bracket and also 1.4mm of the (inner) brg cone flank (there is enough material there).
I also had to fab custom nuts (for a 3-½" 8-point socket, same as for the M105) and find a way to secure them without a lock ring. It took a while to figure this out....
Just out of curiosity I also checked the bore (seat) for the bearing cups #3992, for roundness. To my surprise they all seem to have a tendency for deformation adopting an oval shape, way beyond tolerances. I had to scrap one of them (with a difference measured over cross of almost 0.01" (= 0.2mm !!!) and managed to refurbish another 4 which "only" were 0.1mm off.
Since the smaller size always appears in the vertical direction, once assembled and properly preloaded we sure have a tremendous additional strain on upper and lower bearing races respectively, added to the normal forces from the vehicles weight and load. No wonder that the normal maintenance and/or just replacing the std. bearings doesn't help for too long!
It will take some time though, to find out how much of an improvement this really was.
Probably someone else here has been that far and could throw in some ideas or has a better remedy to fix this in a more practical/economical way ?????
Gerhard
Attachments
-
 34.3 KB Views: 595
 -
 29.8 KB Views: 637
 -
 58.9 KB Views: 619
 -
 35.7 KB Views: 597
 -
 42.6 KB Views: 600
 -
 47.3 KB Views: 597
 -
 53.3 KB Views: 601
 -
 47.5 KB Views: 595
 -
 45.4 KB Views: 596
Last edited: