• Steel Soldiers now has a few new forums, read more about it at: New Munitions Forums!

  • Microsoft MSN, Live, Hotmail, Outlook email users may not be receiving emails. We are working to resolve this issue. Please add support@steelsoldiers.com to your trusted contacts.


Gasser Cab Install

Barrman

Well-known member
5,165
1,580
113
Location
Giddings, Texas
My work computer has been turning off for no reason at random intervals today. I have started this post at least 4 times already and had my computer just shut off while loading the pictures. So, here goes one picture a post.

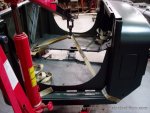
My biggest worry going into this was being able to to pick up my nicely painted cab at a single point and not have it tump over on me. It took 30 minutes, but I got it to work. This picture is with the cab a bout 2' off the ground.
 

Attachments

Barrman

Well-known member
5,165
1,580
113
Location
Giddings, Texas
All right, I finally got a picture posted today. Try for two this time.

Once I got it to balance right, I thought I was home free. If you look at the next picture, you will see the cab almost to the frame. See where I screwed up?

Yep, I put the straps under all 4 mounting bolt locations. Because they are the best locations to hook to for strength and paint preservation. Worked great until I tried to get the straps out. I ended up using a 6' pry bar to pick up the cab near the straps and pull the straps out.
 

Attachments

Barrman

Well-known member
5,165
1,580
113
Location
Giddings, Texas
The picture above showing the rear straps also shows off the big blemish with my replacement cab. What looks like a fork lift tong had gone through the back of the cab. That was how I got it. I hammered it back together and welded the hole up. But, since I don't think Bondo or any kind of filler belongs on MV's, I got as far as I could with a hammer and dolly and that is where it stays. Plus, the bed will cover that up unless you guys that know now about it go looking for it that is.

Once the straps were out, the rear mount bolts dropped right in. The fronts were a little harder since I couldn't see where they were supposed to go. I loosely tightened the rear mount bolts down, brought the engine hoist back in, wrapped a chain around the cab floor cross member and then picked up. This lifted the front of the cab about 1/2". Just right to see where the front frame holes were and get those bolts started.

It sure is weird to see a cab on top of the frame I have been looking at for the last 3 weeks. Looks almost like a truck in my shop.

I did all the stuff pictured on Tuesday night. Wednesday, I put the steering column/box back in. Loaded just fine from the top. I had Colton my 9 year old inside the cab to protect the paint on the column while I thought I would be wrestling the box into place. He wasn't needed. But, his little bit of pressure sure did help line the box mount holes up. If you are doing a steering box job, have somebody at the other end of the column. Big help.

Sorry about the multiple post. I was so tired of typing all this out and then loosing it throughout the day.
 

Attachments

SasquatchSanta

New member
1,177
18
0
Location
Northern Minnesota
Looks Good!

The blemish on the back of the cab is something no one would have noticed had you not mentioned it. Not using bondo is noble.

I'd like to build a gasser. Would like to find a good project gasser w/o winch.

Keep up the good work.
 

clinto

Moderator, wonderful human being & practicing Deuc
Staff member
Administrator
Super Moderator
Steel Soldiers Supporter
Supporting Vendor
12,596
1,123
113
Location
Athens, Ga.
Rock on Barrman, that is awesome! :beer:
 

Barrman

Well-known member
5,165
1,580
113
Location
Giddings, Texas
Thanks for the kind words guys. I am at home today because my 9 year old son Colton woke up with the crud. A few minutes ago he was hurling pretty good. He is needed for the next step of the build because he is my "bolt holder" inside the cab while I turn the other end to attach all the firewall stuff. It probably isn't in either of our best interest to take him outside in rain and 30 degree weather. He could make a mess inside the cab or something.

I will post more when I have something signigant to write about.
 

Srjeeper

New member
1,505
40
0
Location
NE, Pa.
Very nice work Barrman :!:

Don't consider those a blemish, but rather a "Birth Mark" only your truck has. :wink:

Keep up the good work and pics. :D
 

Barrman

Well-known member
5,165
1,580
113
Location
Giddings, Texas
Actually Chris, we use a spagetti pot for such use around here. Old one with the teflon worn off not the one we still cook with. 5 gallon buckets are too tall to put in the bed with him. (they fall over and hit him in the head.) We took him to the doc this afternoon. Stomach virus. His fever had gotten up to around 103 and just about 15 minutes ago broke. He should be fine in another day or so.

I did get to go outside this evening and work on the truck. Ebrake handle on and adjusted along with the starter lever. Now I need to go read the manual. My truck had the old style air regulator and the cab had the D type most of you guys have on your trucks now. The old manuals tell you how to convert over. But, I know the old one I had worked. I need to learn about taking the new style one apart and making sure it will work before I paint it and stick it on the truck.

I figure I will be better off in the long run this way since I have 2 spare D types while no spare old style ones are here. The air lines are different a little and I don't want to do this conversion with the fenders on the truck. I might scratch something.
 
Top
AdBlock Detected

We get it, advertisements are annoying!

Sure, ad-blocking software does a great job at blocking ads, but it also blocks useful features of our website like our supporting vendors. Their ads help keep Steel Soldiers going. Please consider disabling your ad blockers for the site. Thanks!

I've Disabled AdBlock
No Thanks