• Steel Soldiers now has a few new forums, read more about it at: New Munitions Forums!

  • Microsoft MSN, Live, Hotmail, Outlook email users may not be receiving emails. We are working to resolve this issue. Please add support@steelsoldiers.com to your trusted contacts.


5-ton M51A2 air pack rebuild

Robo McDuff

In memorial Ron - 73M819
Steel Soldiers Supporter
2,863
1,407
113
Location
Czech Republic
Thought it would be useful to start a new thread on the air pack rebuild (attempt)

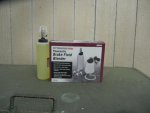
I was loosing DOT 5 brake fluid while the truck was parked for two years. No visible leakage. In the end decided to bite the bullet and got the MC and the air pack out on the bench.
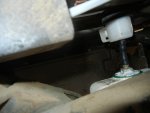
With the AP, all the air lines looked dry initially and not rusted, so I hoped I could get away with some small repairs. Then I had the AP upside-down and turned a few times, and a milky fluid started coming out of the air-vent T connections on top, but not out of the two other air connections lower on the diaphragm thingsy in front.


AC-rebuild-02cr.jpg


Out of the slave hydraulic cylinder came clear blueish transparent DOT 5.

No fluid came out of the open rear-end air connection!

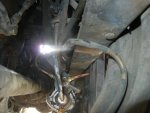
So I took of the air cylinder part to see what was there. When taking it out, the parts were on an angle with each other, so any liquid that was in the intermediate section with the spring would run into the rear air section.

AC-rebuild-04c.jpg


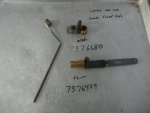
Taking everything apart, it looks like somebody put a lot of heavy grease on the seal. I think that, until today, the rear section was without liquid, given the fact that no liquid came out of the rear air connections, and the rear section has a lot of yellowish grease, also on the seal (pic left). On the other hand, in the part with the spring (pic right), there was a murky more grayish grease and the milky liquid and other stuff on the walls and spilling out on the table.


AC-rebuild-15cr.jpg AC-rebuild-12rc.jpg AC-rebuild-13cr.jpg

Most of the liquid spilled on the table when opening the air cylinder, but some of it probably went into the air section, because there was a milky liquid in there as well, but with yellowish untainted grease.

AC-rebuild-18cr.jpg

So I will have to take the rest apart as well and rebuild the thing, but I have to get parts from the Netherlands for that. Will cost me 55 EUR, and hoping they have the proper set for the M39 AP and not the Deuce long AP.
 

BEASTMASTER

Active member
898
140
43
Location
Burgaw, N.C.
I've been thinking of doing that very thing myself. been losing fluid for 14 yrs, no visible leaks though. I just put fluid in it before I go anywhere,or every three to four weeks.
 

Robo McDuff

In memorial Ron - 73M819
Steel Soldiers Supporter
2,863
1,407
113
Location
Czech Republic
Packing wick for air pack piston

Finally, I have time and all missing parts and new parts together to re-assemble the air pack.

Question about the "packing wick", which is part of the air pack piston assembly.

My original air pack has a very thin packing wick, the kit has a wick about 2 feet long and about 1/3 inch thick

IMG_3622.jpg

IMG_3625.jpgIMG_3626.jpg
The two wicks compared before (above) and after (below) putting the retaining plate on top of it (no packing ring added yet. In all pics thin left, thick right


IMG_3624.jpgIMG_3623.jpg

The thick one seems very thick. Is it correct and did an earlier repair effort put a smaller wick there or should I fabricate a thinner wick from it? With the thick wick, the packing ring seems to be rather narrow.

Anybody has pics about this part or experience with it?

I removed and cleaned out all the grease in the air pack cylinder. I am going to oil the rings, seals and wick in the air part with the prescribed air tool oil, and the seals in the hydraulic part with the DOT 5 brake fluid.
 

Robo McDuff

In memorial Ron - 73M819
Steel Soldiers Supporter
2,863
1,407
113
Location
Czech Republic
I went with the whole set to a small company for hydraulic systems; the people there know us and like to help. First reaction after seeing the wick: from which museum did you get that? Then they offered to make a complete new piece which would replace all this with one piece of steel and one special sleeve/cup seal. In the end, to keep it simple (and cheap), they recommended to replace the wick and spring for a fitting seal/sleeve/cup seal (don't know the correct name).

air pack reassembly _16.jpg
air pack reassembly _11.jpg


The retaining plate fits perfectly in the blue cup seal and will work the same way the wick and spring did.

air pack reassembly _14.jpg air pack reassembly _13.jpg air pack reassembly _15.jpg
 

Robo McDuff

In memorial Ron - 73M819
Steel Soldiers Supporter
2,863
1,407
113
Location
Czech Republic
Slave cylinder cap assembly

air pack reassembly _02.jpg

Sounds very simple according the TM.

1. Clamp slave cylinder cap (1) in vise.
2. Put check valve (2), spring (3) and washer (4) in slave cylinder cap (1).
3. Push down spring (3) . Put in snapring.

but it is a PITA

The spring is rather strong, and the snapring not very easy to handle, and the groove for the snap ring is about an inch down inside the cap, so it jumps out unless you get it perfectly straight. After a lot of trying, I went to a technician with some really nice equipment. In the end, he made a special tube and we put the snapring and washer and spring in the tube and then pushed it straight down into the slave cylinder cap. We managed after the third try.

air pack reassembly _03.jpg


End plate assembly for the air part. The relay piston. This part was a bit rusty. It did not came out of the end plate like this, but I had left it in a damp place while waiting for the rebuild kit. :-? :doh: aua aua


air pack reassembly _04.jpg air pack reassembly _05.jpg

Cleaned everything, put in new cup seals, and assembled.

air pack reassembly _06.jpg air pack reassembly _07.jpg air pack reassembly _08.jpg

I am switching between three TMs to get the best pics and explanations (they are almost identical). The TM ... 35 from 1964 mentions that the inner and outer cup seal are not identical. The TM .. 34-2-2 does not mention this and the TM ..260-34-2-3 (for M800 series) also not. I could not see any difference between the replacements. Could this be because one cup is facing the brake fluid and the other cup is facing the air side?
 
Last edited:

Robo McDuff

In memorial Ron - 73M819
Steel Soldiers Supporter
2,863
1,407
113
Location
Czech Republic
Trying to figure out what goes where: I have too many parts.

air pack reassembly _10.jpg air pack reassembly _01.jpg

Above right is how the seals - gaskets for the hydraulic piston rod are shown in the TM, below how it really looks.

air pack reassembly _17.jpg


Below, attached the hydraulic piston to the rod. I did it before putting the spring on, is easier.
Than the spring and attaching the air piston to the rod, using the new seal. The TM mentions some kind of washer and snapring between the spring and the last piston plate. Never saw that on my old set, did not see something like that in the rebuild kit either.


air pack reassembly _21.jpgair pack reassembly _22.jpgair pack reassembly _23.jpg

And finally putting the piston assembly with end plate back into the cylinder.

air pack reassembly _24.jpg
 

topo

Active member
897
219
43
Location
farmington NM
I replaced the master cylinder on my M52A2 with anew one and rebuilt the air pack because of a air leak in to the vent system .

I used a vacuum bleeder that runs off of compressed air from a gas powered compressor I pulled from the right rear wheel cylinder .
that worked real good the peddle is vary firm I have not done the other cylinder yet .
I then aired up the truck and when pumping the peddle I noticed the air pack not working any ideas ?


I then see brake fluid dripping from the brass banjo fitting from the bottom of the air pack for the line that comes from the master cylinder its cracked so it will be a week before a new one gets hear .
 

topo

Active member
897
219
43
Location
farmington NM
Finished the new master cylinder and air pack rebuild .
The Harbor fright Pneumatic brake bleeder worked great the bottle that holds new fluid fits in side the master cylinder and it adds fluid as needed . I made a wrench from a Craftmans socket so I could leave the wrench on when bleeding and close the bleeder while still pulling a vacuum .

The two cup seals 7376680 is wider then seal 7376459 one on the air side the other on the fluid side when taking them off the piston they looked the same .
I put the wider one on the air side the instructions talk about red or yellow dots my kit had no dots . Maybe someone when taking there 5 ton air pack apart can post how they find there .
 

Attachments

Robo McDuff

In memorial Ron - 73M819
Steel Soldiers Supporter
2,863
1,407
113
Location
Czech Republic
Finally an almost close to this thread .. for now.

Before I forget: VERY IMPORTANT: when uncoupling and taking off the truck, be extremely careful with unscrewing the lines and make sure you do not bump the airpack against anything when you wriggle it out (or back) from the truck. I somehow ever so slightly damaged the threads on the connector fittings. That causes a major pain if you cannot repair it and cannot replace the connectors.

The fixed line between the slave cylinder and the rest of the brake hydraulic system was already damaged before removal, and I had to cut it to get the thing out at all. I could not get a fitting tube to replace it, ending up using a real hydraulic flex hose to reconnect the airpack brake section with the rest of the truck.

2020 04 brake repair 01.jpeg 2020 04 brake repair 02.jpeg


The airpack back in place, with the new bolts and the flex line clearly visible.

2020 04 brake repair 03.jpg 2020 04 brake repair 04.jpeg

Tomorrow I will complete reconnecting the lines, capping the front glad-hands and bleed the brakes.
 

Robo McDuff

In memorial Ron - 73M819
Steel Soldiers Supporter
2,863
1,407
113
Location
Czech Republic
Airpack dismantel - 01cc.jpg

This is what I mean. The regulator section of the airpack, main air connector. The left wall was dented when removing the airpack. Two other connectors got destroyed because we could not get them free normally. By the time they were free, either the tread was dented or the bolt part rounded.

aua aua aua aua
 

Ajax MD

Well-known member
1,571
1,420
113
Location
Mayo, MD
View attachment 794959

This is what I mean. The regulator section of the airpack, main air connector. The left wall was dented when removing the airpack. Two other connectors got destroyed because we could not get them free normally. By the time they were free, either the tread was dented or the bolt part rounded.

aua aua aua aua
Ouch. Sorry for your troubles.
 

Robo McDuff

In memorial Ron - 73M819
Steel Soldiers Supporter
2,863
1,407
113
Location
Czech Republic
Thanks, I think we all have been there and know the feeling. Did I already mention that I want a few quiet minutes in a dark alley with the total @#$%@$!^ who made the layout for the lines?

Had to take of the main line from the air tank to the air pack to get the air pack side connected. Then had a horrible time trying to get the line back onto the air tank; proper access was blocked by the fuel filter

o_O o_O :cautious: :cautious:

Then I capped the airpack side of the vent line from the MC and then last thing to do is reconnecting the carefully stored and preserved line between the MC into the slave cylinder on the airpack. Happy me, finally done ....


eeehhhhh .. the flare at the end of the line does not go into the MC receiver. Tried a few times, even sanded down the flare a bit, but no dice, cannot get it far enough in to let the bolt grab into the receiver threads.

At 6 PM, that was the moment I carefully put the tools down, cleaned everything and went home. I will try again when I am fresh tomorrow morning, don't want to risk destroying the next connector because I am getting tired and angry.
 

Robo McDuff

In memorial Ron - 73M819
Steel Soldiers Supporter
2,863
1,407
113
Location
Czech Republic
Oops, good that I did not try too hard. something is missing:

Brakes - Master Cylinder - 02c.JPG

On the left, you see that there is an additional connector between the MC still in white and the outgoing line.

Problem is, I am sure that my collection of connectors remaining in the "truck box" does not include that one anymore, which means I have a new search effort in front of me.

Maybe it ended up in the boxes "1953 NSU motor cycle" :rolleyes: :whistle:
 
Top
AdBlock Detected

We get it, advertisements are annoying!

Sure, ad-blocking software does a great job at blocking ads, but it also blocks useful features of our website like our supporting vendors. Their ads help keep Steel Soldiers going. Please consider disabling your ad blockers for the site. Thanks!

I've Disabled AdBlock
No Thanks