


wandering neurons
Active member
- 248
- 112
- 43
- Location
- Fallon, NV
For the LMTV community (and should be similar for other wedge brake systems):
I had a noisy rear left side pair of air chambers after I shut down my M1081 LVAD. You could hear air leaking out of the spring chamber (larger inboard section that uses caging bolt). The air could be heard with or without the spring brake set or released, and only after the engine was no longer supplying air pressure, or if pressurized via the front emergency glad hand.
After lots of reading and some trepidation, I removed both assemblies from the truck. And here's my thoughts and some photos...
SAFETY FIRST! Those caged spring brake cans can be dangerous! The spring is the diameter of a regular car suspension spring and is highly compressed when properly caged.
1. I used the emergency glad hands to pressurize the brakes with the spring brakes released (knob pushed in), same could be done with engine air.
2. With the spring brakes released, I caged the spring brakes.
3. Apparently, pre-1998 LMTVs use smaller caging bolts due to a change in spring chamber size. NAPA TWD HD 10039 works)
4. Use a pen and put alignment marks and numbers on your air lines for both chambers, along with alignment marks for every fitting and along the length of each assembly, including the clamps. Must do, it's a pain to realign later...
5. Removal is pretty straightforward outlined in the TMs. You will have to get creative to loosen the locking nuts at the brake backing plate. You will need to remove all of the angle fittings from the front chamber to rotate it off the plate, and the inner and outer fittings from the rear chamber.
6. Removed all lines, including the CTIS line, and moved all of them inboard to be out of the way. Made it a lot easier.
7. The outer (smaller) diaphragm is glued to the shaft that pushes on the wedge. I peeled off the bad diaphragm and used acetone to remove the cement, and a wire brush to clean the surface. I used Goop Automotive to carefully glue the new diaphragms to the shaft, making sure it was centered properly. One chance on this.
8. Assemble the spring brake (inner) chamber first. I used a pair of screwdrivers to shift the spring-loaded center valve assembly toward the outer position and locked it there with another screwdriver across the face of the center assembly. This makes installing and centering the diaphragm much easier! When done fastening the spring diaphragm to the center section, carefully release tension on the center valve assembly.
9. Install the outer diaphragm with shaft, don't forget the nylon sleeve that's inside the shaft...
10. Make sure everything is properly aligned based on your pre-disassembly alignment marks. If you don't align everything, you won't get the assemblies to bolt up, especially the air lines.
11. Under the truck, I threaded the rear assembly on, bottomed the threads and turned it back out, but did not set the locknut yet.
12. I attached and tightened all of the T-fittings based on alignment marks, then the lines to the rear chamber assembly but not tightly, just got threaded nicely.
13. I then installed the front chamber assembly and right-angle fittings tightened properly to alignment marks. Again, did not lock the assembly to the backing plate.
14. I attached the lines from the rear assembly to front assembly.
15. By leaving both assemblies loose, I could rotate as necessary to get the lines aligned and threaded.
16. Now tighten all lines, then set the locknuts on the assemblies to the backing plate.
17. Pressurize your lines (engine or shop air via front emergency glad hand). Check for air leaks with spring brakes both pressurized and depressurized, check service brake, and shut off engine to listen for leaks. If your diaphragms are not centered and secured, you will get leaks. Fix them!
General note about rear chamber assemblies - there two major versions according to SuprMan, but I can identify three: Two "old" styles that use the smaller cage bolts and one "new" style using the larger bolts. The older can versions are only identified by disassembly of the spring chamber, but they both use the same internals. One has smooth lips for the diaphragm for both the can and the intermediate spring brake assemblies. The other has a raised outer ring on the intermediate section, which is used to center, retain, and seal the spring chamber diaphragm.
Turns out, the spring in the rear chamber had broken into two pieces and punctured the diaphragm, causing the leaking. With a replacement spring can assembly (finding out about the two variants of old can), I now have functional and non-leaking brakes.
Pics:
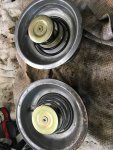
Center section of brake assembly. This is the inner, spring brake end pf the intermediate section. You can see the lip on one, no lip on the other. Flipped over looks the same but doesn't have a spring, and you pry from the other end to collapse this spring to make assembling the inner spring chamber and diaphragms much easier. Sorry, no photo, though I may mock it up later from leftover parts.
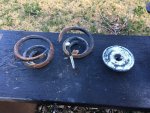
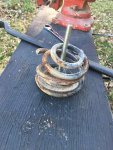
Several photos of the broken spring . Part of the spring had escaped from under the metal retainer that is grabbed by the caging bolt. Both spring halves got wrapped in each other, compounding the problem. Note size of the spring, hence the warning on proper procedures and safety. This got disassembled in the back yard, pointed in a safe direction, very carefully. Think loaded malfunctioned firearm...
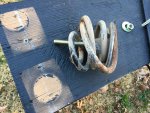
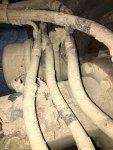
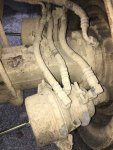
Good (but muddy) photos of the air lines and alignment of parts (for those of you who take yours apart without marking them first!)
I had a noisy rear left side pair of air chambers after I shut down my M1081 LVAD. You could hear air leaking out of the spring chamber (larger inboard section that uses caging bolt). The air could be heard with or without the spring brake set or released, and only after the engine was no longer supplying air pressure, or if pressurized via the front emergency glad hand.
After lots of reading and some trepidation, I removed both assemblies from the truck. And here's my thoughts and some photos...
SAFETY FIRST! Those caged spring brake cans can be dangerous! The spring is the diameter of a regular car suspension spring and is highly compressed when properly caged.
1. I used the emergency glad hands to pressurize the brakes with the spring brakes released (knob pushed in), same could be done with engine air.
2. With the spring brakes released, I caged the spring brakes.
3. Apparently, pre-1998 LMTVs use smaller caging bolts due to a change in spring chamber size. NAPA TWD HD 10039 works)
4. Use a pen and put alignment marks and numbers on your air lines for both chambers, along with alignment marks for every fitting and along the length of each assembly, including the clamps. Must do, it's a pain to realign later...
5. Removal is pretty straightforward outlined in the TMs. You will have to get creative to loosen the locking nuts at the brake backing plate. You will need to remove all of the angle fittings from the front chamber to rotate it off the plate, and the inner and outer fittings from the rear chamber.
6. Removed all lines, including the CTIS line, and moved all of them inboard to be out of the way. Made it a lot easier.
7. The outer (smaller) diaphragm is glued to the shaft that pushes on the wedge. I peeled off the bad diaphragm and used acetone to remove the cement, and a wire brush to clean the surface. I used Goop Automotive to carefully glue the new diaphragms to the shaft, making sure it was centered properly. One chance on this.
8. Assemble the spring brake (inner) chamber first. I used a pair of screwdrivers to shift the spring-loaded center valve assembly toward the outer position and locked it there with another screwdriver across the face of the center assembly. This makes installing and centering the diaphragm much easier! When done fastening the spring diaphragm to the center section, carefully release tension on the center valve assembly.
9. Install the outer diaphragm with shaft, don't forget the nylon sleeve that's inside the shaft...
10. Make sure everything is properly aligned based on your pre-disassembly alignment marks. If you don't align everything, you won't get the assemblies to bolt up, especially the air lines.
11. Under the truck, I threaded the rear assembly on, bottomed the threads and turned it back out, but did not set the locknut yet.
12. I attached and tightened all of the T-fittings based on alignment marks, then the lines to the rear chamber assembly but not tightly, just got threaded nicely.
13. I then installed the front chamber assembly and right-angle fittings tightened properly to alignment marks. Again, did not lock the assembly to the backing plate.
14. I attached the lines from the rear assembly to front assembly.
15. By leaving both assemblies loose, I could rotate as necessary to get the lines aligned and threaded.
16. Now tighten all lines, then set the locknuts on the assemblies to the backing plate.
17. Pressurize your lines (engine or shop air via front emergency glad hand). Check for air leaks with spring brakes both pressurized and depressurized, check service brake, and shut off engine to listen for leaks. If your diaphragms are not centered and secured, you will get leaks. Fix them!
General note about rear chamber assemblies - there two major versions according to SuprMan, but I can identify three: Two "old" styles that use the smaller cage bolts and one "new" style using the larger bolts. The older can versions are only identified by disassembly of the spring chamber, but they both use the same internals. One has smooth lips for the diaphragm for both the can and the intermediate spring brake assemblies. The other has a raised outer ring on the intermediate section, which is used to center, retain, and seal the spring chamber diaphragm.
Turns out, the spring in the rear chamber had broken into two pieces and punctured the diaphragm, causing the leaking. With a replacement spring can assembly (finding out about the two variants of old can), I now have functional and non-leaking brakes.
Pics:
Center section of brake assembly. This is the inner, spring brake end pf the intermediate section. You can see the lip on one, no lip on the other. Flipped over looks the same but doesn't have a spring, and you pry from the other end to collapse this spring to make assembling the inner spring chamber and diaphragms much easier. Sorry, no photo, though I may mock it up later from leftover parts.
Several photos of the broken spring . Part of the spring had escaped from under the metal retainer that is grabbed by the caging bolt. Both spring halves got wrapped in each other, compounding the problem. Note size of the spring, hence the warning on proper procedures and safety. This got disassembled in the back yard, pointed in a safe direction, very carefully. Think loaded malfunctioned firearm...
Good (but muddy) photos of the air lines and alignment of parts (for those of you who take yours apart without marking them first!)
Attachments
-
 83.5 KB Views: 74
 -
 137.2 KB Views: 69
 -
 84 KB Views: 70
 -
 135.3 KB Views: 69
 -
 74.7 KB Views: 70
 -
 72.3 KB Views: 67