• Steel Soldiers now has a few new forums, read more about it at: New Munitions Forums!

  • Microsoft MSN, Live, Hotmail, Outlook email users may not be receiving emails. We are working to resolve this issue. Please add support@steelsoldiers.com to your trusted contacts.


Front glad hand removal/ relocate...

SteelPeak

New member
12
0
1
Location
Reno, NV
Hey Guys, I recently added a winch to my rig and had to remove the glad hands in the process. I know the emergency needs to vent as to not lock the breaks so my plan is to run a longer hose up under the cab to keep it out of the elements (froze on me last winter) and stick a vent on it. Can I just cap the blue/service side? Or would I be better off adding a longer hose and vent cap to that one too? Does anyone see a major problem or disadvantage to relocating to a higher/safer location? Thanks in advance!

IMG_20180823_193959.jpg
 

Ronmar

Well-known member
3,266
6,609
113
Location
Port angeles wa
Both front service and emergency lines come in and feed 2 check valves respectively(thru “T”s). Only reason to vent the emergency at the gladhand is in the event one of the check valves fail(the one where it feeds air in between dryer and wet tank) and backfeed the other 2 way check valve.

The only reason I can see to have front gladhands is if you wanted to flat tow with another LMTV or some such that has brake air available. If you relocate them too far back into the vehicle, you obviously dont plan on ever using them again right?

If that is the plan, why not remove them completely back to their respective check valve ports and cap those...
 

SteelPeak

New member
12
0
1
Location
Reno, NV
Thanks Ronmar! I do not plan on flat towing the truck with another lmtv and capping would be easier/cleaner than have to reroute. However, last winter my breaks would not release when ice built up on the emergency glad hand valve. With the glad hand off and tape on the end of the hose releasing my parking break sounds muffled and weak (similar to when it was iced up). Are you saying thats because my check valve is bad? When vented all works fine. I've read threads suggesting both sides might need to be vented hence my confusion. Just want to make sure I have a clear understanding so I don't screw something up.
 

NDT

Well-known member
Steel Soldiers Supporter
10,159
5,838
113
Location
Camp Wood/LC, TX
I do not agree with advice given regarding capping front service and emergency lines.
 

Ronmar

Well-known member
3,266
6,609
113
Location
Port angeles wa
I do not agree with advice given regarding capping front service and emergency lines.
The advice given was not to cap the service and emergency lines, it was to de-install them COMPLETELY and cap the ports where they were connected to their respective checkvalves...

These are supply lines. They both take air from the vehicle ahead and feed it to the input of two separate check valves respectively.

In the case of the emergency line it feeds a “T” fitting that then feeds a one way checkvalve that feeds air into the main air system between the air dryer and the wet tank. The other side of the “T” feeds a 2 way check valve input in the park brake circuit. The other side of this 2 way checkvalve is fed from the system park supply valve... when air is fed into the emer line it sets the park brakes and feeds air into the tanks on the towed vehicle.

The service gladhand is similar in feeding a “T” fitting. The outputs of this “T” feed input ports on two separate 2way check valves. The other input on these 2 way checks is fed by the primary and secondary outputs of the brake pedal foot valve. When air is applied to the service gladhand it applies air to the brake system the same way it is applied when you step on the brake pedal in the vehicle

Stealpeak in your case, I would suspect that the one way check where emer air is input between dryer and wet tank is leaking system air back into the front emergency line. If the emer gladhand is plugged, this leakage will build pressure in the line back thru the other leg of the “T” to feed pressure into the input of the 2 way check valve which applies park brake pressure the same way the system park supply does to the other side of that 2 way valve. Quick check for this would be to put a guage on a gladhand fitting and connect it to the front emer gladhand. Start the truck and if you see pressure building on that gauge well then there is your answer...

Removing the front service and emergency lines and their “T” fittings completely and capping the ports AT the checkvalves, removes possible leak areas and removes that possible pathway for leakage into the emergency line that would set the park brake if the emer gladhand is plugged...

TM9-2320-365-20-1 pneumatic schematic drawings start on page 1691
 
Last edited:

Suprman

Well-known member
Supporting Vendor
6,840
654
113
Location
Stratford/Connecticut
If you cap off the front service gladhand your brakes will not release. If you want to cap off the red emergency front gladhand, as long as the inline check valve connected to it is good then it will be fine. If the check valve were to fail you would loose your parking brakes if there is air in the system. Which there will be with normal operation. Why not just relocate them.
 

SteelPeak

New member
12
0
1
Location
Reno, NV
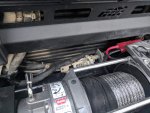
Thanks guys. Do to lack of space I removed the glad hands and hoses back to the check valves and rerouted some vent lines. I didn't want to mess with capping and potentially affecting the breaks. Glad hands can easily be reinstalled down the road if I wish, but for now just wanted them out of the way. Reworked, I don't have very many pics, but hopefully this one helps.

MFP_0820-01.jpg
 

Third From Texas

Well-known member
2,704
6,327
113
Location
Corpus Christi Texas
Do to lack of space I removed the glad hands and hoses back to the check valves and rerouted some vent lines.
When you say that you "re-routed some vent lines, can you elaborate?

I plan on adding a wench and really want to free up the space. As you said, they can always be re-installed should an emergency arise.
 

coachgeo

Well-known member
4,967
3,339
113
Location
North of Cincy OH
Last edited:

Kacperski

New member
3
0
1
Location
Chicago, IL
Thanks guys. Do to lack of space I removed the glad hands and hoses back to the check valves and rerouted some vent lines. I didn't want to mess with capping and potentially affecting the breaks. Glad hands can easily be reinstalled down the road if I wish, but for now just wanted them out of the way. Reworked, I don't have very many pics, but hopefully this one helps.

View attachment 740954
Is the winch mounted on a separate plate that is attached to the truck? Did you weld the plate to the round tube behind the bumper? Thanks
 

seanwmurph

Member
10
27
13
Location
California
The advice given was not to cap the service and emergency lines, it was to de-install them COMPLETELY and cap the ports where they were connected to their respective checkvalves...

These are supply lines. They both take air from the vehicle ahead and feed it to the input of two separate check valves respectively.

In the case of the emergency line it feeds a “T” fitting that then feeds a one way checkvalve that feeds air into the main air system between the air dryer and the wet tank. The other side of the “T” feeds a 2 way check valve input in the park brake circuit. The other side of this 2 way checkvalve is fed from the system park supply valve... when air is fed into the emer line it sets the park brakes and feeds air into the tanks on the towed vehicle.

The service gladhand is similar in feeding a “T” fitting. The outputs of this “T” feed input ports on two separate 2way check valves. The other input on these 2 way checks is fed by the primary and secondary outputs of the brake pedal foot valve. When air is applied to the service gladhand it applies air to the brake system the same way it is applied when you step on the brake pedal in the vehicle

Stealpeak in your case, I would suspect that the one way check where emer air is input between dryer and wet tank is leaking system air back into the front emergency line. If the emer gladhand is plugged, this leakage will build pressure in the line back thru the other leg of the “T” to feed pressure into the input of the 2 way check valve which applies park brake pressure the same way the system park supply does to the other side of that 2 way valve. Quick check for this would be to put a guage on a gladhand fitting and connect it to the front emer gladhand. Start the truck and if you see pressure building on that gauge well then there is your answer...

Removing the front service and emergency lines and their “T” fittings completely and capping the ports AT the checkvalves, removes possible leak areas and removes that possible pathway for leakage into the emergency line that would set the park brake if the emer gladhand is plugged...

TM9-2320-365-20-1 pneumatic schematic drawings start on page 1691
I'm not currently having issues, but removing the front gladhands and possible leak points sounds great! Does the below annotations of the schematic referenced match your guidance? I want to make sure I'm understanding correctly. It appears as though the two-way check valves can be removed as well?
1641517659291.png
 

Ronmar

Well-known member
3,266
6,609
113
Location
Port angeles wa
Yes, and having done it now, I discovered it is easier to simply bypass them than to remove and cap the inlet lines at the 2way checks.

here is something that shows how easy it is… i also removed the check valve and fitting and all that associated tubing down in the bumper and put a quick connect fitting right on the wet tank where the CTIS pressure switch is located…


seanwmurph

Member
10
27
13
Location
California
Thanks! Funny enough I found your YouTube channel just earlier today and was watching all the super helpful videos, but that one doesn't seem to show up for some reason.
 
Top
AdBlock Detected

We get it, advertisements are annoying!

Sure, ad-blocking software does a great job at blocking ads, but it also blocks useful features of our website like our supporting vendors. Their ads help keep Steel Soldiers going. Please consider disabling your ad blockers for the site. Thanks!

I've Disabled AdBlock
No Thanks