• Steel Soldiers now has a few new forums, read more about it at: New Munitions Forums!

  • Microsoft MSN, Live, Hotmail, Outlook email users may not be receiving emails. We are working to resolve this issue. Please add support@steelsoldiers.com to your trusted contacts.


S-250 Shelter / Ham Shack Conversion

rlwm211

Active member
1,648
18
38
Location
Guilford, NY
Professor;
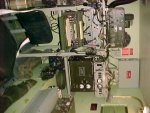
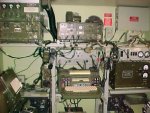
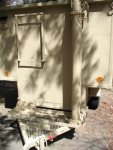
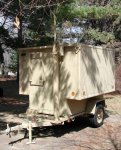
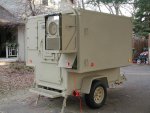
The NMO mounts were put on the hooch by my friend who was one of the three previous owners. From what I can tell, it is a straight connector and uses a 3/8 hole to mount and all he did is run the bit all the way through the roof. It appears that the wire truns straight through.
I will check with him and get the exact info, and post when I do.

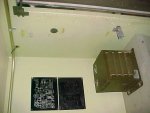
I have two of the speakers. I use one inside and one outside. I can connect them either to the same source, or separate as they are wired to an 1/8 plug and I use a wye cord to combine them if I want to.
Important note on these speakers.You have to pull the transformer inside the speaker when you get one, or at least check to see if it still has one. The transformer is wired in series with the feeds for impedance matching I believe.
I boutght mine on EBAY and paid about 8$ for the speaker and way too much for shipping and handling. The other was already installed in the hooch. They are very midrange oriented and are very appropriate for communications as they limit most everything outside of midrange.
I will get the information on the NMO stuff today If I can.
 

SCSG-G4

PSVB 3003
Steel Soldiers Supporter
5,308
3,193
113
Location
Lexington, South Carolina
Professor,
You might want to switch the curbside and streetside plans. I have found on my S-250 I can barely stretch out on the street side, but at 5'11" I'm too long for the curbside because of the power panel sticking into my shelter. Actual dimension on that side in mine is 70 inches, and the panel comes in about three, so the other side is close. YMMV
 
55
0
0
Location
Brainerd, MN
Professor,
You might want to switch the curbside and streetside plans. I have found on my S-250 I can barely stretch out on the street side, but at 5'11" I'm too long for the curbside because of the power panel sticking into my shelter. Actual dimension on that side in mine is 70 inches, and the panel comes in about three, so the other side is close. YMMV
You raise a good point, Mike. I picked the curb side for the bunk, because I'm putting a 15" x 30" tinted window above it. My home parking options are pretty limited (you know how these spousal negotiations go). On the curb side I'd have a lake view, on the road side, a view of my neighbors' air conditioner.

I'll still consider it though--thanks for the input!

Anybody had the experience of cutting through the wall (and one metal stud) to put in an RV window?
 

pevrs114

Active member
187
32
28
Location
Monroe, NC
Excellent looking shelter. I like the plans a lot.

WRT getting the grounding rods back out, you may consider using a Hi-lift or ratcheting farm jack. They're very handy for getting stakes and fence posts out of the ground, so if you had some kind of attachment loop or hook on the top of the grounding rod, it would work very well.
 

kaiser715

New member
53
8
0
Location
Sanford, NC
Anybody had the experience of cutting through the wall (and one metal stud) to put in an RV window?
I did it on mine, did a iirc 30x33 RV window. There is an RV junkyard up the road from me...I found a window I liked, and it just happened that the walls of it were also 1.5" thick, so I used the same trim ring and didn't have to shim it or anything.

I had to cut one stud too. Using a sharpie, I drew some level guide and centering lines on the side of the shelter, then I held the window up to the shelter while my wife traced around it. After examining my whole arsenal of tools, I decided to use a regular jigsaw for the cut, going thru the whole panel in one shot.

Here's my build: (Remember, this was done as a camper, and my wife got to pick the paint.)

S250 Camper

I never put the finished pics of the interior on that webpage....I'll post back in a few minutes with some inside pics.
 

kaiser715

New member
53
8
0
Location
Sanford, NC
CGarbee had posted a link to my camper on SS before, this is a post I made in that thread:

Here are some interior pics. Forgot to get them posted to my web page.

Here is the bunk in the sleeping position. Cushion is 3" foam, made into 4 pieces. The two center sections will lift out and lean against the back wall to make more floor space. There is about 2' of floor space with the bunk in this position, enough for the portapotti and getting in and out the door. Wood is oak and oak veneer plywood, yet to be stained. I have aluminum hat channel screwed up under the plywood inserts to keep them from bowing.

http://www.sanlee.com/S250/MiscPics/bunk.jpg

Here is the bunk with one cushion/panel removed. This is how we usually set it during the day to have more room for dressing, etc. We can just pull the corners off the fitted sheet up front, and fold back in half on the remaining bunk, so we don't have to fully re-make the bed every night. Also you can see that the portapotti slides up under the rear bunk section during the day. Straps you see in lower right corner are for the portapotti when travelling.

http://www.sanlee.com/S250/MiscPics/bunkopen.jpg

This is the wall opposite the window (to the right as you enter). 2 rows about 6' long of adjustable shelving. Plenty of room for our clothes and stuff for a long weekend. (can also put duffel bags or suitcases under the front half of the bunk for a longer trip).

http://www.sanlee.com/S250/MiscPics/shelves.jpg

Finally, the a/c unit as described in an earlier post. The straps were the only ones I could find before our first trip. I have since found some black straps, but have not put them on yet.

http://www.sanlee.com/S250/MiscPics/ac.jpg

My wife and I had been looking at RV's, toterhomes, etc. She wanted A/C for summer camping. The main purpose in it was the need for something that would fit across the front end of my flatbed trailer (22') and have room for the CJ or M715 behind it.
here is the whole SS thread: http://www.steelsoldiers.com/conversations/24456-commo-shelter-camper.html
 
55
0
0
Location
Brainerd, MN
It's a small world, Kaiser. Turns out you were exactly the guy I wanted to talk with about the RV window. I found your S-250 conversion images on a Google search months ago, before I even had my shelter, but had no way to track you down--funny! You did a great job, and yes, taken some good-natured ribbing about the paint, but I'm the first to agree that not every wife is going to sit still while a guy starts acquiring a GI motorpool in his yard. If paint is the bone of contention, so be it! Like I said you did a great job, and inspired many others to do the same--I know Delk's was able to raise their shelter prices!!

My wife actually suggested I get a camo-net to drape over the exterior of mine--"Sure, honey." (And I thought I'd never find a good enough excuse to get one.)

My window is new; I found it on Ebay, insulated glass, $60 including shipping-probably one of the best Ebay deals I'll ever get. It is a 2" thick unit, so I'll have to cut a spacer for the interior, but that's not the end of the world.

My main concern was whether I need to add a header or reinforce the cut-out perimeter, so that the foam wall system doesn't compress and leave a gap around the window at a later time.

Sounds like not, from your experience.
 

kaiser715

New member
53
8
0
Location
Sanford, NC
One shelter I looked at had an A/C unit in the front wall. It was military or mfgr installed, and the cutout for it took out 2 studs, and there was no bracing or header added added, so I figured I would be OK. A year later, it's fine.

The inner and outer skins are bonded to the foam core, so that helps provide some support and rigidity as well.

When I cut out the window, I did take my hole saw and cut a couple of 3" test holes, just to be sure everything inside the wall was as I expected....first hole, I went in between the studs, and the second I drilled the stud dead center. I figured a little exploration was best, before hauling off and cutting a three foot square hole.

edit: You won't have a problem with the foam core compressing. It's a pretty stiff foam...and is bonded to the skin.
 
Last edited:

ONTOS66

Member
433
3
18
Location
Franklin, NJ
Nice looking setup and kudos to the interior decorator. :)

A good reference for anyone thinking about heating and ac for a small shelter is:

MIL-HDBK-116, Environmental Control of Small Shelters. It covers selecting a unit, pros and cons, installation options, etc. Lots of charts and graphs and idea stimulating material.

I uploaded it to Resources a year or so ago so should be there for the taking. I also uploaded the manuals for the S250 and a couple of other shelters which have line drawings and dimensions.

I have an S250 on a CUCV shelter carrier and will eventually have a combination of civilian ham and military green radios installed.
 
55
0
0
Location
Brainerd, MN
Wow! Nice Job, Mark--that's a lot of green gear! You even have the clock (first one I've seen). How much do you think it weighs?

Still keeping an eye out for your heater. I think you have the advantage with your heaters; I'm a little disillusioned with mine. The beast in my shelter is loud enough to be a constant irritation, and just barely warm enough to register as heat. Not sure what the problem is--possibly a voltage drop from the smaller gauge wiring path till I get my #10 connection made. If that doesn't fix it, I'm going propane ventless. Right now, even my little 750W milkhouse heater is whooping the big ones behind for output!
 

n3sq

New member
108
0
0
Location
Montrose, PA
Easy to get a licence

If your in Northeastern PA, there are plenty of places to take the exam to get your licence. It just takes a little studying.

PM me if you'd like the details.

These shelters are definately COOL to have fun with. I've got an AN/GRC-46-B shelter that I restore and though it is a bit tight it is very relaxing to fire up the generator and sit inside and listen,( I don't have a license to transmitt)......much fun!!!:-D:-D:-D
 

tennmogger

Well-known member
Steel Soldiers Supporter
1,576
527
113
Location
Greenback, TN
Really nice looking S-250 setup! That's quite a nice collection of green radios. Too bad the shelter had that nasty rollover accident while you were taking the pictures :twisted:

I had great plans for my S-250 as a ham shack on wheels but the 404S Unimog radio truck worked out well instead.

Bob WB4ETT

Here are a few pictures of my AN/GRC-142B teletype shelter restoration, fully operational, just need to find the fuel heater.
 

m38inmaine

Well-known member
2,090
45
48
Location
Maine USA
I tried to rotate and save the pictures but for some reason I couldn't get it to work. When the radio gear is running it sounds like a shop vac inside, you can't hear any heaters, or yourself think! That clock was NOS, it was one of my prized finds. It runs off a 9v battery which is used to auto wind the clock, pretty neat item.
 

tennmogger

Well-known member
Steel Soldiers Supporter
1,576
527
113
Location
Greenback, TN
.... When the radio gear is running it sounds like a shop vac inside, you can't hear any heaters, or yourself think! ...
Yeah, but don't you just love the music from a mechanical rtty machine ! :p

I operated higher speed cw with an ART-13 with all relays still operational. It felt like it'd bounce off the table.

It really is nice to see someone keeping the older stuff going.

Bob
 
55
0
0
Location
Brainerd, MN
Well, you guys have given me a new perspective. Having never been in one of these older RTTY shelters, I hadn't considered how noisy they were with all the mechanical operations (relays, teletypewriters, dynamotors, etc.) that are now done electronically. Maybe I'll get used to my AC noise after all.

Rewired my newly acquired power connector tonight with 10AWG cable for a 30 amp circuit. The 3' of old wire that I removed from the connector must have been 4 or 6AWG for the 60 Amp service. Took a lot of heating with a 240 Watt soldering gun to remove! Nice to have the power coming in to the panel the right way, though. Now my ammeter works, too.
 
55
0
0
Location
Brainerd, MN
55
0
0
Location
Brainerd, MN
Progress report

Here's a few photos of the new exterior paint scheme. I went with desert tan; sold locally as "Marsh Grass" ( A rose by any other name...). Seemed to make sense with my sand beach just a few feet away--when it's here it will be parked under some cedars for some shade. It's amazing how hot it gets in full sun; can't imagine Iraq!

I re-did the stenciling with the closest stencil font I could find (later I stumbled on the font someone kindly provided in the download area--next time). I used a stencil burner (kind of a light soldering iron with an angled fine-point copper tip) to trace the labels I printed to size on my computer. I put the labels under a sheet of glass on my drawing board, and cut the letters out of acetate sheets taped on the top side of the glass. Free-handing the curves works just fine for the fogged edges on these. As I'm sure everyone that has done this knows, the spray paint likes to travel, so masking the outer perimeter of the finished stencil is monotonous, but important.

Masked and painted the red on my generator, checked out the telescoping antenna mast--awesome, and mounted a jerry can holder. I was tempted to use my new rivnut tool on the holder bolts, but common sense prevailed after looking at a lot of shelter photos using through-bolting on these. I know I'm already taking a chance with a "non-compliant color" jerry can, (as in not-red) but dropping it on the freeway would be over the top.

My best garage sale find so far this spring was just down the block: a pristine jerry can for the holder for $2! I asked if he still had the flexible spout; he said he thought so, and came out of the back of the garage with a spout and extra gasket. On the way back to the front to pay for it, I spied a GI Teledyne "Big Beam" 6V lantern for $2. I suspect that's the highlight sale experience for the summer!

Time to start on the interior...
 

Attachments

Top
AdBlock Detected

We get it, advertisements are annoying!

Sure, ad-blocking software does a great job at blocking ads, but it also blocks useful features of our website like our supporting vendors. Their ads help keep Steel Soldiers going. Please consider disabling your ad blockers for the site. Thanks!

I've Disabled AdBlock
No Thanks