• Steel Soldiers now has a few new forums, read more about it at: New Munitions Forums!

  • Microsoft MSN, Live, Hotmail, Outlook email users may not be receiving emails. We are working to resolve this issue. Please add support@steelsoldiers.com to your trusted contacts.


Asking for 6.2 Detroit help from North Carolina

v12venator

Member
59
30
18
Location
Raeford, NC
Nevermind, I got it now with that electrical connection on the prop valve up front. It's for the braking warning light to illuminate the brake icon on the dash if there is uneven braking. I read this thread here about how Barrman's valve had had a stupid hard braking going forward and how slowly applying brakes while reversing helped reset the valve. He said his light had come on after the hard braking incident, so considering mine had very little brakes to begin with and I've had a few "hard braking" incidents with it just trying to move it around, I'll see about getting the valve reset by slowly moving back and forth when I get the rest of my braking components on the wheels swapped out.
 

sneekyeye

Active member
252
133
43
Location
ALABAMA
I would wager that you'll have the same problem as I did when i went through the brake system on mine. Mine started leaking through the rear seals of the master cylinder when I replaced the rubber lines, flushed and bled the brake system. A reman master cylinder is only about 30 bucks from Advance though.
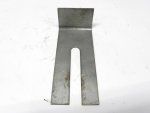
There is a tool to reset the valve, it hooks on the valve and is supposed to press a button to keep it centered while you bleed the brakes. That said, I've never seen or used one. Its in the -20 TM on page 7-10.
 

Attachments

v12venator

Member
59
30
18
Location
Raeford, NC
Right on the money with the leaking rear seals on the master cylinder. I'm gonna check around and see which store has it closest, but my nearest Advanced is closed right now due to someone catching the cooties that's shut down the planet.

I'll have to see if I can fabricate a small plate like that for working on my brakes but I think I remember seeing my pin in the combo valve being fully depressed. Not sure if I'll be able to pull it back out to open up the rear line feed in the combo valve. Guess we'll find out tomorrow. Thanks Sneeky
 

v12venator

Member
59
30
18
Location
Raeford, NC
Got the new combo valve in the mail and on the truck as well as a new master cylinder. Still no rear brakes though, so I am guessing next at the rear prop valve to be the issue. I will disconnect the height adjustment arm for the prop valve to let it freely move to see if that allows fluid to move to my rear wheel cylinders. So far, I have new purple dot 5 in the front to flush the old out, even though I am going to be replacing the front calipers soon anyway. Figure I can get my dot 5mat the parts store 2 pints a week so I should be alright for the time being.
 

v12venator

Member
59
30
18
Location
Raeford, NC
As suspected, based off empirical evidence and the GM technical bulleting regarding the matter, my rear prop valve is the culprit for no rear brakes. I am going to try and find a similar vehicle at the local junk yard tomorrow to see if I can find a bypass line or replacement for the prop valve. Also need to figure out how to adjust my gear selector unlock, since it now only moves in ACC and not ON for the ignition cylinder. Maybe replacing the ignition switch behind the dash wasn't the best idea, but hey, we're gonna roll with it.

20200510_191737.jpg

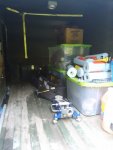
Adding a picture of the rear box as it is now for anyone that's interested. Got a good bit of organizing done yesterday for all the tools I've currently got back there and it's only going to get better once I get better boxes. Still have to set up a box for spare parts and another for cleaning supplies, but it's almost ready to move on it's own power.
 

cucvrus

Well-known member
11,274
9,603
113
Location
Jonestown Pennsylvania
That wire on the front proportioning valve was a sensor to activate the BRAKE light when a fluid pressure issue was active. I seen the disconnected on a few and seem to remember something in the PS cartoon maintenance book about the light flickering but do not recall the fix. I always replaced the rear load sensing valve on my plow trucks because if I didn't have them operational with a plow up front the rear wheels would lock on hard application in the snow covered roads and when loaded with salt the truck would stop on front brakes only. depending on where the valve was positioned when the lever came off or rusted off. I never had any issues with them as long as I maintained them operational. I seen the GM Bulletin but liked the old crude anti lock load sensing brake system none the less. Good Luck either way. Be Safe and Take Care.
 

Sharecropper

Well-known member
Steel Soldiers Supporter
1,816
944
113
Location
Paris KY
I removed my rear proportioning valve years ago when I installed rear disc brakes. Easy, just connect the main line running rearward with the boss on the rear axle that sends fluid to each rear wheel. My truck stops on a dime, even going backwards. Interestingly, I have not replaced the front proportioning valve with a disc/disc unit however I may elect to do this when I pull my 6.2 out for the P400 / 700R4 / NP241 install.
 

v12venator

Member
59
30
18
Location
Raeford, NC
That wire on the front proportioning valve was a sensor to activate the BRAKE light when a fluid pressure issue was active. I seen the disconnected on a few and seem to remember something in the PS cartoon maintenance book about the light flickering but do not recall the fix.
Yeah, I figured out after looking at the wiring diagram again that it links to the brake warning light on the dash and after looking at the cutaway picture in the new combo valve's instructions, I figured it was an open circuit through the combo valve until the innards moved one way or another to close the circuit and light the bulb. After a few light pumps of the brake pedal, thankfully, the inside valve reset and the light bulb in the dash turns off for me.

I always replaced the rear load sensing valve on my plow trucks because if I didn't have them operational with a plow up front the rear wheels would lock on hard application in the snow covered roads and when loaded with salt the truck would stop on front brakes only. depending on where the valve was positioned when the lever came off or rusted off. I never had any issues with them as long as I maintained them operational. I seen the GM Bulletin but liked the old crude anti lock load sensing brake system none the less.
Yeah, my plan was to find a replacement rear prop valve at the junkyard today, but no luck with the dice roll today. Such is the life of looking to a junkyard to have vehicles with replacement parts that were discontinued more than 20 years ago. I'll try ripping it off the truck and cleaning it out with a solvent or maybe some brake clean the day after tomorrow to see if I can't unclog it. I saw lots of debris in the brake fluid when flushing the front calipers, which makes me guess that someone put DOT 3 into the system with some DOT 5 still left in the lines. Thankfully I just got 10 pints of the purple good stuff picked up from the parts store and I'll have that to refill my replaced front calipers and hopefully the fluid in the rear lines after the prop valve. Knowing that I'm going to have a boat load of weight from tools in the rear box, I'd rather not have my back end locking up and swinging out to cause any issues in the event that I do need to jam the brakes.
 

v12venator

Member
59
30
18
Location
Raeford, NC
I'll have to let you know how this backyard remanning of the current one goes. My living situation is in a bit of turmoil right now and will be for a few weeks, so I have to look local for a bit longer. I appreciate it though, you be safe up there and make sure to fire up the Kubota for me.
 

chevymike

Well-known member
581
451
63
Location
San Diego, CA
Knowing that I'm going to have a boat load of weight from tools in the rear box, I'd rather not have my back end locking up and swinging out to cause any issues in the event that I do need to jam the brakes
Actually the way these works is, when the truck is unloaded (and sitting at max ride height), the valve actually reduces the amount of pressure to the rear brakes. As you add weight to the bed and the truck starts to squat, that valve opens up more to increase the amount of pressure. If you are adding weight, you want this all the way open so you are getting max pressure. These valves were installed as an attempt to prevent lockup when trucks are unloaded. If you are planning to add weight that will stay there, they are basically useless and typically reduce braking power. My '97 Ram that I had a camper on full time, I disconnected the valve arm and tied it up to give max pressure. It helped the stopping power. Back in the '70's and earlier, these valves were never used.
 

v12venator

Member
59
30
18
Location
Raeford, NC
I appreciate the experience-based explanation of the rear prop valve, gentlemen.

I guess if I were to take an honest evaluation of the truck, maybe "boat-load" isn't a great description of the weight that I'm going to try to maintain. After loading up basically all of my tools minus a few odds and ends, I still have not seen the rear suspension on my truck move one bit. I don't plan on having pallets of concrete or road salt in the back, so I doubt that my suspension will drop that much and will not necessarily ride at the height that would start to greatly improve brake fluid pressure to the rear wheels or warrant a complete bypass of the valve altogether. If I can clean out the current one or get a replacement one that will act OEM and limit the amount so that the rear isn't locking up, that would be the safest way to set up my rear brakes. All in all, I've not exactly gone out and measured all the weight of the stuff I'm going to keep in the rear enclosure box by box, but I'm fairly certain that it's not going to be too taxing on the 7 or so leaf springs on the back. That would warrant the use of the valve to the back since it would basically be damn-near unloaded, especially if I jam the brakes too hard and the frame rises even further up.

Maybe once I get the rear trailer hitch put on the truck and set up to haul my small camper, that might lower the back end of the truck enough to really start moving the lever arm, but with my 18ft camper being only 3300 lbs, and maybe 700 for tongue weight, I don't think I'll be putting any noticable stress on the rear suspension.
 
Last edited:

cucvrus

Well-known member
11,274
9,603
113
Location
Jonestown Pennsylvania
700 LB tongue weight is plenty that far back. I wouldn't want to tow a heavy trailer anymore without the aid of perfectly operational brake system. That old truck will have it tongue hanging out. Good Luck. Be Safe.
 

Sharecropper

Well-known member
Steel Soldiers Supporter
1,816
944
113
Location
Paris KY
Actually the way these works is, when the truck is unloaded (and sitting at max ride height), the valve actually reduces the amount of pressure to the rear brakes. As you add weight to the bed and the truck starts to squat, that valve opens up more to increase the amount of pressure. If you are adding weight, you want this all the way open so you are getting max pressure. These valves were installed as an attempt to prevent lockup when trucks are unloaded. If you are planning to add weight that will stay there, they are basically useless and typically reduce braking power. My '97 Ram that I had a camper on full time, I disconnected the valve arm and tied it up to give max pressure. It helped the stopping power. Back in the '70's and earlier, these valves were never used.
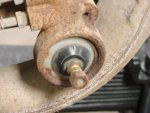
To expand on what Chevy Mike said, if you plan to keep the rear proportioning valve in the braking system, it needs to be adjusted properly. There is a little dot (see photo) on the black circular disc which surrounds the splined shaft. With the truck fully assembled but with no load (empty weight), that little dot is supposed to be oriented straight up at 12 o'clock when the arm is installed onto the splines. I don't remember where I read this, maybe in a Chilton manual or somewhere. But I distinctly remember reading it. I have no idea of how the valve works on the inside or if it can be worn to the point of inefficiency.

Having said this, I still believe the valve should be removed per the GM Service Bulletin. After I completely removed the valve from my M1028 and plumbed the brake line direct, I had an occasion to haul a full 250 gallon water tank (2000 pounds) a considerable highway distance for a farmer neighbor and my truck stopped with no noticable difference than when it was empty. In fact, the 2000 pounds in the bed did not appear to affect the stance of the truck at all. Looking at it from the side, it almost looked like the tank was empty. So my opinion is that the rear proportioning valve is not necessary, but do as you may, it is your truck.

Hope this helps.

DSC02560.JPG
 

cucvrus

Well-known member
11,274
9,603
113
Location
Jonestown Pennsylvania
This is the picture I found in a quick search of my vast collection. 1984 M1008 rear axle brakes. 14 Bolt cooperate axle. Hope that helps. Can't send pictures in PM's on this site. DSCF223414 bolt brake set up..jpg

Be Safe. Take Care.
 

v12venator

Member
59
30
18
Location
Raeford, NC
Welp, I guess it's time for another update. Yesterday while working on the M1031, I was able to get my gear selector to move in ON and ACC positions on the column. I was having an issue where the gear selector would only move in the ACC position after replacing the ignition switch under the dash on the column. So I ripped apart the column and swapped the old ignition switch back in and voila, I can move gears in both key positions again. That'll show me.

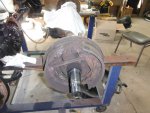
After that, I wanted to set my drag on the rear brake drums before changing out the front calipers on the truck and set my parking brake lever in place as well as put the new axle shaft flange seals in place so I could keep the truck from moving while I had the front wheels off since I've currently got my immobilizer pads underneath the front tires. Boy was that a bad idea. After fiddling around with the drivers side rear brakes for a while, bending and cursing the parking lever arm, reaching out to Rick to see if he had one he could take a picture of, cursing some more at the arm, it was getting late and I had to start buttoning everything back up. Got the drum in place as well as the hub nut, locking key and key retainer clip, put the axle shaft back in and started to put the axle shaft bolts back in place.
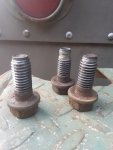
20200515_174738.jpg
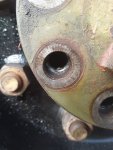
Lo and behold, the knowledge of "if it starts giving you resistance, stop" strikes again. I didn't follow it and have chowdered up hub threads and axle flange bolts to deal with. These bolts are 1/2-13 threads with a 1-1/2 inch length and 3/4 inch hex head. Grade eight 2 inch bolts were easy to find at the parts store, but they don't keep enough in stock at one store to be able to be able to make this repair without some store to store transfers, so I'll have the rest of them tomorrow while I'm working at the Autozone. Once I get those all assembled, I'll have to trim them down to length with the grinder and tap the entire shaft of the bolts to get them to fit my needs. Also some new lock washers to help with torque-ing the bolts and securing the axle shaft to the hub.
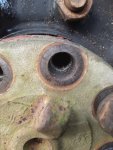
20200515_174759.jpg
20200515_174805.jpg
Some of the more gruesome ones in the hub. After placing two bolts back in the pooched hub, I set out to finding a replacement. ACDelco RW20-123 axle hubs for the M1031 because these 14 bolt rear axles were set up to have dual rear wheels on each side, so the single wheel hubs would not work. Around $200 on Amazon of all places with a Sunday delivery. Once that comes in, I'll knock the wheel lugs out, rip out and inspect the bearings, reinstall if good replace if not, then put the old drum to the new hub if all goes well. I will make a new step by step repair thread if anyone is interested.

I'm kicking myself in the ass for not being able to replace both hub and both drums right now to do this job right, but I just can't afford to do so with moving houses, so I will put that on the list of things I have yet to do to the truck. It will get done as soon as I am settled into my new place.

Thank you all for reading, and a great weekend to you.
 

cucvrus

Well-known member
11,274
9,603
113
Location
Jonestown Pennsylvania
Are you against used cast steel parts? I mean you replace the bearings and races on an old used rear hub and you have a brand new rear used hub that I would have sold for a 1/4 of that price. Even traded for something like that. I am in the process of making a bench grinder stand/pedestal out of an M1028 rear drum, hub, and drive axle. Super easy. Drum open side down, Hub facing opposite and the axle attached. Lug nuts inside the open drum tightened and welding a steel plate on the axle spline. I like making things. And this is about as HD as I can make it and it will last forever. I will probably blast and paint it all when complete. Be Safe and Take Care. Make sure you are getting flange bolts to replace the stock ones. Hardware stores have them.
 

v12venator

Member
59
30
18
Location
Raeford, NC
I just didn't want to bother you right now, Rick, with all this nonsense going on in the world and knowing you're backlogged with shipping as it is. With the new one coming in from the Amazon on sunday, I'll be able to get the truck one step closer to being on the road again after who knows how long it was sitting, and I can even send you the old one to make something out of if you'd like. Plus moving is going to take a bit to get settled in for a couple weeks.

I'll have to check and see if my local hardware store has flange bolts, but considering that grade eight bolts are used in suspension mounting, I'd be more worried about the new hub failing than the bolts themselves. Here's hoping that it's a CNC'd part instead of cast.

Truth be told, I would have taken a crack at tapping the holes back out to where they are supposed to be with the threads, but with 35 year old cast steel, I'd rather not take my chances at welding into the bolt holes, drilling and rethreading just to be safe. I've heard that cast metals are a pain to weld.

Just checking online right now since it's 9PM eastern, I just found them flange bolts at the tractor supply, grade eight 1/2-13 thread with a 1 and 1/2 inch length. I'll have to scoop some up tomorrow on my way into town to do some electrical repair work to a jeep wrangler.
 
Last edited:

v12venator

Member
59
30
18
Location
Raeford, NC
Evening all, just wanted to post an update and provide proper information to anyone that might need it. This will be a precursor to my hub teardown and rebuild thread that will be coming shortly, but I just wanted to make sure I got my information correct for when I gather it all for the rebuild thread.

So I posted about the rear hub being a dual wheel hub for these GM 14 bolt rear ends. I was wrong about that. I'm sure with an open differential or selectable locker differential that the axle shaft would be pushed out far enough to have the space for a dual wheel rear hub, but with the detroit lockers in the CUCV differentials, that is not the case. As such, the RW20123 hub that I posted earlier will not work on these trucks without major rebuilding. The single wheel rear hub with an ACDelco part number of RW20-124 is the replacement hub that will get you back on the road. The dual wheel rear hub has an extra inch and a half space between the axle shaft flange face and the wheel mounting face, and about the same distance lopped off of the backside where you install your bearings and wheel seal.

Now knowing this, I have a dual wheel rear hub for sale with 8 lug studs for dual wheels as well in case anyone is interested. Just PM me if you catch this before I've posted the hub and wheel studs in the classifieds section. The dual wheel lug studs are about an inch longer than the single wheel studs.
 
Top
AdBlock Detected

We get it, advertisements are annoying!

Sure, ad-blocking software does a great job at blocking ads, but it also blocks useful features of our website like our supporting vendors. Their ads help keep Steel Soldiers going. Please consider disabling your ad blockers for the site. Thanks!

I've Disabled AdBlock
No Thanks