• Steel Soldiers now has a few new forums, read more about it at: New Munitions Forums!

  • Microsoft MSN, Live, Hotmail, Outlook email users may not be receiving emails. We are working to resolve this issue. Please add support@steelsoldiers.com to your trusted contacts.


Beginning the Journey

TomTime

Well-known member
Steel Soldiers Supporter
691
1,666
93
Location
MD.
I had a chance to do a little work on the truck today. Was hoping to get both sub woofers installed but the going was slower than expected, really for no good reason. A couple small screw ups here and there that I had to redo but generally it ran pretty smoothly, just took a longer than expected.

So the plan is to drop to 8” “under seat” powered subwoofers into the dead space behind the driver and co-driver seats. I’m using the under seat subs because they are thin enough to fit in the void in the truck wall. Given how thin the skin (internal and external) is on the truck I’m concerned about vibrations and am doing several layers of insulation - will see if it works or not.

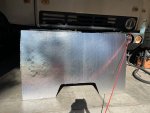
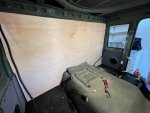
So here is the first step - Kilmat on the truck skin both the exterior skin (which you can see below) but also on the interior skin - which I applied on the interior facing portion so you can’t see it - but it’s there.
View attachment 877903

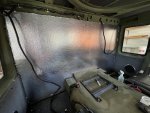
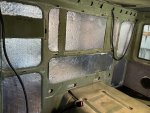
After the Kilmat I applied 4mm Siless closed cell foam
View attachment 877904

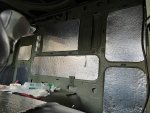
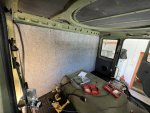
Lastly I used regular fiberglass insulation to provide some baffling and more thermal and acoustic abatement.
View attachment 877905

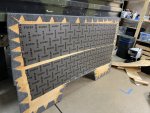
That was all relatively easy and quick. After that I used the original plastic paneling as a template to create two new panels out of plywood. This part was a real time suck - I think primarily because of the large number of holes that need to be drilled in each piece of plywood and relative precision required, even with a template. I then cut holes for the subwoofer and speaker grill. After all the drilling, cutting and sanding I did a dry fit to check for hole alignment - which was acceptable.
View attachment 877906

Lastly I upholstered the new panel and attached the subwoofer to the back, put the grill on and fished the wiring up to the ceiling of the cab. Hoping to get the second one installed tomorrow and make some incremental progress beyond that.
View attachment 877907
Wow, nice job, I like it!

Hopefully there are no leaks in those areas where you put the fiberglass. If that fiberglass gets wet it will just hold the water and rust and mold will start.

Tom.
 

gslader

Well-known member
106
287
63
Location
California
Wow, nice job, I like it!

Hopefully there are no leaks in those areas where you put the fiberglass. If that fiberglass gets wet it will just hold the water and rust and mold will start.

Tom.
And short out the electronics. . . I mean what fun are these trucks if you aren't spending money on them or fixing something . . . :rolleyes:
 

gslader

Well-known member
106
287
63
Location
California
Got lucky and had another day of pretty good work on the truck. I got the second subwoofer installed, it went a bit faster than the first one that I installed as I learned (at least a little bit) from the mistakes I made yesterday. A few incremental pictures of the second install. First one is of the wire fishing - this was one of the few things that went better than expected on both installs - pretty easy process with fish tape.
E750D160-968D-49A3-A0A4-D56F1326678A.jpeg

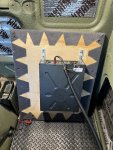
This is the back of the panel with the sub wired up and installed on the brackets
23C56CCA-54D2-4282-9A38-8982620C9B01.jpeg

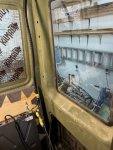
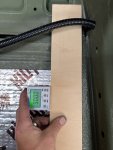
I was a bit ahead of schedule so I decided to start tackling the back paneling. The measurements on the interior were pretty straight forward except for the taper on the cab as it goes up above the windows and curves and angles on the transmission hump (more on that below). I made an ad hoc profile gauge to measure the curve on the upper cab - unfortunately it isn’t a constant angle. Below is some excess plywood that I used to record the profile of the cab.
20DD3D88-F73F-464B-A0F0-D1CB6C4B320C.jpeg

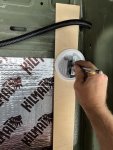
Necessity is the mother invention and lacking a good rigid circle to scribe the profile I resorted to a cream cheese lid - I think this falls into the category of “It’s not stupid if it works” - that said it was not my proudest moment.
DF013904-D788-4F21-BA58-7185F0709D6F.jpeg

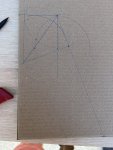
Getting the right profile on transmission hump was one of the more challenging measurements to get just because where it was located made it really tough to get accurate measurements. For anyone contemplating something similar the measurements I came with are the following. The vertical wall of the transmission hump is 21.1 degrees off vertical and curve radius where it transitions to horizontal is 2.66” and the transmission hump is 9.5” vertically off the floor (I measured this off my new flooring which is thicker so your results may vary). In the end with a little high school geometry and a compass (yeah for math!) I was able to quickly mock-up a prototype out of cardboard.

36518062-F6B9-4491-B830-B2B38BFD1032.jpeg

I’m using a 1/2” rigid insulation to fill a couple of depressions in the back of the cab so I decided that before I cut it up I would use it as a light weight full sized template to a) check fitment and b) see if can shoe horn in the whole back panel in one piece. Here is the template before dry fitting. Also, a quick note before I forget, I shrunk all the measurements by 1/4” per side to allow for the upholstery - that is probably more than I need but I would rather have it a little small than a little big - real tough to cut it down once it is upholstered.
54170A93-B471-4A95-BDD8-4D95477B9DB1.jpeg

So here is the cab with the template dry fit in place. The template was nearly perfect with a small portion on the co-driver side that needed to get trimmed down by about 1/2”. Based on the dry-fit it appears theoretically possible to fit this all in one piece but it will definitely require the removal of at least one (and likely both) seats and also the steering wheel. I am not looking forward to this - I think this will be really tough, really awkward and will likely bang up things in the cab - oh well.
3F597274-935D-4948-A52A-A3CC44DA0888.jpeg

After cleaning up the template I used it to create an outline on the plywood I’ll use for the backing. I then cut up the rigid insulation and used it to fill some voids in the back wall.
D558C1A7-80D8-45E7-AB5D-BD108D935946.jpeg

More to come tomorrow hopefully. Would really like to get the rear panel cut, upholstered and installed.
 
Last edited:

gslader

Well-known member
106
287
63
Location
California
Another day of working on the truck (mostly). I used my insulation template and cut out the rear panel from 1/2” plywood. I expected that I would have to remove all three seats and the steering wheel. To start with I removed the steering wheel and co-driver and middle seat - I was hoping I could shoe horn it in past the drivers seat . . . . No dice. I pulled the driver seat out as well and was able to get the rear panel dry fit. With all the seats out it wasn’t that awkward to get into place but still not fun.
8DA05050-6CFD-4B81-B4C0-543009B46981.jpeg

I didn’t have to do any trimming the rear panel and my next step was to get it upholstered. This was actually more of a pain than expected (first I ran out of contact cement half way through - which was just poor planning on my part). The size of the panel and the upholstery material made this more of a challenge than I expected. This part ended up taking longer than expected but I eventually got the face upholstered then flipped it over and secured the upholstery to the back of the panel. Lastly I added two strips of 4mm Siless backing to the plywood to minimized any squeaks that may come from wood-to-metal contact.
75D7ABDA-A5FB-4388-8BA7-25CB32CC73F4.jpeg

I put the whole thing out in the sun to set-up and while that was going on I took advantage of the driver seat being out to redo the flooring (no pictures of this). I had screwed up putting the flooring in initially and ended up needing to do it in two pieces so with new flooring recently delivered I did the entire thing in one piece. One other change I made (that I’m happy with so far) is that on the first version I had cut out an opening in the flooring for the accelerator pedal base to be bolted to the floor. After I installed it I realized I didn’t really need that opening and it just provided another point for dirty ingress so on this second version I did not cut out a hole for the accelerator base plate and just bolted it through the flooring - which seems to be working great and has a much cleaner look.

I did some last prep work on the cab back wall to prepare for the paneling. I ensured all of the insulation was in place and installed four rivnuts and took measurements of their positions relative to the cab so I could hopefully drill through my back panel and find the rivnuts. . .
3117BB4B-06DE-40BE-AF01-0A9ED0863A04.jpeg

I brought the back panel into the cab and had some good success getting the holes accurately drilled through the back panel. The biggest issue that I ran into here was that one of the Rivnuts pulled out so I had to back everything out, take the panel back out of the truck, fix the rivnut and put the panel back in . . . 20 minutes of my life that I will never get back. I was glad to have the panel in and hope to take a break from work that requires me taking the seats in and out . . . What a total pain.
15A3212B-4ABB-452B-B205-3E378F77C35C.jpeg

I got the driver seat and steering wheel put back in and took it for a test drive. It’s a bit quieter but not orders of magnitude.

Next up is getting the ceiling upholstered and installing the ceiling center electrical console and new relay and switch assembly . . . I just don’t want to take the seats out any more!
 

gslader

Well-known member
106
287
63
Location
California
Looking sharp.

My cab has to wait until I finish the habitat.

What subs are those?
Those are Rockville 8” underseat subs (Link Here)- I have no experience with them and can’t speak to the quality. I’m using the Memphis Audio “headless” head unit (Link Here) so the subs and four speakers (two 4x6’s and two tweeters) are all controlled via a the Memphis Audio Bluetooth app and I can hide all of stereo components.
 
Last edited:

gslader

Well-known member
106
287
63
Location
California
Top
AdBlock Detected

We get it, advertisements are annoying!

Sure, ad-blocking software does a great job at blocking ads, but it also blocks useful features of our website like our supporting vendors. Their ads help keep Steel Soldiers going. Please consider disabling your ad blockers for the site. Thanks!

I've Disabled AdBlock
No Thanks