

I replaced my 802's fuel tank well nuts a couple months ago. The process was horrendous but I was happy to get it done. Being my unit has 26 original hours on it, i wanted to cover all bases on it to ensure reliability for the long haul.
Needless to say, the dreadful feeling that came over me when i noticed missing fuel in the tank a month later was overwhelming. I have had nightmares about it over the last month, knowing i would have to address this all over again.
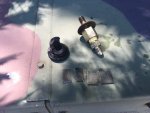
Today, while on vacation i decided to see what i could do without tearing the genset apart. As i placed my hand on the fuel drain hose, the fittings at the tank where the well nut resides almost fell out of the tank into my hand. Upon futher mild manipulation/pursuasion, i easily pulled the hose, fittings, and 3/4 of the well nut out of the tank.
It seems although i am mechanically inclined, and like to think i can judge torque very well by touch, it seems i overdid it this time around and over torqued the fitting into the well nut, causing failure sometime immediately after the repair. You guys said to be careful of this and i was soo sure i did good. SIGH.
Upon further review, i decided i may be able to carefully hack away at the pinched aluminum surrounding the well nut fitting, so as to clear away JUST enough to get a wrench on the fitting once a replacement well nut has been procured.
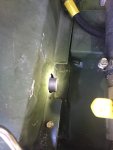
I grabbed my one handed mini hack saw and fairly easily cut away 3/8" from one side, and about a 1/2" from the other. It went fairly easily, even with the limited space available for saw travel. Patience and a light constant hand pressure was key.
I placed a rubber stopper i had from another project into the opening of the fuel tank and blasted away any diesel and aluminum shavings with some brake cleaner so as not to get any in the fuel tank. Even though the 80x fuel filter system is pretty good, no reason to fill the tank with Aluminum shavings and unneccessary debris. The stopper still resides in the tank u til a new well nut areives.
Now i have to order another $15 well nut from green mountain, and wait the almost 3 weeks i waited the first time for the new part.
This time i will torque it half as much as the first time, and as others have said, use a liberal amount of permatex #2 agianst the tank between the well nut, between the well nut and washer, and on the threads of the well nut fitting. This should ensure proper sealing. If it doesn't, it's an additional $15 + shipping, and 5 minutes to replace the well nut again!
I highly recommend this procedure to all. I will recommend that if the well nut and fitting are not centered in the aluminum hole of the genset that they pass through, for you to remove the fuel tank cover and loosen the two tank holders and move the tank to the left or right as required, to ensure your well nut and fitting come out of the tank and past the aluminum.
Wish i thought of this the first time!
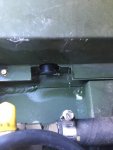
I took a file and softened the sharp edges on the cut aluminum so it now looks as if it were supposed to be that way, and i will buy some of that paint Daybreak was raving about to touch up scratch marks around where i cut prior to replacing the wellnut and fitting.
Last thing i have to do is fish out the small piece of well nut and brass nut that are still at the bottom of the tank. Or not!
Good luck all!
Needless to say, the dreadful feeling that came over me when i noticed missing fuel in the tank a month later was overwhelming. I have had nightmares about it over the last month, knowing i would have to address this all over again.
Today, while on vacation i decided to see what i could do without tearing the genset apart. As i placed my hand on the fuel drain hose, the fittings at the tank where the well nut resides almost fell out of the tank into my hand. Upon futher mild manipulation/pursuasion, i easily pulled the hose, fittings, and 3/4 of the well nut out of the tank.
It seems although i am mechanically inclined, and like to think i can judge torque very well by touch, it seems i overdid it this time around and over torqued the fitting into the well nut, causing failure sometime immediately after the repair. You guys said to be careful of this and i was soo sure i did good. SIGH.
Upon further review, i decided i may be able to carefully hack away at the pinched aluminum surrounding the well nut fitting, so as to clear away JUST enough to get a wrench on the fitting once a replacement well nut has been procured.
I grabbed my one handed mini hack saw and fairly easily cut away 3/8" from one side, and about a 1/2" from the other. It went fairly easily, even with the limited space available for saw travel. Patience and a light constant hand pressure was key.
I placed a rubber stopper i had from another project into the opening of the fuel tank and blasted away any diesel and aluminum shavings with some brake cleaner so as not to get any in the fuel tank. Even though the 80x fuel filter system is pretty good, no reason to fill the tank with Aluminum shavings and unneccessary debris. The stopper still resides in the tank u til a new well nut areives.
Now i have to order another $15 well nut from green mountain, and wait the almost 3 weeks i waited the first time for the new part.
This time i will torque it half as much as the first time, and as others have said, use a liberal amount of permatex #2 agianst the tank between the well nut, between the well nut and washer, and on the threads of the well nut fitting. This should ensure proper sealing. If it doesn't, it's an additional $15 + shipping, and 5 minutes to replace the well nut again!
I highly recommend this procedure to all. I will recommend that if the well nut and fitting are not centered in the aluminum hole of the genset that they pass through, for you to remove the fuel tank cover and loosen the two tank holders and move the tank to the left or right as required, to ensure your well nut and fitting come out of the tank and past the aluminum.
Wish i thought of this the first time!
I took a file and softened the sharp edges on the cut aluminum so it now looks as if it were supposed to be that way, and i will buy some of that paint Daybreak was raving about to touch up scratch marks around where i cut prior to replacing the wellnut and fitting.
Last thing i have to do is fish out the small piece of well nut and brass nut that are still at the bottom of the tank. Or not!
Good luck all!
Attachments
-
 35.9 KB Views: 160
 -
 36.6 KB Views: 155
 -
 37.3 KB Views: 164
Last edited: