• Steel Soldiers now has a few new forums, read more about it at: New Munitions Forums!

  • Microsoft MSN, Live, Hotmail, Outlook email users may not be receiving emails. We are working to resolve this issue. Please add support@steelsoldiers.com to your trusted contacts.

Humvee ownership, day two. Power steering blew a gasket, I think.

comanderfritz

New member
68
0
0
Location
Kentucky CSA
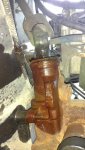
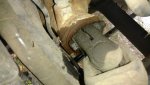
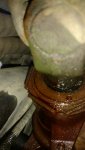
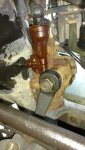
So, just trying to get everything worked out. Took the new ride down to other end of the island today to see if there was any issues besides the rear lights problems I'm having. Made it down just fine. At some point around getting down there and heading back I noticed a steady drip. looked under it and saw a leak where the steering column meets the power steering box. Lost all fluid within 20 minutes. Was an interesting ride back home. So my question is will this be a simple gasket replacement? What's the best method of attack to get in there. Or is this something else entirely? I don't want to go do something I don't need to. I read a previous thread that said it's the o ring and can be removed with 4 bolts. I suppose worst case i have to get a new unit. Anyways. pictures are what happened. One picture before I figured out this happened... still don't regret buying.
 

Attachments

Last edited:

86humv

Well-known member
Steel Soldiers Supporter
1,692
490
83
Location
Texas
I just replaced the whole thing....that way you can change your pitman arm the same time....but if your looks real good and comes off easy...re-use it.
Yours looks like its been replaced. [ pitman arm ]
 

NDT

Well-known member
Steel Soldiers Supporter
10,187
5,922
113
Location
Camp Wood/LC, TX
Well that's a class 3 leak... Lol

Is that a recent auction hmmwv? Noticed a ton of people have those 8 bolt that have been posting lately.
So which is worse: A HMMWV that sat since the 80's and every seal is rotten, or one that has been maintained/used and has 30 coats of flaking CARC?
 

tage

Active member
679
68
28
Location
LOS ANGELES / CALIFORNIA
So which is worse: A HMMWV that sat since the 80's and every seal is rotten, or one that has been maintained/used and has 30 coats of flaking CARC?
Depends I guess. I like to have the recent mwo's, and the 6.5 gep in mine. Some like the pickled trucks.

On a separate note to the op. You should prolly check to see if the hubs have the updated washer mwo done.
 

comanderfritz

New member
68
0
0
Location
Kentucky CSA
Depends I guess. I like to have the recent mwo's, and the 6.5 gep in mine. Some like the pickled trucks.

On a separate note to the op. You should prolly check to see if the hubs have the updated washer mwo done.
What am I looking for that they did on that wo. Haven't read that far yet. Just about to do a geared hub check when I get the power steering fixed.

Anyone y'all know of that would want to buy the old unit to rebuild?
 

Lionel

Member
Steel Soldiers Supporter
498
24
18
Location
Baltimore/ MD
Same thing happened to mine and you could follow the "blood" trail for a mile. Just get a plug kit for the input shaft. It has all the new seals and thrust washers in it already. Drop the box. Get the correct spanner wrench. Take off the locking nut. Back the old one out and screw the new one in according to the TM's. Once the box was out, it literally took 20 minutes. Could do it in half that time now having done one. Search for NSN 2530-01-361-8012. There's a lot more in that kit than needed, but is cheap at around $45 shipped and has the input shaft plug kit in it.
 

Lionel

Member
Steel Soldiers Supporter
498
24
18
Location
Baltimore/ MD
Forgot to mention that when I did this job, the proper spanner was no where to be found. I wanted to get it don ASAP so I went to Harbor freight and picked up a couple of their cheap ones. Had to grind some of the inner arms to get clearance, but it worked well. For the correct spanner wrench, search for Kent Moore SPX J-7624.
 

Lionel

Member
Steel Soldiers Supporter
498
24
18
Location
Baltimore/ MD
Put the steering box in the vise, wire brush and clean off the whole area around the input shaft and end of the box. Loosen the lock nut, clean area again. Note the approximate position of the plug in the threaded opening (I take pics as I go for reference). Use the spanner to loosen the plug. Mine was B***s tight. Clean the area again and remove the plug. My kit came with an extra o-ring which I did not use. It also came with a packet of grease. Use plenty of it. Reinstall the plug and adjust the pre-load. Reinstall the lock nut and you are finished. I wish all jobs were this easy and went this smoothly. My sense is that this must be a common failure since the military had Saginaw put this kit together in one package as opposed to just the seals. That and I suppose its a more expedient repair in the field this way. I think you could probably do it in the frame if needed.
 
Top
AdBlock Detected

We get it, advertisements are annoying!

Sure, ad-blocking software does a great job at blocking ads, but it also blocks useful features of our website like our supporting vendors. Their ads help keep Steel Soldiers going. Please consider disabling your ad blockers for the site. Thanks!

I've Disabled AdBlock
No Thanks