• Steel Soldiers now has a few new forums, read more about it at: New Munitions Forums!

  • Microsoft MSN, Live, Hotmail, Outlook email users may not be receiving emails. We are working to resolve this issue. Please add support@steelsoldiers.com to your trusted contacts.


M151A2's Finally Home

1943ht

Active member
478
94
28
Location
Batavia, OH 45103
When I was stationed with my Armor Unit in the late 80's (I was the CO) all of our MUTTS had hot water heaters .. Would admit that on rainy cold days that heater came in pretty handy many times even without the side curtains installed :).

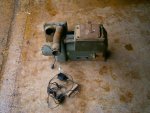
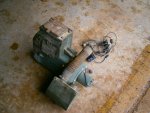
The 151 heater looks pretty straightforward regards install (Brackets and hoses to ducts, power switch and resister etc), 199MP what are the challenges that I need to consider based on your experience? This heater has a brand new heater core and blower.

I have a hot water heater (From a M38 Jeep) in the M37 that was a retro install done while it was in Korea and it puts out a lot of heat even this winter while tooling around town with the top off .. I pulled that heater and the switch when I went thru the truck, and it was no big deal (had to soldier up the core as it had a small leak).

PB I know, you've been out to my place, I will miss it! I lived in that crappy little apartment at Benning for 27 months, but always had the CAMO shop to play in. 1st order of business after moving in is to find a restoration group in the Carlisle Area :beer:

P4090002.jpgP4090001.jpg
 
Last edited:

199th mp

New member
40
1
0
Location
Centralia, Washington
mark, the primary difficulty i faced during the install was the small spaces in which to place the various parts. once the cluster is removed, that is your only access point of any size at all. i had trouble getting my hands back in to the areas where i needed to connect the hoses and attach other brackets, route the wires, and hold everything together with one hand while trying to tighten everything up with the other. if you have the manual available, that will be to your advantage. also, have a small jack on the passenger floor to hold up the assembly until you have all the bolts started, as it's difficult to be on both sides of the floor pan at the same time. also, remove the windshield completely, so as to draw your cutout pattern accurately.lastly, and this is the really important bit, complete the job before you're old and arthritic. i seriously considered taking up heavy drinking during this job, and i've never drank in my life. good luck, colonel--by the way, when we came out of the nam, our brigade retired to benning in oct 70, and i was one of the color party that brought the flags home in a C141 from bien hoa airbase.
 

Jay Mallari

New member
19
0
1
Location
Middlesex, England
Someone also suggested that you should tack weld the nuts behind the dash for the passenger grab handle because once you installed the heater, there's no way to get your hand back there to install the nuts. Do it as well for the nuts in the windshield hinges if you want to install a passenger side mirror in future.
 

L1A1

Active member
1,010
13
38
Location
H'burg, VA
Mutts appear to be USMC vehicles. Notice the front bumper and the wheel hub caps sans tie down eyes... Nice find-good luck with the resto when the time comes....
Matt
 
Top
AdBlock Detected

We get it, advertisements are annoying!

Sure, ad-blocking software does a great job at blocking ads, but it also blocks useful features of our website like our supporting vendors. Their ads help keep Steel Soldiers going. Please consider disabling your ad blockers for the site. Thanks!

I've Disabled AdBlock
No Thanks