• Steel Soldiers now has a few new forums, read more about it at: New Munitions Forums!

  • Microsoft MSN, Live, Hotmail, Outlook email users may not be receiving emails. We are working to resolve this issue. Please add support@steelsoldiers.com to your trusted contacts.

Mep 803a No/Low Low Power Output

Iron.Horse

New member
14
22
3
Location
Frederick, Maryland
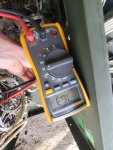
10 terminal block reads 12.2 on upper wires, not disconnected. Little tricky to get in there. A1 test, with wires disconnected is a crazy bizarre reading in the 60.0 range. I triple checked it and every time got a different reading, but it was definitely no lower than 50-60 ohms
 

kloppk

Well-known member
Steel Soldiers Supporter
2,295
4,070
113
Location
Pepperell, Massachusetts
The resistance should be the same 12.2 at 10 Terminal block AND across the two wires behind the gauge panel.
Your 50-60 ohms indicates a poor connection between 10 and one or both of those wires.
I mentioned to check, inspect, clean the P4/J4 connector pins in post #12. Did you do that?
 

Iron.Horse

New member
14
22
3
Location
Frederick, Maryland
The resistance should be the same 12.2 at 10 Terminal block AND across the two wires behind the gauge panel.
Your 50-60 ohms indicates a poor connection between 10 and one or both of those wires.
I mentioned to check, inspect, clean the P4/J4 connector pins in post #12. Did you do that?
Yes sir, found J5, pulled it apart and sprayed it with electronics cleaner. I honestly have looked everywhere for P5 but haven't found it yet. I'll try to look again for it.
 

kloppk

Well-known member
Steel Soldiers Supporter
2,295
4,070
113
Location
Pepperell, Massachusetts
Your DMM is actually displaying 76,300 ohms (7.6 KOhms)

P5 and J5 connect together.
J5 is bolted to the floor of the compartment behind the gauges. A small black connector with 4 wires..
P5 plugs into J5 behind the right access door.
P5 also has 4 wires.

Do you know how to decipher the -24 TM to figure exactly how it's wired from A1 to find 10?
The TM wiring method can be confusing to figure out...

edit:

Here is a quick drawing showing the actual wiring...
1750459137858.png
 
Last edited:

Iron.Horse

New member
14
22
3
Location
Frederick, Maryland
Your DMM is actually displaying 76,300 ohms (7.6 KOhms)

P5 and J5 connect together.
J5 is bolted to the floor of the compartment behind the gauges. A small black connector with 4 wires..
P5 plugs into J5 behind the right access door.
P5 also has 4 wires.

Do you know how to decipher the -24 TM to figure exactly how it's wired from A1 to find 10?
The TM wiring method can be confusing to figure out...

edit:

Here is a quick drawing showing the actual wiring...
View attachment 949149
I Really, Really appreciate the drawing and help... The tracing of wires makes a lot of sense, I pulled J5 again and sprayed it, traced the wires and looked for rubs and chews, they look fine. The original spade connectors were replaced with permanent crimps, wires seem solid. I guess I could cut them out and re-splice for good measure? Wires seem fine going into gen head, no rubs, but I can't see where the one set terminates on the... coil? Only the other set on number 10.

Should I cut out the larger wire that lays on the gen head and replace from the plug to where it enters the head? That would eliminate a few feet of wire that could have internal damage?
 

kloppk

Well-known member
Steel Soldiers Supporter
2,295
4,070
113
Location
Pepperell, Massachusetts
Don't cut any wires yet. You need to do some more measurements to isolate where the problem really is.

Based on your reported measurements there is an issue with voltage making it from A1 to the two Find 10 terminals.
What needs to be done are some continuity measurements on the wiring between the two.
All continuity measurements below would be a resistance reading of about 0 ohms.
Disconnect P5
1) Check for continuity from one of the Find 10 terminals to P5 pin 1 or P5 Pin 2. One or the other is connected to P5-1.
2) Check for continuity from the other Find 10 terminals to P5 pin 1 or P5 Pin 2. One or the other is connected to P5-2.
If you find "continuity" for the two wires in steps 1 & 2 above, then proceed to step 3.
3) Check for continuity from J5-1 to Terminal Block 5 terminal 17.
4) Check for continuity from Terminal Block 5 terminal 17 to the wire that goes to A1 terminal 6.
5) Check for continuity from J5-2 to Terminal Block 5 terminal 18.
6) Check for continuity from Terminal Block 5 terminal 18 to the wire that goes to A1 terminal 5.

Post up your findings and we'll go from there.
 
Last edited:

LuckeyD

Active member
48
154
33
Location
Vilseck, Germany
That TB 10 is located inside the main gen and you have to remove the main gen back panel with 6 bolts if I remember right. Only had 2 60HZ issues with this and both had an eaten wire from that TB to the exciter stator. The rest were 400HZ gens. Test is to start the gen set holding the S1 in start to see if an AC Voltage is produced on a panel gage or meter connected to K1, on the S8 side of the K1, L3 to chassis. If something shows then goes away as you allow the S1 to go to the run position, you have a better way to TS the thing. At the moment and if I followed the thread correctly, this could be a Mag pickup, S14, K15 K16, fuse, regulator or wiring as I have repaired several by ensuring all terminals were tight. Mr. Kloppk is testing the regulator at this time. It goes with the attachment. I hope it tests OK as it is costly. Forum members have this guy taken care of. You can test the main gen by connecting a 9VDC transistor battery to Wire 104C disconnected from A1 B+ terminal 6 ( the F+ ) and wire 105C usually connected to A1 terminal 5 B-(F-) Apply for a moment or two only while engine running. This will test if the main gen is OK as you should read about 70-89VAC or something and now you can be relieved it isn't something costly like a main gen. OH, If the freq meter is working the main gen is usually OK.
 

Attachments

Iron.Horse

New member
14
22
3
Location
Frederick, Maryland
Don't cut any wires yet. You need to do some more measurements to isolate where the problem really is.

Based on your reported measurements there is an issue with voltage making it from A1 to the two Find 10 terminals.
What needs to be done are some continuity measurements on the wiring between the two.
All continuity measurements below would be a resistance reading of about 0 ohms.
Disconnect P5
1) Check for continuity from one of the Find 10 terminals to P5 pin 1 or P5 Pin 2. One or the other is connected to P5-1.
2) Check for continuity from the other Find 10 terminals to P5 pin 1 or P5 Pin 2. One or the other is connected to P5-2.
If you find "continuity" for the two wires in steps 1 & 2 above, then proceed to step 3.
3) Check for continuity from J5-1 to Terminal Block 5 terminal 17.
4) Check for continuity from Terminal Block 5 terminal 17 to the wire that goes to A1 terminal 6.
5) Check for continuity from J5-2 to Terminal Block 5 terminal 18.
6) Check for continuity from Terminal Block 5 terminal 18 to the wire that goes to A1 terminal 5.

Post up your findings and we'll go from there.
Sorry it took so long to get the results back, but work has been super busy and there just hasn't been much extra time to mess with the "non-essential" farm projects like the genset. I finally got some help tonight to hold everything in the proper places and read the results and all I can say is that Mr. Kloppk, you certainly know what your talking about!

I followed your instructions as outlined, and had intermittent continuity on the P5 plug, pin 2. I was working on getting the pin out of the plug and the wire came out. I am not sure I disasembled and reasembled the plug quite the proper way, but I got it done, and guess what? 120v at the convenience plug!!! I have confirmed that in 1ph 120/240 there is 120v at both L1/N and L3/N with the circuit interupter closed, so I believe that logically the genset is putting out 240 at the lugs? My only concern is that I am not getting any readings off of any of the 3 gauges for the Hz, frequency, and voltage, and the voltage adjust dial doesn't seem right. The other important gauges on the unit (coolant temp, battery, oil pressure) seem to work perfectly. Despite this, I still can't believe that there is actually power coming out of the unit. Thank you so much for your patience and clear instructions, it means more than you know.
 

LuckeyD

Active member
48
154
33
Location
Vilseck, Germany
I am very glad you found your issue with AC output. I attached several PDF docs. I always use the DMM to set things as the gages are only close. You can think the gen of having 2 sides. DC is usually the engine and AC is the gen. Connected by the mag pickup and S16 and the S1 provides a field flash to kick off the AC Side. Your supposed to hold the s1 in start until you see something on the gages, but in your case use the DMM till you know the gages are working properly.
1. Those AC gages on the control panel are shown on the AC schematic along with the AC Volt ADJ. The wiring diagram I attached indicates where and the path of the wiring issues. I would check the voltage adjust first. Start with the device and go backwards to where it goes in the wiring diagram. The adjust only goes from the voltage regulator to the potentiometer. With Everything OFF a short check is using the DMM and disconnecting wire 156A from terminal 1 of the regulator A1 terminal 1 and check resistance with probes on the wire and the other on terminal 2 with wire 157B is connected. It is a 5 K ohm POT and you should read a smooth increase and decrease of resistance as you rotate the Volt adj thru its movement. Any strange ness other than a smooth increase or decrease 0-5K ohm should be checked thru wiring and POT.
2. The bad connection you found and fixed may also be present in other places. Beside that small connector is a larger one. ensure this guy is all OK as well. Sometimes they are not fully connected and this gives similar indications to what you express in your latest communication. The gen does funny things. Corrosion and recessed pins are common. I hope it turns out just a lose connection here. Then all works well.
3. Usually the FREQ meter will indicate something no matter where the S6 is set to so this is a puzzle. Before you start, take the wiring diagram and follow the voltage from the Freq Gage backwards from the gage to the transducer box and from there backward to where the AC comes from. There should be 120VAC applied to the Freq Transducer as the AC Convenience receptacle is connected there on 60 HZ gens. You stated it is OK at the convenience receptacle. After you are sure the path on the paper, try it on the gen set. If 120VAC is applied to the transducer, (gen running) and if the gage freq meter reads nothing, check the wiring, but most likely the transducer or gage has failed. The Trans box takes 120 Input and makes a small voltage out to the gage and it uses it to make a reading.
4. The AC Voltage gage passes thru the S6 which selects what you want to see on the gages. A failed S6 is a usual issue on a lot of gens. The diagrams provide insight to follow if things are all good after check outs. I set the S6 to put out L1 to N and measure what is applied to the gage. If I read 120 on the DMM and gage says it has nothing I usually change the gage for example. The designations of a device are in the color coded schematic so you can follow the general path and in the wiring diagram. When you get the time, check it out and let us know your progress. Good luck.
 

Attachments

Top