Ok. I apologize to all the ones that were interested in this build. I have been mostly posting on facebook and my instagram (@dirtyvee90 for those interested). I also have a youtube now for some of my crazy offroad exploits. you can check out one of my videos here:
https://youtu.be/0MROvlggWDs.
I would be posting pictures but for some ****ING reason, I cannot due to improper file extension. IDK. so you will have to deal with words until i figure that crap out.
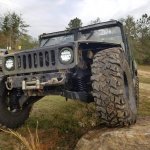
Since my last post, I have changed career paths as well as went completely insane with my build. The trucks drivetrain, to begin with, has been completely upgraded to a 10k drivetrain. Both differentials are now AuburnGear Ected Electronic lockers and have been rebuilt. She now rides on 41.5 x 13.50 R 17 Pitbull Rockers and a set of 17" Raceline Assault wheels +20mm.
The cooling system has been upgraded to a Predator Motorsports aluminum racing radiator fabbed by Rod. The tri cooler has been deleted and replaced with two 14" oil coolers and one 12" oil cooler. 14" engine oil, 14" transmission, and 12" power steering each with there own electric fan mounted on the back of the hood vents. I did this to create space between the different cooling systems and reduce heat soak and increase air velocity by having less surface area to pull air through per fan. This allows the engines fan to pull air exclusively through the radiator and not fight to pull air through the tri cooler as well as the radiator.
In addition, I have been working with Michael E Hoffman with American Humvee to test a larger spring lift. With a set of his front springs and a 2" lift spacer in the front and a set of front springs in the rear, I realized 4" of lift on my lightweight m998. I also realized a huge ride difference and spring flex which you could see for yourself if I could get these **** photos to load.
Yes, a lot of you will hate (but I really don't care BTW) but I chopped the hood to allow for better spring travel and trail clearance. I use the truck primarily for offroad use and have scaled some vicious rock trails with my setup.
My turbo design is now in its 3rd generation. I began trying the side mount design because I believed it had the room. It does have the room but it is a bad design when we have the ability to access the back of the engine as Humvees does. Side mounts also block the entire side of the engine and make it very difficult if not impossible to access the injectors or glow plugs or anything along that side. All that being said I took the route of using newer model turbo diesel center mount turbo manifolds and fabbed a y pipe to connect the two to a t3/t4 turbo flange. Instead of using the HX35 turbo I opted for a G35 Ball Bearing turbo that is water and oil cooled. I used braided steel lines with AN fitting for all connections and sourced my oil feed from my oil pressure sensor. The water supply was easy as I just plumbed the radiator return line through the turbo and into the reservoir. The reservoir is custom fabbed by a friend and is all aluminum. I used 2.25" tubing to match the outlet of the turbo with silicone couplers and T clamps to connect the aluminum tubing. The Front mount intercooler 3" thick 23" wide and 11" tall with 2.50" inlet and outlet. I opted to keep the mil-spec intake manifold for hood clearance and had quad star tuning to fab an intake cap with a 3" mandrel bent steel pipe and a 3" to 2.5" silicone coupler with t clamps to connect it to the rest of the intake system. The small size piping is maintained in order to speed up the air volumization (is that a word) process to build boost. The PCV port on the intake manifold was blocked and used as a boost source for one of 9 street glow gauges (inexpensive and very attractive not to mention accurate gauges). The PCV dump tube is re-routed to the silicone coupler connecting the stock intake box to 4"aluminum elbow. As stated 4" aluminum pipe and silicone couplers were used as intake piping from the stock intake box and run to the 4" intake side of the gt35 turbo mounted to the custom fabbed turbo Y pipe. This setup is leaps and bounds more efficient to the original setup and much easier to work with. The Turbo door used for turbo model Humvees is a must if you don't fab your own to clear the turbo. I also took the extra time to titanium heat rap the manifolds and Y-pipe as well as added a titanium turbo blanket to keep temps inside the engine bay to a minimum.
Fuel delivery has become an adventure. I discovered my truck was reset in Maine in 2016 and was fortunate enough to get a new model DB2 injection pump. I advanced the timing +2 degrees from center and turned up the injection pump. Using all AN fittings and braided steel lines I deleted the factory fuel tank. Using a 20-gallon fuel cell in the bed and deleting the factory mechanical fuel pump I reworked the fuel lines to run a Holley mighty mite electric fuel pump and AN fittings and lines from tank to a custom fitted spin on Wix fuel filter with primer. From there I ran AN fittings to the injection pump and a custom made feed the beast setup to better fuel the pump. The injectors also got treatment and were rebuilt using Marine style fuel injector nozzles.
Moving on to steering. This part of the truck is by far the most frustrating thing I have had to deal with. As much abuse as I put on the truck the single weakest length is ALWAYS the steering. I have not been to one real ride yet without wearing out a steering component enough to cause extreme wheel dance. I finally got sick of it and completely removed the factory design and fabbed my own full hydro steering system. This has yet to be tested.
On to safety mods. A good friend, Jeremy Johnson with Safety 3rd Customs, fabbed me a beautiful set of full rocker panels, which I challenge anyone to find higher quality or attention to detail or even a more competitive price for a full set. The center skids are 3/16 steel and still in the fab process. The winch bumper is custom cut and bent from 3/16 steel as well and extends from the front bumper under the front differential and just past. This was used to provide a strong and safe mounting location for the full hydro dual ram. It also created a great ramp to slide up rock obstacles without damaging the framework underneath or causing hang-ups in more difficult obstacles. A 10 point roll cage is also in the works with a unique front bumper design as well as a pair of race seats and 5 point harnesses. As these come to pass ill post up pictures etc.
INTERIOR MODS: Phoenix Hummer Repair is in the process of fabbing me a center console to rival all offroad center consoles. STAND BY TO BE AMAZED lol. It should be my new location for my stereo system, two 6 1/2 speakers, my CB radio, a place for a 9" screen, and 12 toggle switches for accessories that seem to grow like crazy.
Photos coming soon.