• Steel Soldiers now has a few new forums, read more about it at: New Munitions Forums!

  • Microsoft MSN, Live, Hotmail, Outlook email users may not be receiving emails. We are working to resolve this issue. Please add support@steelsoldiers.com to your trusted contacts.


M109A3 RV Conversion

Clay James

Member
524
3
18
Location
Reno/NV
After seeing all the 109 threads lately I thought I'd contribute like I said I would. If it wasn't for the other threads on these, I probably wouldn't have one. I'll try to get it all in the reserved threads so it's not all spread out. 10 Should do it.

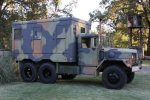
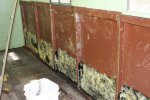
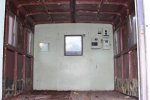
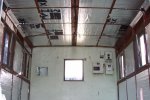
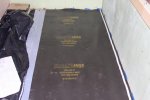
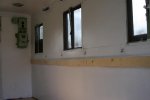
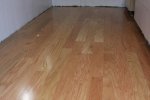
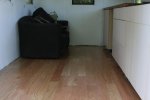
I got it Feb. of last year and started the conversion in the summer. The EUC was less than 2 weeks! I had a trip to the beach planned and a month to work on it. My goal was to get the floors replaced since there was a ton of rust on the sub-floor and replace the insulation in the walls.

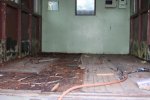
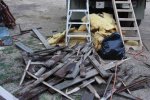
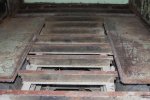
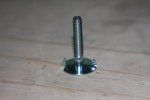
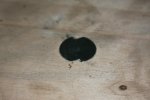
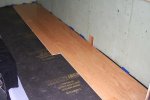
The wood floor on top I didn't plan to save and I tried unbolting it and found that would take ages so I got a BFH and BF 4ft pry bar and broke it out. Most of the bolts broke off since they were so rusted and I just took a hammer and pounded them out the bottom.

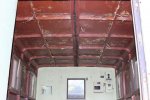
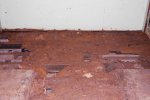
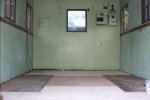
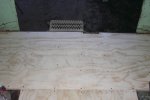
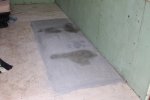
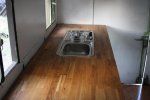
The sub-floor turned out to be a nightmare. Anyone that's done this before will know what I mean. It had piles of rust all over the top and had large holes in it. The entire outside had hundreds of spot welds that were about 1/2" apart, so I spent days with an air chisel and hammer breaking them all. Since it was summer and I took all the insulation out it was like an oven in the box which made it miserable, but the determined German blood in me was committed to getting it done. Filled up 3, 5 gallon buckets with rust. The new sub-floor is 1" plywood. I'll put 1/4" over that and a oak floor on top.

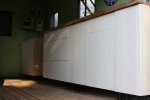
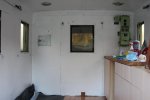
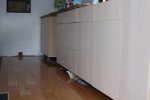
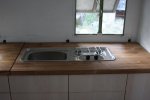
I haven't done much since then but I'm going to get going on it again. I'm still torn on how to do the inside. I really want to make it look like a 1940s style travel trailer(my favorite era), but it would be pretty difficult and expensive. I have been following RAYZER's M146 conversion and really like that setup. Decisions, decisions.
 

Attachments

Last edited:

Clay James

Member
524
3
18
Location
Reno/NV
Really liked this insulation. It's foam with heat reflectant foil on both sides. The foam makes it rigid so just cut it the right size and push it into place and it stays.

A few pics at Doran Beach on the north end of Bodega Bay. The roof makes a good tanning bed for the girls and a landing platform for seagulls to walk around on and wake me up in the morning. Truck made it there and back with no problems. Drove there at 50MPH which is WOT and that used almost half the tank. Drove back at 45 at about 2200RPM after deciding if I was going so slow already no one would notice the 5mph difference and that use a little over 1/4 tank. This is all just based on the gauge but it seems the RPM drop really saves fuel. I see 11.00x20s in the future. I'm already rebuilding and LDS to drop in. I also have a WMO filter setup I need to get going so next time I'll pay less to get there than my friends driving their Suburban.

I did get pulled by a Placer county Sheriff the day I left because of no plate(was on a temporary). It was registered historic and I had a Class C license and he ran my info and didn't say anything about it.

2/29/12

Got some offroad lights mounted. Still need to change out the IR lenses and wire them up. Also ordered another clear set so I'll have a set for backup lights too.
I had been thinking about how to secure the floor and found these bolts at McMaster-Carr and they fit the bill. Used about 45 of them so this floor isn't going anywhere. The wheel wells were sticking up a little past the floor so I decided the best course of action was to get some 1/4" plywood and add another layer on top of the floor. The wheel wells are now slightly lower so all I have to do before installing the hardwood floor is fill them in with something.
 

Attachments

Last edited:

Clay James

Member
524
3
18
Location
Reno/NV
3/24/12 Got a few more things done. Started on getting the oak floor put down. Since the wheel well was uneven and the 1/4" plywood top layer made it a little lower than the top of it I filled it in with some self leveling floor filler to get it nice and even. Then I put a vapor barrier down and the foam underlayment. I decided to go with engineered natural oak floors. They seemed like the way to go since they're designed for a floating floor installation and that was the way I wanted to go with this project, and they just snap together making it super easy to install. Only had enough cash for one package of it so I got it started. The walls being uneven make things slightly more difficult. This caused some trouble on the sub-floor too. I cut the sheets perfectly square and some corners would be off so I would have to shave them down to get them to fit. Apparently when they built the box 'close enough' was the spec.

Also got the M939 seats in. These suckers are HEAVY! I still managed to get them in, but man was it hard to lift them up that high to get them in the cab. They're not bolted in or hooked up yet but I did air them up with the shop air and they're going to be sweet for those bumpy roads and long trips.

4/4/12 Got more flooring installed but ran out so I couldn't finish. Really how it's turning out so far. Also painted the interior with Behr ultra pure white which turned out to be a really good choice. It seems much brighter in there now and it sticks really well to the old paint. Just need to touch out some of the corners and around the windows and lights. It took almost exactly one gallon. After months of work it's finally starting to come together and I'm almost to the point of just needing to do the finish work.

4/15/12 Floor done! Now to be paranoid about keeping it clean and scratch free.
 

Attachments

Last edited:

Clay James

Member
524
3
18
Location
Reno/NV
4/15/12 Installed a muffler. Went with the Donaldson M070028 and it definitely cuts out the exhaust to the point where I really don't hear it much over the engine noise anymore. I didn't trim down the stack, just moved it up so it's further away from the cab and can cut down even more noise. Also installed a grab handle on the hood with one I got from McMaster-Carr.

A really good upgrade I did was install a remote breather system for the axles, transmission and transfer case. No more leaking axle seals or pushed out oil from those stupid one way vents.

Got the seats bolted down yesterday, hooked up to the air system and installed a pressure regulator for them since the deuces air system is too strong.
Took it for a test drive for the first time since November of last year. The muffler and air ride seats make it much more comfortable. Now the ladies will be even more enthusiastic about riding in it.

And since its April 15th, lets not forget it's the 100th anniversary of the Titanic sinking. Been really into it since I was a child and it will probably be the inspiration for some of the interior of the box.

6/8/12 Got the last section of counter and installed the sink. Now to get a faucet and plan where to mount the water tanks and run plumbing.
 

Attachments

Last edited:

Clay James

Member
524
3
18
Location
Reno/NV
7/13/12 Scored a Westbrass Victorian faucet on eBay for super cheap. Somehow missed that it was a vented faucet until I got it, so I'll see if I can get that to work with the instant heater I plan on using.

Decided to get these done at Les Schwab since they deal with split rims and can powder coat them for cheap. They also crack check the rim and check the mounting holes for wear during this process. The guy broke these down fast too. I dropped them off and he thought they were going to be pretty hard and called back a shortly after I got home and said they were ready for pickup so I could take them home and clean out the grooves of any grease the bead blasting might not get which can ruin the power coating when they heat them up.

Going to mount up some never mounted Firestone T831's as singles. Thought about singles vs. duals for a while and decided to go single since it's mostly going to be on the road. Price also contributed to the decision.

I'm rebuilding the brakes while I have the wheels off. Going to rebuild the master cylinder and wheel cylinders and replace all the lines.

7/19/12 Got my tires and wheels mounted at Les Schwab. The wheels looked great! Like they were brand new. Rich was helpful and new what he was doing and showed me how to do these. It's really pretty easy, I did a few of them because I wanted to know how. The only bad part is I wasn't able to find any American made tubes and flaps. I can't wait to get my brakes finished and axles serviced so I can try these things out.

The center of the wheel in pic #8 is an optical illusion. :)
 

Attachments

Last edited:

Clay James

Member
524
3
18
Location
Reno/NV
8/1/12 Been doing brake and axle work the past few weeks. Replaced every hard line, rebuilt the wheel cylinders and master cylinder and got braided stainless lines made locally. It's good to see all brand new brake lines everywhere. Also repacked the bearings and replaced the seals. One rear axle seal was in backwards and some of the lock rings didn't even have any tabs bent down. I took the time to do everything right. I also got new style front axle seals. This type of seal allows for some deflection of the axle without destroying it which would happen to the old type seal. It's also USA made so I'd call that a win. I'm going to put this type in my A2 so I can hopefully stop the leaking.

8/10/12 I got the brakes bled, which turned out to be unusually easy. I just poured DOT 5 into my remote reservoir until it was full, pumped the brake and added more. Went to the air pack and each wheel cylinder and cracked the bleeders until fluid started coming out then closed it. I just wanted to get some of the air out before I did the final bleeding. By the time I was done I had a firm pedal. I thought it couldn't be that easy. On the other two trucks I had to bleed them much more to get a pedal. Drove it around my ranch and was able to lock the brakes on the dirt hills. Guess it really was that easy. It's nice to catch a break when working on these trucks.

Took it for a drive with the new tires and man is the steering touchy. It's not bad at lower speeds but up around 40 it starts getting very hard to keep under control. The good news is it appears I gained about 5MPH, although I had a tough time looking at the gauges because I had to concentrate so hard on keeping it on the road. I searched and found out they have no caster in the stock configuration in order to make it steer easier with the bias plys and manual steering. These radials have much higher road contact with the squared tread, so steering becomes easier. I need to shim it to about 4 degrees caster to get it manageable again. Flipping the shims makes 9 degrees caster which is too much. I'm going to get some shims at NAPA and stick under the stock ones. I'll check my toe in too.
 

Attachments

Last edited:

Danger Ranger

New member
2,253
23
0
Location
Roland, IA
Interesting concept with the reserved posts. I never would have thought of that. I am now subscribed and waiting for more progress, looks good.
 

Clay James

Member
524
3
18
Location
Reno/NV
A few people have done that and I think it's a good idea. It's nice to have all the info and pics on one page instead of having to go through pages and pages and find a few at a time.
 

Clay James

Member
524
3
18
Location
Reno/NV
Bought air ride seats for an M939 from GL. I don't think they were ever even used. I'm picking them up next Wednesday. I spent 5 hours in a my a2 today with the box seat and can't wait to get these in the 109.
 

Attachments

Craig C

New member
106
1
0
Location
San Jose, CA
Seats and Floor

Nice seats, where did those come out of. They would be nice for my shop van.

Ok, the floor, did you replace the steel floor or was it wood all the way through.....looks like wood over a steel floor and the steel rusted out as well.

Mine at one time had several inches inside most likely before or while it set at DRMO before being auctioned off. I know the wood in several places forward isn't so great and having seen your pics am now wondering about the floor beneath the wood.

Keep the info and pics coming.

Thanks,
 

Clay James

Member
524
3
18
Location
Reno/NV
The seats came out of GL in French Camp.

I didn't replace the steel sub-floor, just put the plywood down and I'll tar the bottom to keep the water off. The floor didn't look that bad when I got it but I saw some patches underneath that were rusted with lots of flakes falling out so I decided to replace the whole floor. In pics 7 and 8 you can see how bad the rust was. It was the entire sub-floor which made it far beyond repair. Yours is probably pretty bad too if it had water in it. Check under the truck for rusted through patches or maybe pull up a board or too and look. The roof is probably full of leaks too.
 
Top
AdBlock Detected

We get it, advertisements are annoying!

Sure, ad-blocking software does a great job at blocking ads, but it also blocks useful features of our website like our supporting vendors. Their ads help keep Steel Soldiers going. Please consider disabling your ad blockers for the site. Thanks!

I've Disabled AdBlock
No Thanks