• Steel Soldiers now has a few new forums, read more about it at: New Munitions Forums!

  • Microsoft MSN, Live, Hotmail, Outlook email users may not be receiving emails. We are working to resolve this issue. Please add support@steelsoldiers.com to your trusted contacts.

Air Fails To Build Intermittently; Parking Brake?

gottaluvit

Active member
I'll take your word for it, as it's been a minute since I checked mine, but I seem to remember there only being 3. None of the ones pictured are on the wet tank. If I missed one I'd like to know about it.


Yes they can be disassembled. I agree with replacement though. I got mine at Truck Pro for $12 a piece without an account.

View attachment 570494
Well there is one on the wet tank as well on A2s. Gonna just order another and have all new.20150716_190914.jpg
 

Swamp Donkey

The Engineer
Steel Soldiers Supporter
1,450
119
63
Location
Gray, GA
Well there is one on the wet tank as well on A2s. Gonna just order another and have all new.View attachment 570609
Mine does not have one there, or the extra line coming to the wet tank. Is that the supply for the CTIS? If so, that might explain the extra check valve. I don't have CTIS.

20150716_200033.jpg


So what is this? The thing with two mounting holes?View attachment 570610
That is Double Check Valve #7 coming off the spring brake tank, I believe. It was part of the ABS MWO package. Part# N20954A

Screenshot_2015-07-16-20-07-22.jpg
 

Swamp Donkey

The Engineer
Steel Soldiers Supporter
1,450
119
63
Location
Gray, GA
Mine is a A2 with CTIS
Still interesting that both of your valves are in different places on the same version of truck.

Sorry for the sidetrack gottaluvit. My curiosity got me. :-D Hopefully one of these is your problem and it will finally be resolved.
 

Ford Mechanic

Active member
1,805
6
38
Location
Edenton, NC
Something else you might find interesting.

We've heard of mistakes made during the rebuild process. Expecially the Red River depot (I think that's the one). Do yours have rebuild tags on them?
From looking real hard at my truck. I have no rebuild tags, leading me to belive it's never been through a rebuild. It may not have anything at all to do with the differences between our trucks.
 

gottaluvit

Active member
Something else you might find interesting.

We've heard of mistakes made during the rebuild process. Expecially the Red River depot (I think that's the one). Do yours have rebuild tags on them?
From looking real hard at my truck. I have no rebuild tags, leading me to belive it's never been through a rebuild. It may not have anything at all to do with the differences between our trucks.
No rebuild tags here either. Maybe done on base and being from different locations could cause the differences. I have the little mwo triangle tags by the door but no cool "Rebuilt At ..." tags. My check valve on the wet tank is after the tank and not before it like Ford Mechanic's. I reckon it gives the same end result.?.?
 

Swamp Donkey

The Engineer
Steel Soldiers Supporter
1,450
119
63
Location
Gray, GA
No rebuild tags here either. Maybe done on base and being from different locations could cause the differences. I have the little mwo triangle tags by the door but no cool "Rebuilt At ..." tags. My check valve on the wet tank is after the tank and not before it like Ford Mechanic's. I reckon it gives the same end result.?.?
Mine is a RRAD rebuild but everything I have checked to date throughout the truck is by the TM. The only issue I found is new U-joints on a very sloppy jack shaft. The check valves flow IN through the female end and OUT the male end. It would appear that Ford Mechanic's can only flow towards the air dryer and yours can only flow towards wherever that line goes from the orientation in the pictures yall posted. I'm not familiar with air flow patterns for CTIS vehicles so I'm not much help further than that.

Ford Mechanic, I found the diagram in the TM I referenced when checking these out a while back on my truck. It jogged my memory as to why I didn't think there was a 4th valve. My truck matches the two part diagram below perfectly. In the top diagram the valves for the primary and secondary (two top tanks) are #26 and the wet tank (bottom tank) doesn't show one on either end. Neither diagram is version specific as some are when there are differences between versions. When I can get to my desktop computer I'm going to run through the P2P program flow diagrams to see what purpose they serve on the A2s. It'll drive me nuts if I dont, lol.

Screenshot_2015-07-16-23-46-53.jpg

Screenshot_2015-07-16-23-47-22.jpg
 
Last edited:

gottaluvit

Active member
I got the new governor yesterday and three of the check valves. The wet tank check valve is 1/2" m/f and the other tanks are 3/4" m/f. I ordered all 1/2" but the seller sent me all 3/4". I took the one off of the wet tank first before noticing I got the "wrong" valves and that is when I noticed I got new 3/4" instead of 1/2" ones. This forced me to just take the wet tank one apart since I couldn't just R&R it, as I wanted to see some results now. (This truck isn't getting my long driveway graveled as well as other projects as long as it is crippled.) So the check valves come apart very easily and are easy to clean. Only a spring and a rubber seat inside. Cleaned up the rubber seat (which was still supple) and it's seating location as well as one on the primary tank (cleaning others same day I get back to truck time) since that is the guage that drops fastest when depressing the treadle foot valve (brake pedal). Even with the new governor on it and the two aforementioned check valves cleaned, my governor still would not cut in even fanning the brakes to 10 psi on primary guage. Builds good when cold (first start truck) and spurratically. Had truck a bit warm the other day on my property and pressure wouldn't even build after shutting down and draining tanks just like the time bringing it back from the system methanol cleaning. So I raised the hood and took a walk through my woods to give it a cool off and it built back pressure on start up after cooling. At least I could now engage the front axle to get out of the mud I was stuck in and the radiator fan could run. To me this sounds like the only thing affected by heat could be the darn unloader valve. So it looks like I am going to have to go through that headache again and maybe do it right this time. Must not have cleaned that thing up good enough last time. It will shine this time guaranteed! It was stuck in the open position last time and I couldn't build at all on startup. Now it seems as if it only gets stuck when warm. Daggone it! Wish me luck... or the sense to do it right.
 

The HUlk

Member
469
7
18
Location
Cincy, OH
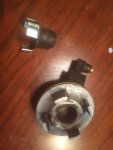
Symptoms are exactly what I was experiencing when my unloader had the black tar looking goo on it you see in the photo. Solvent alone didn't cut it, I used some 400 grit sandpaper until both mating surfaces shined like new. That's when I realized the cap has rubber seals in it, be carefull.

image.jpg
 
Top
AdBlock Detected

We get it, advertisements are annoying!

Sure, ad-blocking software does a great job at blocking ads, but it also blocks useful features of our website like our supporting vendors. Their ads help keep Steel Soldiers going. Please consider disabling your ad blockers for the site. Thanks!

I've Disabled AdBlock
No Thanks