RAYZER
Well-known member
- 3,380
- 59
- 48
- Location
- sanford/florida
That's some really good engineering there Dave, im impressed!
Steel Soldiers now has a few new forums, read more about it at: New Munitions Forums!


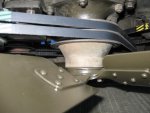
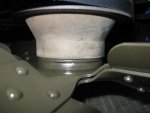
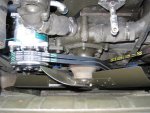

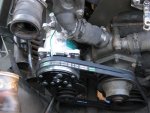


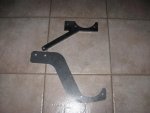
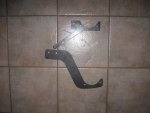
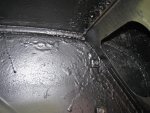
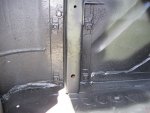
Solid job! Did you make any additional 3/8" steel plates? I would be interested in buying one. I'm looking to do the same upgrade to my daily driver. The more time I save on the fabrication process, the better. It drives my wife crazy if I spend more time with the truck then with her. I tell her she is always welcome to bring me out a beer and shoot the breeze while I tinker on the truck...Now that I have the front end of the engine accessible, it is time to mount the compressor. I removed the small, L-shaped bracket to mount the clevis for the radiator support and the lift ring form the front of the cylinder head. In the photo, you will see I numbered the bolt holes 1, 2, & 3. These are the holes used to mount the compressor bracket to the cylinder head.
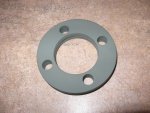
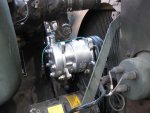
I had the machine shop fabricate a 3/8” steel plate to mount to the front of the head. The plate rests on the lip of the block where the head and block meet. I had a notch cut in the upper left corner of the plate, looking at the front of the engine, to clear the thermostat housing. The right side of the plate is perpendicular to the right side of the cylinder head.
I laid a machinist square on the lip of the block and drew a vertical line on the head up through the center of each of the 3 bolt holes on the front of the head, 1, 2, & 3. I put the plate on the lip and transferred the vertical lines to the plate. Next I measured up from the lip of the block to the center of each hole, and transferred the measurements to the plate, marked the location of each of the 3 holes, and drilled them out with my drill press.
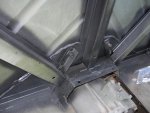
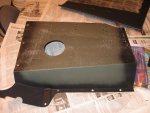
Using the plate, I clamped the plate to the back 2 mounting holes on the compressor, marked the location to drill the holes to mount the compressor to the plate. After drilling the holes, I bolted the compressor to the plate and bolted the plate to the head. Be sure to install the Radiator support bracket and lift ring to the head when you install the plate. (In the pictures, the radiator bracket is upside down). After the trial fit, I removed the plate and painted it. I used all grade 8 bolts, washers, lock washers, and nuts.
That is what the EX use to saySolid job! Did you make any additional 3/8" steel plates? I would be interested in buying one. I'm looking to do the same upgrade to my daily driver. The more time I save on the fabrication process, the better. It drives my wife crazy if I spend more time with the truck then with her. I tell her she is always welcome to bring me out a beer and shoot the breeze while I tinker on the truck...
") , she said she does not know much mechanicaly, but does know the differance between a screw driver and a cresent wrench,
, she said she does not know much mechanicaly, but does know the differance between a screw driver and a cresent wrench,