• Steel Soldiers now has a few new forums, read more about it at: New Munitions Forums!

  • Microsoft MSN, Live, Hotmail, Outlook email users may not be receiving emails. We are working to resolve this issue. Please add support@steelsoldiers.com to your trusted contacts.


WC-51 Restoration or Bust!!

Tinwoodsman

Well-known member
Steel Soldiers Supporter
3,923
75
48
Location
Comfort, Texas
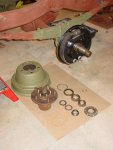
Got some axle work done today. Packed and installed the rear axle hub bearings and installed hubs and seals. Rear axles and flanges were installed and one drum for testing. Will adjust the rear shoes and install the other drum next. I installed new front inner axle seals and all new axles bushings. Installed the passenger side steering knuckle and adjusted the bearing preload. Installed refurbished felt seal retainer and seal on the passenger side and then packed the axle knuckle and bowl and installed the axle, backing plate and spindle. Waiting on a couple of gaskets so I should be able to install the drivers side knuckle and axle, both hubs and the remaining drums on Wednesday. Then old wheels and tires and roll out for frame painting. Enjoy the pictures.


Assembled-Hub.jpgRear-Drum.jpgFront-Axle-Bowl.jpgFront-Knuckle.jpgKnuckle-Felt-Rear-Seal.jpgInstalled-Knuckle-Seal-Reta.jpgBacking-Plate,-Spindle-and-.jpg
 

Attachments

Tinwoodsman

Well-known member
Steel Soldiers Supporter
3,923
75
48
Location
Comfort, Texas
Okay, finally got some work done. Finished final paint on chassis and refurbished all four hubs, drums and brake pads and wheel cylinders. Rebuilt front steering knuckles and replaced drivers side front axle. Refurbished and remounted transfer case with proper insulators between cross member and T/C mounts. Rebuilt master cylinder and installed all new brake lines. Still waiting on a few connector nuts to finished that job. Installed refurbished gas tank and fuel line. Re-stalled pintle hitch (or is that penal hitch) after blasting, prime and paint.Front-View.jpgRear-View.jpgMaster-Cylinder.jpgFront-Brake-Lines.jpgRear-Brake-Lines.jpgTransfer-Case.jpgFuel-Tank.jpgPintle-Hitch.jpg
 

zout

Well-known member
7,744
154
63
Location
Columbus Georgia
PB - the only way that MV is going to get hauled I bet is by an enclosed trailer - humidity controlled and
the interior of his trailer will looker far sweeter than the MV - so he can sit in the trailer - watch his plazma screen
tv on is leather couch looking at it - it is that nice.

TWM - excellent workmanship Sir. I am envious.
You and Poppop make me to never want to show my stuff in public again.aua
 

Tinwoodsman

Well-known member
Steel Soldiers Supporter
3,923
75
48
Location
Comfort, Texas
When I purchased the WC, the seats were pretty much trashed with the exception of the seat back shells. There were no seat bottom springs that were salvagable so I will have to use heavy duty seat foam. In the meantime, I was able to find a used seat back spring on ebay and used that as a pattern to use parts of the original seat back springs to make a second spring set. As you can see, the originals were really bad. The final spring sets were blasted and primered and today I upholstered them. You can see the springs, the burlap protection layer and the foam padding I installed. I used seat coveres supplied by New Life Canvas and they turned out pretty good. I will post the bottoms when completed.

Original-Springs.jpgPrimed-Seat-Back-Spring.jpgBurlap-Pad.jpgBurlap-Hog-Ringed.jpgUpholstered-Spring-Assy.jpgInstalled-Back-Rests.jpg
 

papabear

GA Mafia Imperial 1SG
13,508
2,383
113
Location
Columbus, Georgia
When I purchased the WC, the seats were pretty much trashed with the exception of the seat back shells. There were no seat bottom springs that were salvagable so I will have to use heavy duty seat foam. In the meantime, I was able to find a used seat back spring on ebay and used that as a pattern to use parts of the original seat back springs to make a second spring set. As you can see, the originals were really bad. The final spring sets were blasted and primered and today I upholstered them. You can see the springs, the burlap protection layer and the foam padding I installed. I used seat coveres supplied by New Life Canvas and they turned out pretty good. I will post the bottoms when completed.

View attachment 417010View attachment 417011View attachment 417012View attachment 417013View attachment 417014View attachment 417015
Looks outstanding TWM!!!:-D

When should I send my seats down for covering??:roll:
 

Tinwoodsman

Well-known member
Steel Soldiers Supporter
3,923
75
48
Location
Comfort, Texas
Started working on the steering gear but had to stop since the shaft and nut at the top was rusted through. Was able to get the steering wheel off and did find a NOS worm and shaft assemby. Should be here Friday. I made two wood bases for my seat pans since the springs were not salvageable. Will take them to San Antonio tomorrow and have new seat foam cut to fit the pans and seat covers. Finally, I refurbished all four knee action shocks and replaced the shock oil and exercised each one. Blasted them and the link arms and primed and painted. Installed them today.

Seat-Pan-Base.jpgRear-Shock-and-Link.jpgFront-Shock-and-Link.jpg
 
Last edited:

zout

Well-known member
7,744
154
63
Location
Columbus Georgia
Kent - do not plan on going anywhere after the cookout - you will be chained inside the garage and fed a bowl of rice a day till ya have PB's seat covers DONE.

Rice and water will be maintained till final approval of acceptance by PB is acknowledged.

You keep posting these disgusting awesome pics and I will be forced to have no knowledge of you even being here (I will not let anyone enter the garage).
Besides - your voice won;t be able to be heard over the pig screaming and clawing in the cooker.
 

Tinwoodsman

Well-known member
Steel Soldiers Supporter
3,923
75
48
Location
Comfort, Texas
Upon removal of the steering wheel I noticed the top of the steering shaft and nut were rusted away. I was able to find a NOS shaft and worm assembly back east and installed it Saturday. Took a little trial and error to adjust the backlash (notice the copy of the TM page Doghead) but got is assembled, primed and painted. Installed the shaft today and reinstalled the master cylinder and hope to install the engine tomorrow.

New-Steering-Shaft.jpgNew-Shaft-and-Worm-Gear.jpgNew-Shaft-Installed.jpgPrimed-and-Painted.jpgSteering-Gear-Installed.jpg
 

zout

Well-known member
7,744
154
63
Location
Columbus Georgia
I could not agree more PB - Intricate precision work comes to mind when I see his work.

BTW TWM - Zout has hog rings and pliers already :jumpin:
 

Tinwoodsman

Well-known member
Steel Soldiers Supporter
3,923
75
48
Location
Comfort, Texas
Today I finished upholstering the seat bottoms for my WC. I was able to get seat pans but the springs were not available. Instead I used high density seat foam mounted on plywood bases that have T-Bolts inserted into the boards to accept 5/16" cap screws. I had the foam cut 1/2" wider than the base board dimensions to allow for a tighter cover fit. I centered the board on the foam and glued the two together. I then marked a 2" line around the board edge as a stretch point for the canvas for stapling. That way you are assured the material is stretched even on all sides. Then I applied a sheet of plastic (laundry bag) which allows the canvas to slide easier over the foam during installation. I then turned the seat cover inside out and placed in on the seat foam making sure it was equal on all sides. The cover was folded down on the foam and turned upside down with the board exposed. Then I placed a large board across the seat bottom to allow clamps to be used to press the board down compressing the foam. This made it easier to pull the seatcover's edge to the objective 2" mark for stapling. I started stapling at the center of each side leaving the corners until all four sides were stapled. I then flaired and stapled each corner. Finally, used a template created from the board to locate and expose the holes to mount the seat to the pan. Finally, I mounted the seat bottom to the pan.

All I have have left to do now is sandblast, primer and paint the seat pans and frames and set aside until cab is ready. This was my first attempt at using foam and it is very easy so anyone can do it.

Seat Pan.jpgSeat-Foam.jpgSeat-Board-and-Foam.jpgClear-Plastic-Layer.jpgSeat-Cover-Reversed-for-Mou.jpgFoam-Compression-Bar.jpgCover-Stretched-and-Stapled.jpgFinished-Seat-Bottom.jpgFinished-Seat-and-Back.jpg
 
Last edited:
Top
AdBlock Detected

We get it, advertisements are annoying!

Sure, ad-blocking software does a great job at blocking ads, but it also blocks useful features of our website like our supporting vendors. Their ads help keep Steel Soldiers going. Please consider disabling your ad blockers for the site. Thanks!

I've Disabled AdBlock
No Thanks