• Steel Soldiers now has a few new forums, read more about it at: New Munitions Forums!

  • Microsoft MSN, Live, Hotmail, Outlook email users may not be receiving emails. We are working to resolve this issue. Please add support@steelsoldiers.com to your trusted contacts.


M1007 - CUCV Suburban Clone Build Thread

Barrman

Well-known member
5,163
1,572
113
Location
Giddings, Texas
I will check out that primer. Thanks.

I took a picture of the badge mount hole plug on my M1009 last night. It looks basically like a plastic pop rivet. I had it in my head they were just push in things. Anyway, a search for plastic pop rivets brings back several different types of things I still need to investigate.
 

Attachments

Barrman

Well-known member
5,163
1,572
113
Location
Giddings, Texas
O'Reilly's has some black plastic ones. So does Harbor Freight of course too. I already needed 18 of them to secure the power lock/power window umbilical wire covers for each of the doors. Now I will just get 7 more. Thanks for the help everyone.

Progress wise the drivers side doors are now aligned with the body lines and with the cleaned up but still very springy stock door seals back on. They close and don't rattle. I still need to replace the striker post since the rubber sleeves are long gone. Then, the doors might open and close with ease, or more ease than they are already doing.

Now that I am back at work, that means I am back at messing with the 6500. We had the injector lines all off to do the head swap. Something I didn't think about was the fuel line from the lift pump to the fuel filter. It goes under the lines and exits for a drivers side mounted HMMWV fuel filter. I need the passenger side exit fuel line for a CUCV. Off came the injector lines so we could swap that out the other day.

I didn't even think about it until we were putting the lift pump back on after swapping in an oil return lift pump plate for the turbo and after I got the line threaded back into the fuel pump did it click that the line was wrong. Oh well, as I keep telling my students it sure is nice sitting on a stool doing this work compared to hugging the front cross member or doing one armed push ups under the hood doing it.

I also started doing the serpentine belt bracket clean up and install. That is how I got to spend time learning about the CS-130 alternator and how it has to have at least 35 Ohms resistance for the exciter wire or will burn up the regulator in an instant. There are some nice cheap adaptor pigtails to go from a SI to CS alternator. Some have the resistor and some don't. Since most of the information says "idiot light is the resistor, gauge needs a resistor." I am going with the resistor since I will have a gauge.

We also got the M1008 step bumper brackets moved out 1/2". I will test fit it in a while and take pictures if I like how it fits.
 

Barrman

Well-known member
5,163
1,572
113
Location
Giddings, Texas
Three weeks later and all kinds of progress.

Door striker bolts replaced and all doors operate super smooth, easy and almost new car like.

All power lock solenoids tested and installed.

All power window motors tested, cleaned, lubed and installed with lubed up arms.

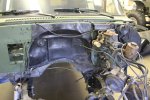
Insulation added to the factory rubber firewall covers and installed.

Window wiper linkage cleaned, lubed and installed.

Energy suspension motor mount inserts installed.

Tail light buckets cleaned, painted and installed with all lights working.

Door handles painted and installed.

The local locksmith should have my barn door lock rekeyed today to the CUCV code to match the CUCV cylinders I painted and put on the front doors.

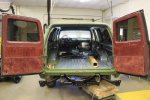
Drivers barn door panels insulated and installed with all the trim pieces in the new color.

Passenger side panel is ready but can't put it on until the lock cylinder is installed.

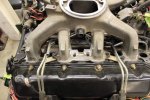
That is what got done. Most of the past few weeks has been spent on two things. The 5 remaining intake manifold bolt holes and the M1008 step bumper.

I don't have access to a mill but I thought it would be no problem with a die grinder or cut off wheel or sawzall, etc... to just cut down the tall middle intake manifold aluminum that isn't needed anymore. No, it is a problem. Full size electric sawzall just isn't accurate enough. Small air powered unit is too small to get all of it. Die grinder isn't accurate enough and a cut off blade can only get to about 30% of each cut. That left a hack saw blade. 3 of them are done with only 2 more to go. Maybe next week.

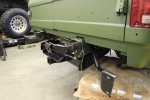
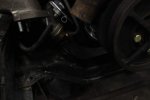
There are pictures here and on other sites of square body Suburbans/K5's/M1009 trucks with the military step bumper. There are several threads with pictures here of how somebody cut up either the frame or the bumper to make it fit. I wanted to cut the frame as little as possible. I also wanted the pintle hook to be just as strong as they are on a M1008. That means the bumper has to be solid to the frame and the pintle support brackets have to be installed. Otherwise, I should have just drilled 4 new holes and slapped a M1009 bumper on there in about an hour.

Lets cover the M1009 bumper first. There are 3 bolts that hold the bumper to the frame on each frame horn of the M1009. The holes are in a crescent shape. The Suburban uses 3 holes per frame horn as well. They are also in a crescent shape. Too bad the crescent shapes are opposite between the two trucks. The top ones are the same though so it is super easy to bolt them up, chalk up the area to be drilled and then drill them. That gets the bumper and shackle mounts installed. The bumper end supports I think are also bolt in. I never got that far.

I didn't get that far because to make the already weak M1009 pintle have even half of the support it does on the M1009 and have a receiver hitch on a Suburban. The 1" square tubing under the pintle mount has to go away. Unless I just wanted to pull around an empty M416 trailer, I didn't see an easy way to make it have any support. I would have just put the bumper on for the shackle mounts and used a receiver hitch slide in pintle hook with the license plate area for a license plate.

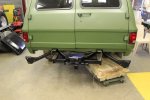
I wanted a full strength receiver hitch, full strength pintle, full strength shackles, possible swing away tire carrier in the future and the military bumper. M1008 step bumper it had to be. I decided to cut from the bumper side if cuts had to be made as much as possible. I have the bumper solidly mounted to the truck, shackle tubes solid to the frame and should have the pintle support brackets figured out in a few days. Once done, I will take it all apart to paint and get pictures then. I can say this. Only the outer bumper support brackets bolt on without modification. Everything else has to be cut or modified in some form.

I think I even have figured out the sequence to install all the parts. First the receiver, then the pintle support brackets, then the outer brackets to the frame, then the fuel tank, then the shackle tube support brackets lower bolts, then the shackle tubes to the bumper. Followed by the bumper to the truck which is the other end of the shackle mounts and upper part of the shackle support brackets. The pintle housing gets bolted to the pintle support brackets then the pintle goes in. Yeah, super easy and simple.


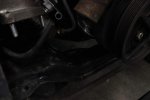
While doing all of that, I also put on a set of 35x 12.50 tires from another project of mine just to see how they fit. The rears fit the fenders great. I can't do the front fenders until we get the engine in the truck. Which we can't do until I modify a TH400-NP208 pedestal just a bit so it will bolt up to a 2wd 4L80E. Followed by drilling new cross member mount holes 1-1/2" back. Should be next week for that as well. Maybe the week after. Then I get to see how much I have to pull off the front fenders. Followed by another burst of green and black painting off all the remaining parts.
 

Warthog

Moderator
Super Moderator
Steel Soldiers Supporter
13,775
227
63
Location
OKC, OK
Man my head hurts. And I'm so dizzy :shock:

Glad I saved the step bumper from that M1008.

Thanks for the update.
 

Barrman

Well-known member
5,163
1,572
113
Location
Giddings, Texas
Most of last weekend I spent sanding and painting all the parts for the rear bumper and hitch. They are all back in my class now and just about ready to go on. I also took the camera from the art teacher while she was at lunch a few minutes ago. So, I got pictures!
 

Attachments

Barrman

Well-known member
5,163
1,572
113
Location
Giddings, Texas
We should get the fuel tank strapped in this afternoon. I decided to drill a spot for a regular civilian RV type trailer plug next to the MV plug on the bumper. I have always used a pigtail I made from a MV trailer but figured this would be less hassle. I want to make a plug between it and the truck wiring so bumper removal in the future will be easy.

We also finished the intake manifold machine process. (A student with a file and a hack saw blade) Here is the finished product.
 

Attachments

Another Ahab

Well-known member
17,825
4,157
113
Location
Alexandria, VA
Most of last weekend I spent sanding and painting all the parts for the rear bumper and hitch. They are all back in my class now and just about ready to go on. I also took the camera from the art teacher while she was at lunch a few minutes ago. So, I got pictures!
That is sure looking real good, Barman.
 

Barrman

Well-known member
5,163
1,572
113
Location
Giddings, Texas
We did get the fuel tank back in along with the skid plate. Hopefully, today I can wire in some plugs for the pair of trailer plugs and get the bumper mounted.

I also discovered yesterday that the rain gutters seem to be vehicle specific bolt patterns. The Cowdog is an '87 and it had chrome rain gutters. I pulled body color painted non chrome gutters from a 1989. We cleaned them up and got them looking nice and green. Any single screw on any of the 5 gutters will line up, but not the rest. I went home and pulled the chrome ones out. Holding them up to a 1990 they don't line up either. I wonder if they glued them on and then a worker came along with a drill and popped the holes in whatever pattern they felt like that day? They are just sheet metal screws. Not the self tapping type with the little drill bit end, but they will punch a hole and thread if you push hard enough.

Besides the kid with a file and a hack saw blade working on the intake manifold the last few weeks. I had another student with a file trimming the seal ring on the TH400-NP208 mount/pedestal to fit into a 4L80E. He finally got it to fit very snug and nicely yesterday. Of course, now the cross member mount won't clear the transmission oil pan. More grinding on Monday I guess.
 

86m1028

Active member
1,687
16
38
Location
Murphy TEXAS
Ok since no one else is gonna say it....nopics

We want pics, more pics the better (of the burb of course)

On the drip rails, I'm pretty sure your right (glued then screws, where ever the guy or gal decides to place them).
Ive tried to swap them & have never gotten them to line up.
I'm putting (painted to match) them on my m1028
Guessing the purest on here will cringe but oh well !!

I had to do a lot of clearancing (grinding) on my tall 205 adapter to fit with the 4L80.
I'm also running a stock m1008 crossmember

Keep up the great work & post lots of pics !!!
 

Warthog

Moderator
Super Moderator
Steel Soldiers Supporter
13,775
227
63
Location
OKC, OK
Did you ever work on freeing up the rings? No better time than when the engine is out and be rotated on the stand.
 

Barrman

Well-known member
5,163
1,572
113
Location
Giddings, Texas
No I haven't done anything beside dribble some Marvel Mystery Oil down that one cylinder Joe. It has been sitting for a few months now. Once we get it mounted in the truck and the exhaust run, then I will start playing with the fuel and electrical systems. Which will include running the engine. The front body work will still be off then, so access or pulling won't be very difficult.

I plan to run a stock cross member, just moved back however far it works out to be. Probably the much mentioned 1.5 inches.
 

Warthog

Moderator
Super Moderator
Steel Soldiers Supporter
13,775
227
63
Location
OKC, OK
If you do it on the stand with a slight rotation of the stand you can get the fluid all round the rings instead of just on the bottom. Just thinking out loud.
 

Barrman

Well-known member
5,163
1,572
113
Location
Giddings, Texas
We got the rear bumper with all the pintle hook supports, shackle mounts tubes braced and the end brackets for the bumper installed a few days ago. Then it was time to turn the truck around and stab the GEP/4L80E into place.

We had a very hard time doing it yesterday and just finished up a while ago. I couldn't get the motor mount clam shells over the motor mounts bolted to the frame. We ended up pulling the bolts holding the mounts to the frame then slid them in from the bottom. It all worked out ok in the end. Would not have been fun if the fenders were installed though.

Attached are pictures of the rear bumper installed, the clearance of the GEP HMMWV oil pan from the cross member and the oil pan from the front diff. I was really concerned about those clearances and it turns out I had nothing to worry about. Lots of room in all directions.

I was pleasantly surprised even though I had read it here and on other web sites about the transmission cross member. There are two mount bolts/holes on each frame rail. The 4L80E pushes the cross member back from the TH400 mount just enough for the front cross member bolt holes to line up with what used to be the rear bolt holes in the frame. I still need to drill new rear bolt holes, but I have the location and a template already bolted in like magic or something.
 

Attachments

Top
AdBlock Detected

We get it, advertisements are annoying!

Sure, ad-blocking software does a great job at blocking ads, but it also blocks useful features of our website like our supporting vendors. Their ads help keep Steel Soldiers going. Please consider disabling your ad blockers for the site. Thanks!

I've Disabled AdBlock
No Thanks