
- 2,334
- 4,214
- 113
- Location
- Massachusetts
Part 2...
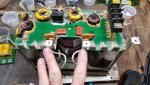
Remove this bolt and spacer. (mine is missing it)

Remove the screws attaching the fan and bottom panel. There are spacers where the bolt passes thru the fan housing.

Pull the fan and base panel away.
The bracket shown in the pic attached to the base panel would be loose by the heat sink. Just slide it out and set aside.

Almost there...

Remove these 2 bolts and spacers

Remove the screws attaching the top of the capacitor board to the top board vis the "L" brackets.
Remove the 2 screws attaching the bottom of the board.

Tilt the board away and remove these two nuts. You may need to use and allen wrench on the inside to prevent the bolts from turning.
(Pic taken before removing the cap boards mounting screws.)

Remove the various "L" brackets that used to be bolted to the top of the frame. Keep track of were they go. Some are slightly different.

After that it's just a matter of removing the spacers and screws that make up the stack of boards.
There are many washers used in the spacer stack up. Be sure to remove them from the PCB's as they sometimes are stuck to them.
!!Very Important!! Be sure to re-install them properly to maintain the correct spacings.
Easy peezy
Remove this bolt and spacer. (mine is missing it)
Remove the screws attaching the fan and bottom panel. There are spacers where the bolt passes thru the fan housing.
Pull the fan and base panel away.
The bracket shown in the pic attached to the base panel would be loose by the heat sink. Just slide it out and set aside.
Almost there...
Remove these 2 bolts and spacers
Remove the screws attaching the top of the capacitor board to the top board vis the "L" brackets.
Remove the 2 screws attaching the bottom of the board.
Tilt the board away and remove these two nuts. You may need to use and allen wrench on the inside to prevent the bolts from turning.
(Pic taken before removing the cap boards mounting screws.)
Remove the various "L" brackets that used to be bolted to the top of the frame. Keep track of were they go. Some are slightly different.
After that it's just a matter of removing the spacers and screws that make up the stack of boards.
There are many washers used in the spacer stack up. Be sure to remove them from the PCB's as they sometimes are stuck to them.
!!Very Important!! Be sure to re-install them properly to maintain the correct spacings.
Easy peezy
Attachments
-
 178.6 KB Views: 4


